Search Results: "tpo"

10 March 2023

Antoine Beaupr : how to audit for open services with iproute2

The computer world has a tendency of reinventing the wheel once in a while. I am not a fan of that process, but sometimes I just have to bite the bullet and adapt to change. This post explains how I adapted to one particular change: the netstat to sockstat transition. I used to do this to show which processes where listening on which port on a server:
netstat -anpe
It was a handy mnemonic as, in France, ANPE was the agency responsible for the unemployed (basically). That would list all sockets (-a), not resolve hostnames (-n, because it's slow), show processes attached to the socket (-p) with extra info like the user (-e). This still works, but sometimes fail to find the actual process hooked to the port. Plus, it lists a whole bunch of UNIX sockets and non-listening sockets, which are generally irrelevant for such an audit. What I really wanted to use was really something like:
netstat -pleunt   sort
... which has the "pleut" mnemonic ("rains", but plural, which makes no sense and would be badly spelled anyway). That also only lists listening (-l) and network sockets, specifically UDP (-u) and TCP (-t). But enough with the legacy, let's try the brave new world of sockstat which has the unfortunate acronym ss. The equivalent sockstat command to the above is:
ss -pleuntO
It's similar to the above, except we need the -O flag otherwise ss does that confusing thing where it splits the output on multiple lines. But I actually use:
ss -plunt0
... i.e. without the -e as the information it gives (cgroup, fd number, etc) is not much more useful than what's already provided with -p (service and UID). All of the above also show sockets that are not actually a concern because they only listen on localhost. Those one should be filtered out. So now we embark into that wild filtering ride. This is going to list all open sockets and show the port number and service:
ss -pluntO --no-header   sed 's/^\([a-z]*\) *[A-Z]* *[0-9]* [0-9]* *[0-9]* */\1/'   sed 's/^[^:]*:\(:\]:\)\?//;s/\([0-9]*\) *[^ ]*/\1\t/;s/,fd=[0-9]*//'   sort -gu
For example on my desktop, it looks like:
anarcat@angela:~$ sudo ss -pluntO --no-header   sed 's/^\([a-z]*\) *[A-Z]* *[0-9]* [0-9]* *[0-9]* */\1/'   sed 's/^[^:]*:\(:\]:\)\?//;s/\([0-9]*\) *[^ ]*/\1\t/;s/,fd=[0-9]*//'   sort -gu
          [::]:* users:(("unbound",pid=1864))        
22  users:(("sshd",pid=1830))           
25  users:(("master",pid=3150))        
53  users:(("unbound",pid=1864))        
323 users:(("chronyd",pid=1876))        
500 users:(("charon",pid=2817))        
631 users:(("cups-browsed",pid=2744))   
2628    users:(("dictd",pid=2825))          
4001    users:(("emacs",pid=3578))          
4500    users:(("charon",pid=2817))        
5353    users:(("avahi-daemon",pid=1423))  
6600    users:(("systemd",pid=3461))       
8384    users:(("syncthing",pid=232169))   
9050    users:(("tor",pid=2857))            
21027   users:(("syncthing",pid=232169))   
22000   users:(("syncthing",pid=232169))   
33231   users:(("syncthing",pid=232169))   
34953   users:(("syncthing",pid=232169))   
35770   users:(("syncthing",pid=232169))   
44944   users:(("syncthing",pid=232169))   
47337   users:(("syncthing",pid=232169))   
48903   users:(("mosh-client",pid=234126))  
52774   users:(("syncthing",pid=232169))   
52938   users:(("avahi-daemon",pid=1423))  
54029   users:(("avahi-daemon",pid=1423))  
anarcat@angela:~$
But that doesn't filter out the localhost stuff, lots of false positive (like emacs, above). And this is where it gets... not fun, as you need to match "localhost" but we don't resolve names, so you need to do some fancy pattern matching:
ss -pluntO --no-header   \
    sed 's/^\([a-z]*\) *[A-Z]* *[0-9]* [0-9]* *[0-9]* */\1/;s/^tcp//;s/^udp//'   \
    grep -v -e '^\[fe80::' -e '^127.0.0.1' -e '^\[::1\]' -e '^192\.' -e '^172\.'   \
    sed 's/^[^:]*:\(:\]:\)\?//;s/\([0-9]*\) *[^ ]*/\1\t/;s/,fd=[0-9]*//'  \
    sort -gu
This is kind of horrible, but it works, those are the actually open ports on my machine:
anarcat@angela:~$ sudo ss -pluntO --no-header           sed 's/^\([a-
z]*\) *[A-Z]* *[0-9]* [0-9]* *[0-9]* */\1/;s/^tcp//;s/^udp//'        
   grep -v -e '^\[fe80::' -e '^127.0.0.1' -e '^\[::1\]' -e '^192\.' -
e '^172\.'           sed 's/^[^:]*:\(:\]:\)\?//;s/\([0-9]*\) *[^ ]*/\
1\t/;s/,fd=[0-9]*//'          sort -gu
22  users:(("sshd",pid=1830))           
500 users:(("charon",pid=2817))        
631 users:(("cups-browsed",pid=2744))   
4500    users:(("charon",pid=2817))        
5353    users:(("avahi-daemon",pid=1423))  
6600    users:(("systemd",pid=3461))       
21027   users:(("syncthing",pid=232169))   
22000   users:(("syncthing",pid=232169))   
34953   users:(("syncthing",pid=232169))   
35770   users:(("syncthing",pid=232169))   
48903   users:(("mosh-client",pid=234126))  
52938   users:(("avahi-daemon",pid=1423))  
54029   users:(("avahi-daemon",pid=1423))
Surely there must be a better way. It turns out that lsof can do some of this, and it's relatively straightforward. This lists all listening TCP sockets:
lsof -iTCP -sTCP:LISTEN +c 15   grep -v localhost   sort
A shorter version from Adam Shand is:
lsof -i @localhost
... which basically replaces the grep -v localhost line. In theory, this would do the equivalent on UDP
lsof -iUDP -sUDP:^Idle
... but in reality, it looks like lsof on Linux can't figure out the state of a UDP socket:
lsof: no UDP state names available: UDP:^Idle
... which, honestly, I'm baffled by. It's strange because ss can figure out the state of those sockets, heck it's how -l vs -a works after all. So we need something else to show listening UDP sockets. The following actually looks pretty good after all:
ss -pluO
That will list localhost sockets of course, so we can explicitly ask ss to resolve those and filter them out with something like:
ss -plurO   grep -v localhost
oh, and look here! ss supports pattern matching, so we can actually tell it to ignore localhost directly, which removes that horrible sed line we used earlier:
ss -pluntO '! ( src = localhost )'
That actually gives a pretty readable output. One annoyance is we can't really modify the columns here, so we still need some god-awful sed hacking on top of that to get a cleaner output:
ss -nplutO '! ( src = localhost )'    \
    sed 's/\(udp\ tcp\).*:\([0-9][0-9]*\)/\2\t\1\t/;s/\([0-9][0-9]*\t[udtcp]*\t\)[^u]*users:(("/\1/;s/".*//;s/.*Address:Port.*/Netid\tPort\tProcess/'   \
    sort -nu
That looks horrible and is basically impossible to memorize. But it sure looks nice:
anarcat@angela:~$ sudo ss -nplutO '! ( src = localhost )'    sed 's/\(udp\ tcp\).*:\([0-9][0-9]*\)/\2\t\1\t/;s/\([0-9][0-9]*\t[udtcp]*\t\)[^u]*users:(("/\1/;s/".*//;s/.*Address:Port.*/Port\tNetid\tProcess/'   sort -nu
Port    Netid   Process
22  tcp sshd
500 udp charon
546 udp NetworkManager
631 udp cups-browsed
4500    udp charon
5353    udp avahi-daemon
6600    tcp systemd
21027   udp syncthing
22000   udp syncthing
34953   udp syncthing
35770   udp syncthing
48903   udp mosh-client
52938   udp avahi-daemon
54029   udp avahi-daemon
Better ideas welcome.

8 March 2023

Anton Gladky: Boost C++: default for Debian Bookworm will remain 1.74.0

Boost C++ is a popular set of free, open-source C++ libraries that provide developers with powerful tools and functionality to enhance their software development projects. The newest version, 1.81.0, has been available in Debian Bookworm for about a month now, but the default version for boost-dependent packages is still the older 1.74.0. The transition to the newer library has been postponed due to possible regressions that could take more time to resolve. This means that the default version for boost-dependent packages in Debian Bookworm will remain 1.74.0 until after the release. If you re working on your own project, you can use the newest version of Boost C++ (1.81.0) to take advantage of its new features and improvements. Debian Bullseye users can also access Boost C++ 1.81.0 from the bullseye-backports repository. Thanks Freexian for supporting this effort.

6 February 2023

Vincent Bernat: Fast and dynamic encoding of Protocol Buffers in Go

Protocol Buffers are a popular choice for serializing structured data due to their compact size, fast processing speed, language independence, and compatibility. There exist other alternatives, including Cap n Proto, CBOR, and Avro. Usually, data structures are described in a proto definition file (.proto). The protoc compiler and a language-specific plugin convert it into code:
$ head flow-4.proto
syntax = "proto3";
package decoder;
option go_package = "akvorado/inlet/flow/decoder";
message FlowMessagev4  
  uint64 TimeReceived = 2;
  uint32 SequenceNum = 3;
  uint64 SamplingRate = 4;
  uint32 FlowDirection = 5;
$ protoc -I=. --plugin=protoc-gen-go --go_out=module=akvorado:. flow-4.proto
$ head inlet/flow/decoder/flow-4.pb.go
// Code generated by protoc-gen-go. DO NOT EDIT.
// versions:
//      protoc-gen-go v1.28.0
//      protoc        v3.21.12
// source: inlet/flow/data/schemas/flow-4.proto
package decoder
import (
        protoreflect "google.golang.org/protobuf/reflect/protoreflect"
Akvorado collects network flows using IPFIX or sFlow, decodes them with GoFlow2, encodes them to Protocol Buffers, and sends them to Kafka to be stored in a ClickHouse database. Collecting a new field, such as source and destination MAC addresses, requires modifications in multiple places, including the proto definition file and the ClickHouse migration code. Moreover, the cost is paid by all users.1 It would be nice to have an application-wide schema and let users enable or disable the fields they need. While the main goal is flexibility, we do not want to sacrifice performance. On this front, this is quite a success: when upgrading from 1.6.4 to 1.7.1, the decoding and encoding performance almost doubled!
goos: linux
goarch: amd64
pkg: akvorado/inlet/flow
cpu: AMD Ryzen 5 5600X 6-Core Processor
                              initial.txt                 final.txt               
                                 sec/op        sec/op     vs base                 
Netflow/with_encoding-12      12.963    2%   7.836    1%  -39.55% (p=0.000 n=10)
Sflow/with_encoding-12         19.37    1%   10.15    2%  -47.63% (p=0.000 n=10)

Faster Protocol Buffers encoding I use the following code to benchmark both the decoding and encoding process. Initially, the Decode() method is a thin layer above GoFlow2 producer and stores the decoded data into the in-memory structure generated by protoc. Later, some of the data will be encoded directly during flow decoding. This is why we measure both the decoding and the encoding.2
func BenchmarkDecodeEncodeSflow(b *testing.B)  
    r := reporter.NewMock(b)
    sdecoder := sflow.New(r)
    data := helpers.ReadPcapPayload(b,
        filepath.Join("decoder", "sflow", "testdata", "data-1140.pcap"))
    for _, withEncoding := range []bool true, false   
        title := map[bool]string 
            true:  "with encoding",
            false: "without encoding",
         [withEncoding]
        var got []*decoder.FlowMessage
        b.Run(title, func(b *testing.B)  
            for i := 0; i < b.N; i++  
                got = sdecoder.Decode(decoder.RawFlow 
                    Payload: data,
                    Source: net.ParseIP("127.0.0.1"),
                 )
                if withEncoding  
                    for _, flow := range got  
                        buf := []byte 
                        buf = protowire.AppendVarint(buf, uint64(proto.Size(flow)))
                        proto.MarshalOptions .MarshalAppend(buf, flow)


         )
     
 
The canonical Go implementation for Protocol Buffers, google.golang.org/protobuf is not the most efficient one. For a long time, people were relying on gogoprotobuf. However, the project is now deprecated. A good replacement is vtprotobuf.3
goos: linux
goarch: amd64
pkg: akvorado/inlet/flow
cpu: AMD Ryzen 5 5600X 6-Core Processor
                              initial.txt               bench-2.txt              
                                sec/op        sec/op     vs base                 
Netflow/with_encoding-12      12.96    2%   10.28    2%  -20.67% (p=0.000 n=10)
Netflow/without_encoding-12   8.935    2%   8.975    2%        ~ (p=0.143 n=10)
Sflow/with_encoding-12        19.37    1%   16.67    2%  -13.93% (p=0.000 n=10)
Sflow/without_encoding-12     14.62    3%   14.87    1%   +1.66% (p=0.007 n=10)

Dynamic Protocol Buffers encoding We have our baseline. Let s see how to encode our Protocol Buffers without a .proto file. The wire format is simple and rely a lot on variable-width integers. Variable-width integers, or varints, are an efficient way of encoding unsigned integers using a variable number of bytes, from one to ten, with small values using fewer bytes. They work by splitting integers into 7-bit payloads and using the 8th bit as a continuation indicator, set to 1 for all payloads except the last.
Variable-width integers encoding in Protocol Buffers: conversion of 150 to a varint
Variable-width integers encoding in Protocol Buffers
For our usage, we only need two types: variable-width integers and byte sequences. A byte sequence is encoded by prefixing it by its length as a varint. When a message is encoded, each key-value pair is turned into a record consisting of a field number, a wire type, and a payload. The field number and the wire type are encoded as a single variable-width integer called a tag.
Message encoded with Protocol Buffers: three varints, two sequences of bytes
Message encoded with Protocol Buffers
We use the following low-level functions to build the output buffer: Our schema abstraction contains the appropriate information to encode a message (ProtobufIndex) and to generate a proto definition file (fields starting with Protobuf):
type Column struct  
    Key       ColumnKey
    Name      string
    Disabled  bool
    // [ ]
    // For protobuf.
    ProtobufIndex    protowire.Number
    ProtobufType     protoreflect.Kind // Uint64Kind, Uint32Kind,  
    ProtobufEnum     map[int]string
    ProtobufEnumName string
    ProtobufRepeated bool
 
We have a few helper methods around the protowire functions to directly encode the fields while decoding the flows. They skip disabled fields or non-repeated fields already encoded. Here is an excerpt of the sFlow decoder:
sch.ProtobufAppendVarint(bf, schema.ColumnBytes, uint64(recordData.Base.Length))
sch.ProtobufAppendVarint(bf, schema.ColumnProto, uint64(recordData.Base.Protocol))
sch.ProtobufAppendVarint(bf, schema.ColumnSrcPort, uint64(recordData.Base.SrcPort))
sch.ProtobufAppendVarint(bf, schema.ColumnDstPort, uint64(recordData.Base.DstPort))
sch.ProtobufAppendVarint(bf, schema.ColumnEType, helpers.ETypeIPv4)
For fields that are required later in the pipeline, like source and destination addresses, they are stored unencoded in a separate structure:
type FlowMessage struct  
    TimeReceived uint64
    SamplingRate uint32
    // For exporter classifier
    ExporterAddress netip.Addr
    // For interface classifier
    InIf  uint32
    OutIf uint32
    // For geolocation or BMP
    SrcAddr netip.Addr
    DstAddr netip.Addr
    NextHop netip.Addr
    // Core component may override them
    SrcAS     uint32
    DstAS     uint32
    GotASPath bool
    // protobuf is the protobuf representation for the information not contained above.
    protobuf      []byte
    protobufSet   bitset.BitSet
 
The protobuf slice holds encoded data. It is initialized with a capacity of 500 bytes to avoid resizing during encoding. There is also some reserved room at the beginning to be able to encode the total size as a variable-width integer. Upon finalizing encoding, the remaining fields are added and the message length is prefixed:
func (schema *Schema) ProtobufMarshal(bf *FlowMessage) []byte  
    schema.ProtobufAppendVarint(bf, ColumnTimeReceived, bf.TimeReceived)
    schema.ProtobufAppendVarint(bf, ColumnSamplingRate, uint64(bf.SamplingRate))
    schema.ProtobufAppendIP(bf, ColumnExporterAddress, bf.ExporterAddress)
    schema.ProtobufAppendVarint(bf, ColumnSrcAS, uint64(bf.SrcAS))
    schema.ProtobufAppendVarint(bf, ColumnDstAS, uint64(bf.DstAS))
    schema.ProtobufAppendIP(bf, ColumnSrcAddr, bf.SrcAddr)
    schema.ProtobufAppendIP(bf, ColumnDstAddr, bf.DstAddr)
    // Add length and move it as a prefix
    end := len(bf.protobuf)
    payloadLen := end - maxSizeVarint
    bf.protobuf = protowire.AppendVarint(bf.protobuf, uint64(payloadLen))
    sizeLen := len(bf.protobuf) - end
    result := bf.protobuf[maxSizeVarint-sizeLen : end]
    copy(result, bf.protobuf[end:end+sizeLen])
    return result
 
Minimizing allocations is critical for maintaining encoding performance. The benchmark tests should be run with the -benchmem flag to monitor allocation numbers. Each allocation incurs an additional cost to the garbage collector. The Go profiler is a valuable tool for identifying areas of code that can be optimized:
$ go test -run=__nothing__ -bench=Netflow/with_encoding \
>         -benchmem -cpuprofile profile.out \
>         akvorado/inlet/flow
goos: linux
goarch: amd64
pkg: akvorado/inlet/flow
cpu: AMD Ryzen 5 5600X 6-Core Processor
Netflow/with_encoding-12             143953              7955 ns/op            8256 B/op        134 allocs/op
PASS
ok      akvorado/inlet/flow     1.418s
$ go tool pprof profile.out
File: flow.test
Type: cpu
Time: Feb 4, 2023 at 8:12pm (CET)
Duration: 1.41s, Total samples = 2.08s (147.96%)
Entering interactive mode (type "help" for commands, "o" for options)
(pprof) web
After using the internal schema instead of code generated from the proto definition file, the performance improved. However, this comparison is not entirely fair as less information is being decoded and previously GoFlow2 was decoding to its own structure, which was then copied to our own version.
goos: linux
goarch: amd64
pkg: akvorado/inlet/flow
cpu: AMD Ryzen 5 5600X 6-Core Processor
                              bench-2.txt                bench-3.txt              
                                 sec/op        sec/op     vs base                 
Netflow/with_encoding-12      10.284    2%   7.758    3%  -24.56% (p=0.000 n=10)
Netflow/without_encoding-12    8.975    2%   7.304    2%  -18.61% (p=0.000 n=10)
Sflow/with_encoding-12         16.67    2%   14.26    1%  -14.50% (p=0.000 n=10)
Sflow/without_encoding-12      14.87    1%   13.56    2%   -8.80% (p=0.000 n=10)
As for testing, we use github.com/jhump/protoreflect: the protoparse package parses the proto definition file we generate and the dynamic package decodes the messages. Check the ProtobufDecode() method for more details.4 To get the final figures, I have also optimized the decoding in GoFlow2. It was relying heavily on binary.Read(). This function may use reflection in certain cases and each call allocates a byte array to read data. Replacing it with a more efficient version provides the following improvement:
goos: linux
goarch: amd64
pkg: akvorado/inlet/flow
cpu: AMD Ryzen 5 5600X 6-Core Processor
                              bench-3.txt                bench-4.txt              
                                 sec/op        sec/op     vs base                 
Netflow/with_encoding-12       7.758    3%   7.365    2%   -5.07% (p=0.000 n=10)
Netflow/without_encoding-12    7.304    2%   6.931    3%   -5.11% (p=0.000 n=10)
Sflow/with_encoding-12        14.256    1%   9.834    2%  -31.02% (p=0.000 n=10)
Sflow/without_encoding-12     13.559    2%   9.353    2%  -31.02% (p=0.000 n=10)
It is now easier to collect new data and the inlet component is faster!

Notice Some paragraphs were editorialized by ChatGPT, using editorialize and keep it short as a prompt. The result was proofread by a human for correctness. The main idea is that ChatGPT should be better at English than me.


  1. While empty fields are not serialized to Protocol Buffers, empty columns in ClickHouse take some space, even if they compress well. Moreover, unused fields are still decoded and they may clutter the interface.
  2. There is a similar function using NetFlow. NetFlow and IPFIX protocols are less complex to decode than sFlow as they are using a simpler TLV structure.
  3. vtprotobuf generates more optimized Go code by removing an abstraction layer. It directly generates the code encoding each field to bytes:
    if m.OutIfSpeed != 0  
        i = encodeVarint(dAtA, i, uint64(m.OutIfSpeed))
        i--
        dAtA[i] = 0x6
        i--
        dAtA[i] = 0xd8
     
    
  4. There is also a protoprint package to generate proto definition file. I did not use it.

5 February 2023

Jonathan Dowland: 2022 in reading

In 2022 I read 34 books (-19% on last year). In 2021 roughly a quarter of the books I read were written by women. I was determined to push that ratio in 2022, so I made an effort to try and only read books by women. I knew that I wouldn't manage that, but by trying to, I did get the ratio up to 58% (by page count). I'm not sure what will happen in 2023. My to-read pile has some back-pressure from books by male authors I postponed reading in 2022 (in particular new works by Christopher Priest and Adam Roberts). It's possible the ratio will swing back the other way, which would mean it would not be worth repeating the experiment. At least if the ratio is the point of the exercise. But perhaps it isn't: perhaps the useful outcome is more qualitative than quantitative. I tried to read some new (to me) authors. I really enjoyed Shirley Jackson (The Haunting of Hill House, We Have Always Lived In The Castle). I Struggled with Angela Carter's Heroes and Villains although I plan to return to her other work, in particular, The Bloody Chamber. I also got through Donna Tartt's The Secret History on the recommendation of a friend. I had to push through the first 15% or so but it turned out to be worth it.
a book cover for Shirley Jackson's 'We have always lived in the castle'
a book cover for Margaret Atwood's 'The Handmaid's Tale'
a book cover for Adam Roberts' 'The This'
a book cover for Emily St. John Mandel's 'Sea of Tranquility'

I finally read (and loved) The Handmaid's Tale, which I had never read despite loving Atwood. My top non-fiction book was The Nanny State Made Me by Stuart Maconie. I still read far more fiction than non-fiction. Or perhaps I'm not keeping track of non- fiction as well. I feel non-fiction requires a different approach to reading: not necessarily linear; it's not always important to read the whole book; it's often important to re-read sections. It might not make sense to consider them in the same bracket. My favourite novels this year were Sea of Tranquility by Emily St. John Mandel, a standalone sort-of sequel to The Glass House but in a very different genre; and The This by Adam Roberts, which was equally remarkable. The This has an interesting narrative device in the first third where a stream of tweets is presented in parallel with the main text. This works well, and does a good job of capturing the figurative river of tweet-like stuff that is woven into our lives at the moment. But I can't help but wonder how they tackle that in the audiobook.

14 January 2023

Dirk Eddelbuettel: RApiDatetime 0.0.8 on CRAN: Maintenance

A new release of our RApiDatetime package is now on CRAN. RApiDatetime provides a number of entry points for C-level functions of the R API for Date and Datetime calculations. The functions asPOSIXlt and asPOSIXct convert between long and compact datetime representation, formatPOSIXlt and Rstrptime convert to and from character strings, and POSIXlt2D and D2POSIXlt convert between Date and POSIXlt datetime. Lastly, asDatePOSIXct converts to a date type. All these functions are rather useful, but were not previously exported by R for C-level use by other packages. Which this package aims to change. This release accomodates a CRAN request (as one does) to change (one single) instance of sprintf() to snprintf(). No more, no less.

Changes in RApiDatetime version 0.0.8 (2023-01-14)
  • Update one use of sprint to snprintf
  • Minor edits to DESCRIPTION

Courtesy of my CRANberries, there is are comparisons to the previous release. More information is on the rapidatetime page. For questions or comments please use the issue tracker off the GitHub repo.

This post by Dirk Eddelbuettel originated on his Thinking inside the box blog. Please report excessive re-aggregation in third-party for-profit settings.

30 December 2022

Simon Josefsson: Preseeding Trisquel Virtual Machines Using netinst Images

I m migrating some self-hosted virtual machines to Trisquel, and noticed that Trisquel does not offer cloud-images similar to the Debian Cloud and Ubuntu Cloud images. Thus my earlier approach based on virt-install --cloud-init and cloud-localds does not work with Trisquel. While I hope that Trisquel will eventually publish cloud-compatible images, I wanted to document an alternative approach for Trisquel based on preseeding. This is how I used to install Debian and Ubuntu in the old days, and the automated preseed method is best documented in the Debian installation manual. I was hoping to forget about the preseed format, but maybe it will become one of those legacy technologies that never really disappears? Like FAT16 and 8-bit microcontrollers. Below I assume you have a virtual machine host server up that runs libvirt and has virt-install and similar tools; install them with the following command. I run a pre-release version of Trisquel 11 aramo on my VM-host, but I believe any recent dpkg-based distribution like Trisquel 9/10, PureOS 10, Debian 11 or Ubuntu 20.04/22.04 would work.
apt-get install libvirt-daemon-system virtinst genisoimage cloud-image-utils osinfo-db-tools
The approach can install Trisquel 9 (etiona), Trisquel 10 (nabia) and the pre-release of Trisquel 11. First download and verify the integrity of the netinst images that we will need. Unfortunately the Trisquel 11 netinst beta image does not have any checksum or signature available.
mkdir -p /root/iso
cd /root/iso
wget -q https://mirror.fsf.org/trisquel-images/trisquel-netinst_9.0.2_amd64.iso
wget -q https://mirror.fsf.org/trisquel-images/trisquel-netinst_9.0.2_amd64.iso.asc
wget -q https://mirror.fsf.org/trisquel-images/trisquel-netinst_9.0.2_amd64.iso.sha256
wget -q https://mirror.fsf.org/trisquel-images/trisquel-netinst_10.0.1_amd64.iso
wget -q https://mirror.fsf.org/trisquel-images/trisquel-netinst_10.0.1_amd64.iso.asc
wget -q https://mirror.fsf.org/trisquel-images/trisquel-netinst_10.0.1_amd64.iso.sha256
wget -q -O- https://archive.trisquel.info/trisquel/trisquel-archive-signkey.gpg   gpg --import
sha256sum -c trisquel-netinst_9.0.2_amd64.iso.sha256
gpg --verify trisquel-netinst_9.0.2_amd64.iso.asc
sha256sum -c trisquel-netinst_10.0.1_amd64.iso.sha256
gpg --verify trisquel-netinst_10.0.1_amd64.iso.asc
wget -q https://cdbuilds.trisquel.org/aramo/trisquel-netinst_11.0-20221225_amd64.iso
echo '179566639ca8f14f0c3d5658209c59a0916d9e3bf9c026660cc07b28f2311631  trisquel-netinst_11.0-20221225_amd64.iso'   sha256sum -c
I have developed the following fairly minimal preseed file that works with all three Trisquel releases. Compare it against the official Trisquel 11 preseed skeleton and the Debian 11 example preseed file. You should modify obvious things like SSH key, host/IP settings, partition layout and decide for yourself how to deal with passwords. While Ubuntu/Trisquel usually wants to setup a user account, I prefer to login as root hence setting passwd/root-login to true and passwd/make-user to false.

root@trana:~# cat>trisquel.preseed 
d-i debian-installer/locale select en_US
d-i keyboard-configuration/xkb-keymap select us
d-i netcfg/choose_interface select auto
d-i netcfg/disable_autoconfig boolean true
d-i netcfg/get_ipaddress string 192.168.10.201
d-i netcfg/get_netmask string 255.255.255.0
d-i netcfg/get_gateway string 192.168.10.46
d-i netcfg/get_nameservers string 192.168.10.46
d-i netcfg/get_hostname string trisquel
d-i netcfg/get_domain string sjd.se
d-i clock-setup/utc boolean true
d-i time/zone string UTC
d-i mirror/country string manual
d-i mirror/http/hostname string ftp.acc.umu.se
d-i mirror/http/directory string /mirror/trisquel/packages
d-i mirror/http/proxy string
d-i partman-auto/method string regular
d-i partman-partitioning/confirm_write_new_label boolean true
d-i partman/choose_partition select finish
d-i partman/confirm boolean true
d-i partman/confirm_nooverwrite boolean true
d-i partman-basicfilesystems/no_swap boolean false
d-i partman-auto/expert_recipe string myroot :: 1000 50 -1 ext4 \
     $primary    $bootable    method  format   \
     format    use_filesystem    filesystem  ext4   \
     mountpoint  /   \
    .
d-i partman-auto/choose_recipe select myroot
d-i passwd/root-login boolean true
d-i user-setup/allow-password-weak boolean true
d-i passwd/root-password password r00tme
d-i passwd/root-password-again password r00tme
d-i passwd/make-user boolean false
tasksel tasksel/first multiselect
d-i pkgsel/include string openssh-server
popularity-contest popularity-contest/participate boolean false
d-i grub-installer/only_debian boolean true
d-i grub-installer/with_other_os boolean true
d-i grub-installer/bootdev string default
d-i finish-install/reboot_in_progress note
d-i preseed/late_command string mkdir /target/root/.ssh ; echo ssh-ed25519 AAAAC3NzaC1lZDI1NTE5AAAAILzCFcHHrKzVSPDDarZPYqn89H5TPaxwcORgRg+4DagE cardno:FFFE67252015 > /target/root/.ssh/authorized_keys
^D
root@trana:~# 
Use the file above as a skeleton for preparing a VM-specific preseed file as follows. The environment variables HOST and IPS will be used later on too.

root@trana:~# HOST=foo
root@trana:~# IP=192.168.10.197
root@trana:~# sed -e "s,get_ipaddress string.*,get_ipaddress string $IP," -e "s,get_hostname string.*,get_hostname string $HOST," < trisquel.preseed > vm-$HOST.preseed
root@trana:~# 
The following script is used to prepare the ISO images with the preseed file that we will need. This script is inspired by the Debian Wiki Preseed EditIso page and the Trisquel ISO customization wiki page. There are a couple of variations based on earlier works. Paths are updated to match the Trisquel netinst ISO layout, which differ slightly from Debian. We modify isolinux.cfg to boot the auto label without a timeout. On Trisquel 11 the auto boot label exists, but on Trisquel 9 and Trisquel 10 it does not exist so we add it in order to be able to start the automated preseed installation.

root@trana:~# cat gen-preseed-iso 
#!/bin/sh
# Copyright (C) 2018-2022 Simon Josefsson -- GPLv3+
# https://wiki.debian.org/DebianInstaller/Preseed/EditIso
# https://trisquel.info/en/wiki/customizing-trisquel-iso
set -e
set -x
ISO="$1"
PRESEED="$2"
OUTISO="$3"
LASTPWD="$PWD"
test -f "$ISO"
test -f "$PRESEED"
test ! -f "$OUTISO"
TMPDIR=$(mktemp -d)
mkdir "$TMPDIR/mnt"
mkdir "$TMPDIR/tmp"
cp "$PRESEED" "$TMPDIR"/preseed.cfg
cd "$TMPDIR"
mount "$ISO" mnt/
cp -rT mnt/ tmp/
umount mnt/
chmod +w -R tmp/
gunzip tmp/initrd.gz
echo preseed.cfg   cpio -H newc -o -A -F tmp/initrd
gzip tmp/initrd
chmod -w -R tmp/
sed -i "s/timeout 0/timeout 1/" tmp/isolinux.cfg
sed -i "s/default vesamenu.c32/default auto/" tmp/isolinux.cfg
if ! grep -q auto tmp/adtxt.cfg; then
    cat<<EOF >> tmp/adtxt.cfg
label auto
	menu label ^Automated install
	kernel linux
	append auto=true priority=critical vga=788 initrd=initrd.gz --- quiet
EOF
fi
cd tmp/
find -follow -type f   xargs md5sum  > md5sum.txt
cd ..
cd "$LASTPWD"
genisoimage -r -J -b isolinux.bin -c boot.cat \
            -no-emul-boot -boot-load-size 4 -boot-info-table \
            -o "$OUTISO" "$TMPDIR/tmp/"
rm -rf "$TMPDIR"
exit 0
^D
root@trana:~# chmod +x gen-preseed-iso 
root@trana:~# 
Next run the command on one of the downloaded ISO image and the generated preseed file.

root@trana:~# ./gen-preseed-iso /root/iso/trisquel-netinst_10.0.1_amd64.iso vm-$HOST.preseed vm-$HOST.iso
+ ISO=/root/iso/trisquel-netinst_10.0.1_amd64.iso
+ PRESEED=vm-foo.preseed
+ OUTISO=vm-foo.iso
+ LASTPWD=/root
+ test -f /root/iso/trisquel-netinst_10.0.1_amd64.iso
+ test -f vm-foo.preseed
+ test ! -f vm-foo.iso
+ mktemp -d
+ TMPDIR=/tmp/tmp.mNEprT4Tx9
+ mkdir /tmp/tmp.mNEprT4Tx9/mnt
+ mkdir /tmp/tmp.mNEprT4Tx9/tmp
+ cp vm-foo.preseed /tmp/tmp.mNEprT4Tx9/preseed.cfg
+ cd /tmp/tmp.mNEprT4Tx9
+ mount /root/iso/trisquel-netinst_10.0.1_amd64.iso mnt/
mount: /tmp/tmp.mNEprT4Tx9/mnt: WARNING: source write-protected, mounted read-only.
+ cp -rT mnt/ tmp/
+ umount mnt/
+ chmod +w -R tmp/
+ gunzip tmp/initrd.gz
+ echo preseed.cfg
+ cpio -H newc -o -A -F tmp/initrd
5 blocks
+ gzip tmp/initrd
+ chmod -w -R tmp/
+ sed -i s/timeout 0/timeout 1/ tmp/isolinux.cfg
+ sed -i s/default vesamenu.c32/default auto/ tmp/isolinux.cfg
+ grep -q auto tmp/adtxt.cfg
+ cat
+ cd tmp/
+ find -follow -type f
+ xargs md5sum
+ cd ..
+ cd /root
+ genisoimage -r -J -b isolinux.bin -c boot.cat -no-emul-boot -boot-load-size 4 -boot-info-table -o vm-foo.iso /tmp/tmp.mNEprT4Tx9/tmp/
I: -input-charset not specified, using utf-8 (detected in locale settings)
Using GCRY_000.MOD;1 for  /tmp/tmp.mNEprT4Tx9/tmp/boot/grub/x86_64-efi/gcry_sha512.mod (gcry_sha256.mod)
Using XNU_U000.MOD;1 for  /tmp/tmp.mNEprT4Tx9/tmp/boot/grub/x86_64-efi/xnu_uuid.mod (xnu_uuid_test.mod)
Using PASSW000.MOD;1 for  /tmp/tmp.mNEprT4Tx9/tmp/boot/grub/x86_64-efi/password_pbkdf2.mod (password.mod)
Using PART_000.MOD;1 for  /tmp/tmp.mNEprT4Tx9/tmp/boot/grub/x86_64-efi/part_sunpc.mod (part_sun.mod)
Using USBSE000.MOD;1 for  /tmp/tmp.mNEprT4Tx9/tmp/boot/grub/x86_64-efi/usbserial_pl2303.mod (usbserial_ftdi.mod)
Using USBSE001.MOD;1 for  /tmp/tmp.mNEprT4Tx9/tmp/boot/grub/x86_64-efi/usbserial_ftdi.mod (usbserial_usbdebug.mod)
Using VIDEO000.MOD;1 for  /tmp/tmp.mNEprT4Tx9/tmp/boot/grub/x86_64-efi/videotest.mod (videotest_checksum.mod)
Using GFXTE000.MOD;1 for  /tmp/tmp.mNEprT4Tx9/tmp/boot/grub/x86_64-efi/gfxterm_background.mod (gfxterm_menu.mod)
Using GCRY_001.MOD;1 for  /tmp/tmp.mNEprT4Tx9/tmp/boot/grub/x86_64-efi/gcry_sha256.mod (gcry_sha1.mod)
Using MULTI000.MOD;1 for  /tmp/tmp.mNEprT4Tx9/tmp/boot/grub/x86_64-efi/multiboot2.mod (multiboot.mod)
Using USBSE002.MOD;1 for  /tmp/tmp.mNEprT4Tx9/tmp/boot/grub/x86_64-efi/usbserial_usbdebug.mod (usbserial_common.mod)
Using MDRAI000.MOD;1 for  /tmp/tmp.mNEprT4Tx9/tmp/boot/grub/x86_64-efi/mdraid09.mod (mdraid09_be.mod)
Size of boot image is 4 sectors -> No emulation
 22.89% done, estimate finish Thu Dec 29 23:36:18 2022
 45.70% done, estimate finish Thu Dec 29 23:36:18 2022
 68.56% done, estimate finish Thu Dec 29 23:36:18 2022
 91.45% done, estimate finish Thu Dec 29 23:36:18 2022
Total translation table size: 2048
Total rockridge attributes bytes: 24816
Total directory bytes: 40960
Path table size(bytes): 64
Max brk space used 46000
21885 extents written (42 MB)
+ rm -rf /tmp/tmp.mNEprT4Tx9
+ exit 0
root@trana:~#
Now the image is ready for installation, so invoke virt-install as follows. The machine will start directly, launching the preseed automatic installation. At this point, I usually click on the virtual machine in virt-manager to follow screen output until the installation has finished. If everything works OK the machines comes up and I can ssh into it.

root@trana:~# virt-install --name $HOST --disk vm-$HOST.img,size=5 --cdrom vm-$HOST.iso --osinfo linux2020 --autostart --noautoconsole --wait
Using linux2020 default --memory 4096
Starting install...
Allocating 'vm-foo.img'                                                                                                                                     0 B  00:00:00 ... 
Creating domain...                                                                                                                                          0 B  00:00:00     
Domain is still running. Installation may be in progress.
Waiting for the installation to complete.
Domain has shutdown. Continuing.
Domain creation completed.
Restarting guest.
root@trana:~# 
There are some problems that I have noticed that would be nice to fix, but are easy to work around. The first is that at the end of the installation of Trisquel 9 and Trisquel 10, the VM hangs after displaying Sent SIGKILL to all processes followed by Requesting system reboot. I kill the VM manually using virsh destroy foo and start it up again using virsh start foo. For production use I expect to be running Trisquel 11, where the problem doesn t happen, so this does not bother me enough to debug further. The remaining issue that once booted, a Trisquel 11 VM has lost its DNS nameserver configuration, presumably due to poor integration with systemd-resolved. Both Trisquel 9 and Trisquel 10 uses systemd-resolved where DNS works after first boot, so this appears to be a Trisquel 11 bug. You can work around it with rm -f /etc/resolv.conf && echo 'nameserver A.B.C.D' > /etc/resolv.conf or drink the systemd Kool-Aid. If you want to clean up and re-start the process, here is how you wipe out what you did. After this, you may run the sed, ./gen-preseed-iso and virt-install commands again. Remember, use virsh shutdown foo to gracefully shutdown a VM.

root@trana:~# virsh destroy foo
Domain 'foo' destroyed
root@trana:~# virsh undefine foo --remove-all-storage
Domain 'foo' has been undefined
Volume 'vda'(/root/vm-foo.img) removed.
root@trana:~# rm vm-foo.*
root@trana:~# 
Happy hacking on your virtal machines!

18 December 2022

Ian Jackson: Rust needs #[throws]

tl;dr: Ok-wrapping as needed in today s Rust is a significant distraction, because there are multiple ways to do it. They are all slightly awkward in different ways, so are least-bad in different situations. You must choose a way for every fallible function, and sometimes change a function from one pattern to another. Rust really needs #[throws] as a first-class language feature. Code using #[throws] is simpler and clearer. Please try out withoutboats s fehler. I think you will like it. Contents A recent personal experience in coding style Ever since I read withoutboats s 2020 article about fehler, I have been using it in most of my personal projects. For Reasons I recently had a go at eliminating the dependency on fehler from Hippotat. So, I made a branch, deleted the dependency and imports, and started on the whack-a-mole with the compiler errors. After about a half hour of this, I was starting to feel queasy. After an hour I had decided that basically everything I was doing was making the code worse. And, bizarrely, I kept having to make individual decisons about what idiom to use in each place. I couldn t face it any more. After sleeping on the question I decided that Hippotat would be in Debian with fehler, or not at all. Happily the Debian Rust Team generously helped me out, so the answer is that fehler is now in Debian, so it s fine. For me this experience, of trying to convert Rust-with-#[throws] to Rust-without-#[throws] brought the Ok wrapping problem into sharp focus. What is Ok wrapping? Intro to Rust error handling (You can skip this section if you re already a seasoned Rust programer.) In Rust, fallibility is represented by functions that return Result<SuccessValue, Error>: this is a generic type, representing either whatever SuccessValue is (in the Ok variant of the data-bearing enum) or some Error (in the Err variant). For example, std::fs::read_to_string, which takes a filename and returns the contents of the named file, returns Result<String, std::io::Error>. This is a nice and typesafe formulation of, and generalisation of, the traditional C practice, where a function indicates in its return value whether it succeeded, and errors are indicated with an error code. Result is part of the standard library and there are convenient facilities for checking for errors, extracting successful results, and so on. In particular, Rust has the postfix ? operator, which, when applied to a Result, does one of two things: if the Result was Ok, it yields the inner successful value; if the Result was Err, it returns early from the current function, returning an Err in turn to the caller. This means you can write things like this:
    let input_data = std::fs::read_to_string(input_file)?;
and the error handling is pretty automatic. You get a compiler warning, or a type error, if you forget the ?, so you can t accidentally ignore errors. But, there is a downside. When you are returning a successful outcome from your function, you must convert it into a Result. After all, your fallible function has return type Result<SuccessValue, Error>, which is a different type to SuccessValue. So, for example, inside std::fs::read_to_string, we see this:
        let mut string = String::new();
        file.read_to_string(&mut string)?;
        Ok(string)
     
string has type String; fs::read_to_string must return Result<String, ..>, so at the end of the function we must return Ok(string). This applies to return statements, too: if you want an early successful return from a fallible function, you must write return Ok(whatever). This is particularly annoying for functions that don t actually return a nontrivial value. Normally, when you write a function that doesn t return a value you don t write the return type. The compiler interprets this as syntactic sugar for -> (), ie, that the function returns (), the empty tuple, used in Rust as a dummy value in these kind of situations. A block ( ... ) whose last statement ends in a ; has type (). So, when you fall off the end of a function, the return value is (), without you having to write it. So you simply leave out the stuff in your program about the return value, and your function doesn t have one (i.e. it returns ()). But, a function which either fails with an error, or completes successfuly without returning anything, has return type Result<(), Error>. At the end of such a function, you must explicitly provide the success value. After all, if you just fall off the end of a block, it means the block has value (), which is not of type Result<(), Error>. So the fallible function must end with Ok(()), as we see in the example for std::fs::read_to_string. A minor inconvenience, or a significant distraction? I think the need for Ok-wrapping on all success paths from fallible functions is generally regarded as just a minor inconvenience. Certainly the experienced Rust programmer gets very used to it. However, while trying to remove fehler s #[throws] from Hippotat, I noticed something that is evident in codebases using vanilla Rust (without fehler) but which goes un-remarked. There are multiple ways to write the Ok-wrapping, and the different ways are appropriate in different situations. See the following examples, all taken from a real codebase. (And it s not just me: I do all of these in different places, - when I don t have fehler available - but all these examples are from code written by others.) Idioms for Ok-wrapping - a bestiary Wrap just a returned variable binding If you have the return value in a variable, you can write Ok(reval) at the end of the function, instead of retval.
    pub fn take_until(&mut self, term: u8) -> Result<&'a [u8]>  
        // several lines of code
        Ok(result)
     
If the returned value is not already bound to variable, making a function fallible might mean choosing to bind it to a variable. Wrap a nontrivial return expression Even if it s not just a variable, you can wrap the expression which computes the returned value. This is often done if the returned value is a struct literal:
    fn take_from(r: &mut Reader<'_>) -> Result<Self>  
        // several lines of code
        Ok(AuthChallenge   challenge, methods  )
     
Introduce Ok(()) at the end For functions returning Result<()>, you can write Ok(()). This is usual, but not ubiquitous, since sometimes you can omit it. Wrap the whole body If you don t have the return value in a variable, you can wrap the whole body of the function in Ok( ). Whether this is a good idea depends on how big and complex the body is.
    fn from_str(s: &str) -> std::result::Result<Self, Self::Err>  
        Ok(match s  
            "Authority" => RelayFlags::AUTHORITY,
            // many other branches
            _ => RelayFlags::empty(),
         )
     
Omit the wrap when calling fallible sub-functions If your function wraps another function call of the same return and error type, you don t need to write the Ok at all. Instead, you can simply call the function and not apply ?. You can do this even if your function selects between a number of different sub-functions to call:
    fn fmt(&self, f: &mut std::fmt::Formatter<'_>) -> std::fmt::Result  
        if flags::unsafe_logging_enabled()  
            std::fmt::Display::fmt(&self.0, f)
          else  
            self.0.display_redacted(f)
         
     
But this doesn t work if the returned error type isn t the same, but needs the autoconversion implied by the ? operator. Convert a fallible sub-function error with Ok( ... ?) If the final thing a function does is chain to another fallible function, but with a different error type, the error must be converted somehow. This can be done with ?.
     fn try_from(v: i32) -> Result<Self, Error>  
         Ok(Percentage::new(v.try_into()?))
      
Convert a fallible sub-function error with .map_err Or, rarely, people solve the same problem by converting explicitly with .map_err:
     pub fn create_unbootstrapped(self) -> Result<TorClient<R>>  
         // several lines of code
         TorClient::create_inner(
             // several parameters
         )
         .map_err(ErrorDetail::into)
      
What is to be done, then? The fehler library is in excellent taste and has the answer. With fehler: fehler provides: This is precisely correct. It is very ergonomic. Consequences include: Limitations of fehler But, fehler is a Rust procedural macro, so it cannot get everything right. Sadly there are some wrinkles. But, Rust-with-#[throws] is so much nicer a language than Rust-with-mandatory-Ok-wrapping, that these are minor inconveniences. Please can we have #[throws] in the Rust language This ought to be part of the language, not a macro library. In the compiler, it would be possible to get the all the corner cases right. It would make the feature available to everyone, and it would quickly become idiomatic Rust throughout the community. It is evident from reading writings from the time, particularly those from withoutboats, that there were significant objections to automatic Ok-wrapping. It seems to have become quite political, and some folks burned out on the topic. Perhaps, now, a couple of years later, we can revisit this area and solve this problem in the language itself ? Explicitness An argument I have seen made against automatic Ok-wrapping, and, in general, against any kind of useful language affordance, is that it makes things less explicit. But this argument is fundamentally wrong for Ok-wrapping. Explicitness is not an unalloyed good. We humans have only limited attention. We need to focus that attention where it is actually needed. So explicitness is good in situtions where what is going on is unusual; or would otherwise be hard to read; or is tricky or error-prone. Generally: explicitness is good for things where we need to direct humans attention. But Ok-wrapping is ubiquitous in fallible Rust code. The compiler mechanisms and type systems almost completely defend against mistakes. All but the most novice programmer knows what s going on, and the very novice programmer doesn t need to. Rust s error handling arrangments are designed specifically so that we can avoid worrying about fallibility unless necessary except for the Ok-wrapping. Explicitness about Ok-wrapping directs our attention away from whatever other things the code is doing: it is a distraction. So, explicitness about Ok-wrapping is a bad thing. Appendix - examples showning code with Ok wrapping is worse than code using #[throws] Observe these diffs, from my abandoned attempt to remove the fehler dependency from Hippotat. I have a type alias AE for the usual error type (AE stands for anyhow::Error). In the non-#[throws] code, I end up with a type alias AR<T> for Result<T, AE>, which I think is more opaque but at least that avoids typing out -> Result< , AE> a thousand times. Some people like to have a local Result alias, but that means that the standard Result has to be referred to as StdResult or std::result::Result.
With fehler and #[throws] Vanilla Rust, Result<>, mandatory Ok-wrapping

Return value clearer, error return less wordy:
impl Parseable for Secret impl Parseable for Secret
#[throws(AE)]
fn parse(s: Option<&str>) -> Self fn parse(s: Option<&str>) -> AR<Self>
let s = s.value()?; let s = s.value()?;
if s.is_empty() throw!(anyhow!( secret value cannot be empty )) if s.is_empty() return Err(anyhow!( secret value cannot be empty ))
Secret(s.into()) Ok(Secret(s.into()))
No need to wrap whole match statement in Ok( ):
#[throws(AE)]
pub fn client<T>(&self, key: & static str, skl: SKL) -> T pub fn client<T>(&self, key: & static str, skl: SKL) -> AR<T>
where T: Parseable + Default where T: Parseable + Default
match self.end Ok(match self.end
LinkEnd::Client => self.ordinary(key, skl)?, LinkEnd::Client => self.ordinary(key, skl)?,
LinkEnd::Server => default(), LinkEnd::Server => default(),
)
Return value and Ok(()) entirely replaced by #[throws]:
impl Display for Loc impl Display for Loc
#[throws(fmt::Error)]
fn fmt(&self, f: &mut fmt::Formatter) fn fmt(&self, f: &mut fmt::Formatter) -> fmt::Result
write!(f, :? : , &self.file, self.lno)?; write!(f, :? : , &self.file, self.lno)?;
if let Some(s) = &self.section if let Some(s) = &self.section
write!(f, )?; write!(f, )?;
Ok(())
Call to write! now looks the same as in more complex case shown above:
impl Debug for Secret impl Debug for Secret
#[throws(fmt::Error)]
fn fmt(&self, f: &mut fmt::Formatter) fn fmt(&self, f: &mut fmt::Formatter)-> fmt::Result
write!(f, "Secret(***)")?; write!(f, "Secret(***)")
Much tiresome return Ok() noise removed:
impl FromStr for SectionName impl FromStr for SectionName
type Err = AE; type Err = AE;
#[throws(AE)]
fn from_str(s: &str) -> Self fn from_str(s: &str) ->AR< Self>
match s match s
COMMON => return SN::Common, COMMON => return Ok(SN::Common),
LIMIT => return SN::GlobalLimit, LIMIT => return Ok(SN::GlobalLimit),
_ => _ =>
; ;
if let Ok(n@ ServerName(_)) = s.parse() return SN::Server(n) if let Ok(n@ ServerName(_)) = s.parse() return Ok(SN::Server(n))
if let Ok(n@ ClientName(_)) = s.parse() return SN::Client(n) if let Ok(n@ ClientName(_)) = s.parse() return Ok(SN::Client(n))
if client == LIMIT return SN::ServerLimit(server) if client == LIMIT return Ok(SN::ServerLimit(server))
let client = client.parse().context( client name in link section name )?; let client = client.parse().context( client name in link section name )?;
SN::Link(LinkName server, client ) Ok(SN::Link(LinkName server, client ))
edited 2022-12-18 19:58 UTC to improve, and 2022-12-18 23:28 to fix, formatting


comment count unavailable comments

30 November 2022

Utkarsh Gupta: FOSS Activites in November 2022

Here s my (thirty-eighth) monthly but brief update about the activities I ve done in the F/L/OSS world.

Debian
This was my 47th month of actively contributing to Debian. I became a DM in late March 2019 and a DD on Christmas 19! \o/ There s a bunch of things I do, both, technical and non-technical. Here are the things I did this month:

Debian Uploads

Other $things:
  • Sponsoring stuff for non-DDs.
  • Mentoring for newcomers.
  • Moderation of -project mailing list.

Ubuntu
This was my 22nd month of actively contributing to Ubuntu. Now that I joined Canonical to work on Ubuntu full-time, there s a bunch of things I do! \o/ I mostly worked on different things, I guess. I was too lazy to maintain a list of things I worked on so there s no concrete list atm. Maybe I ll get back to this section later or will start to list stuff from the fall, as I was doing before. :D

Debian (E)LTS
Debian Long Term Support (LTS) is a project to extend the lifetime of all Debian stable releases to (at least) 5 years. Debian LTS is not handled by the Debian security team, but by a separate group of volunteers and companies interested in making it a success. And Debian Extended LTS (ELTS) is its sister project, extending support to the stretch and jessie release (+2 years after LTS support). This was my thirty-eighth month as a Debian LTS and twenty-nine month as a Debian ELTS paid contributor.
I worked for 41.00 hours for LTS and 30.25 hours for ELTS.

LTS CVE Fixes and Announcements:

ELTS CVE Fixes and Announcements:
  • Issued ELA 731-1, fixing CVE-2022-39377, for sysstat.
    For Debian 9 stretch, these problems have been fixed in version 11.4.3-2+deb9u1.
    For Debian 8 jessie, these problems have been fixed in version 11.0.1-1+deb8u1.
  • Issued ELA 749-1, fixing CVE-2022-41325, for vlc.
    For Debian 9 stretch, these problems have been fixed in version 3.0.17.4-0+deb9u2.
  • Issued ELA 750-1 for a new upstream version update of clamav.
    For Debian 9 stretch, the package has been updated to version 0.103.7+dfsg-0+deb9u1. For Debian 8 jessie, the package has been updated to version 0.103.7+dfsg-0+deb8u1.
  • Started to look at other set of packages.

Other (E)LTS Work:
  • Front desk duty from 21-11 until 27-11 for both, LTS and ELTS.
  • Triaged jqueryui, open-vm-tools, systemd, ffmpeg, lava, pngcheck, snapd, vlc, g810-led, libpgjava, dropbear, python3.5, python3.4, clamav, systat, postgresql-11, and mariadb-10.1.
  • Marked CVE-2009-1143/open-vm-tools as postponed for buster, stretch and jessie.
  • Marked CVE-2022-45873/systemd as not-affected in stretch and jessie.
  • Marked CVE-2022-396 4,5 /ffmpeg as postponed for buster and stretch.
  • Marked CVE-2022-45061/python3. 4,5 as postponed for stretch and jessie.
  • Marked CVE-2022-31160/jqueryui as not-affected for jessie instead.
  • Noted CVE-2022-45061/python3.4 to be marked as postponed; only things to fix is the armhf FTBFS.
  • Auto EOL d linux, libpgjava, nvidia-graphics-drivers, maradns, chromium, and glance for ELTS.
  • Helped and assisted new contributors joining Freexian (LTS/ELTS/internally).
  • Answered questions (& discussions) on IRC (#debian-lts and #debian-elts) and Matrix.
  • Participated and helped fellow members with their queries via private mail and chat.
  • General and other discussions on LTS private and public mailing list.
  • Attended the monthly meeting held on IRC on November 24th.

Until next time.
:wq for today.

16 November 2022

Antoine Beaupr : A ZFS migration

In my tubman setup, I started using ZFS on an old server I had lying around. The machine is really old though (2011!) and it "feels" pretty slow. I want to see how much of that is ZFS and how much is the machine. Synthetic benchmarks show that ZFS may be slower than mdadm in RAID-10 or RAID-6 configuration, so I want to confirm that on a live workload: my workstation. Plus, I want easy, regular, high performance backups (with send/receive snapshots) and there's no way I'm going to use BTRFS because I find it too confusing and unreliable. So off we go.

Installation Since this is a conversion (and not a new install), our procedure is slightly different than the official documentation but otherwise it's pretty much in the same spirit: we're going to use ZFS for everything, including the root filesystem. So, install the required packages, on the current system:
apt install --yes gdisk zfs-dkms zfs zfs-initramfs zfsutils-linux
We also tell DKMS that we need to rebuild the initrd when upgrading:
echo REMAKE_INITRD=yes > /etc/dkms/zfs.conf

Partitioning This is going to partition /dev/sdc with:
  • 1MB MBR / BIOS legacy boot
  • 512MB EFI boot
  • 1GB bpool, unencrypted pool for /boot
  • rest of the disk for zpool, the rest of the data
     sgdisk --zap-all /dev/sdc
     sgdisk -a1 -n1:24K:+1000K -t1:EF02 /dev/sdc
     sgdisk     -n2:1M:+512M   -t2:EF00 /dev/sdc
     sgdisk     -n3:0:+1G      -t3:BF01 /dev/sdc
     sgdisk     -n4:0:0        -t4:BF00 /dev/sdc
    
That will look something like this:
    root@curie:/home/anarcat# sgdisk -p /dev/sdc
    Disk /dev/sdc: 1953525168 sectors, 931.5 GiB
    Model: ESD-S1C         
    Sector size (logical/physical): 512/512 bytes
    Disk identifier (GUID): [REDACTED]
    Partition table holds up to 128 entries
    Main partition table begins at sector 2 and ends at sector 33
    First usable sector is 34, last usable sector is 1953525134
    Partitions will be aligned on 16-sector boundaries
    Total free space is 14 sectors (7.0 KiB)
    Number  Start (sector)    End (sector)  Size       Code  Name
       1              48            2047   1000.0 KiB  EF02  
       2            2048         1050623   512.0 MiB   EF00  
       3         1050624         3147775   1024.0 MiB  BF01  
       4         3147776      1953525134   930.0 GiB   BF00
Unfortunately, we can't be sure of the sector size here, because the USB controller is probably lying to us about it. Normally, this smartctl command should tell us the sector size as well:
root@curie:~# smartctl -i /dev/sdb -qnoserial
smartctl 7.2 2020-12-30 r5155 [x86_64-linux-5.10.0-14-amd64] (local build)
Copyright (C) 2002-20, Bruce Allen, Christian Franke, www.smartmontools.org
=== START OF INFORMATION SECTION ===
Model Family:     Western Digital Black Mobile
Device Model:     WDC WD10JPLX-00MBPT0
Firmware Version: 01.01H01
User Capacity:    1 000 204 886 016 bytes [1,00 TB]
Sector Sizes:     512 bytes logical, 4096 bytes physical
Rotation Rate:    7200 rpm
Form Factor:      2.5 inches
Device is:        In smartctl database [for details use: -P show]
ATA Version is:   ATA8-ACS T13/1699-D revision 6
SATA Version is:  SATA 3.0, 6.0 Gb/s (current: 6.0 Gb/s)
Local Time is:    Tue May 17 13:33:04 2022 EDT
SMART support is: Available - device has SMART capability.
SMART support is: Enabled
Above is the example of the builtin HDD drive. But the SSD device enclosed in that USB controller doesn't support SMART commands, so we can't trust that it really has 512 bytes sectors. This matters because we need to tweak the ashift value correctly. We're going to go ahead the SSD drive has the common 4KB settings, which means ashift=12. Note here that we are not creating a separate partition for swap. Swap on ZFS volumes (AKA "swap on ZVOL") can trigger lockups and that issue is still not fixed upstream. Ubuntu recommends using a separate partition for swap instead. But since this is "just" a workstation, we're betting that we will not suffer from this problem, after hearing a report from another Debian developer running this setup on their workstation successfully. We do not recommend this setup though. In fact, if I were to redo this partition scheme, I would probably use LUKS encryption and setup a dedicated swap partition, as I had problems with ZFS encryption as well.

Creating pools ZFS pools are somewhat like "volume groups" if you are familiar with LVM, except they obviously also do things like RAID-10. (Even though LVM can technically also do RAID, people typically use mdadm instead.) In any case, the guide suggests creating two different pools here: one, in cleartext, for boot, and a separate, encrypted one, for the rest. Technically, the boot partition is required because the Grub bootloader only supports readonly ZFS pools, from what I understand. But I'm a little out of my depth here and just following the guide.

Boot pool creation This creates the boot pool in readonly mode with features that grub supports:
    zpool create \
        -o cachefile=/etc/zfs/zpool.cache \
        -o ashift=12 -d \
        -o feature@async_destroy=enabled \
        -o feature@bookmarks=enabled \
        -o feature@embedded_data=enabled \
        -o feature@empty_bpobj=enabled \
        -o feature@enabled_txg=enabled \
        -o feature@extensible_dataset=enabled \
        -o feature@filesystem_limits=enabled \
        -o feature@hole_birth=enabled \
        -o feature@large_blocks=enabled \
        -o feature@lz4_compress=enabled \
        -o feature@spacemap_histogram=enabled \
        -o feature@zpool_checkpoint=enabled \
        -O acltype=posixacl -O canmount=off \
        -O compression=lz4 \
        -O devices=off -O normalization=formD -O relatime=on -O xattr=sa \
        -O mountpoint=/boot -R /mnt \
        bpool /dev/sdc3
I haven't investigated all those settings and just trust the upstream guide on the above.

Main pool creation This is a more typical pool creation.
    zpool create \
        -o ashift=12 \
        -O encryption=on -O keylocation=prompt -O keyformat=passphrase \
        -O acltype=posixacl -O xattr=sa -O dnodesize=auto \
        -O compression=zstd \
        -O relatime=on \
        -O canmount=off \
        -O mountpoint=/ -R /mnt \
        rpool /dev/sdc4
Breaking this down:
  • -o ashift=12: mentioned above, 4k sector size
  • -O encryption=on -O keylocation=prompt -O keyformat=passphrase: encryption, prompt for a password, default algorithm is aes-256-gcm, explicit in the guide, made implicit here
  • -O acltype=posixacl -O xattr=sa: enable ACLs, with better performance (not enabled by default)
  • -O dnodesize=auto: related to extended attributes, less compatibility with other implementations
  • -O compression=zstd: enable zstd compression, can be disabled/enabled by dataset to with zfs set compression=off rpool/example
  • -O relatime=on: classic atime optimisation, another that could be used on a busy server is atime=off
  • -O canmount=off: do not make the pool mount automatically with mount -a?
  • -O mountpoint=/ -R /mnt: mount pool on / in the future, but /mnt for now
Those settings are all available in zfsprops(8). Other flags are defined in zpool-create(8). The reasoning behind them is also explained in the upstream guide and some also in [the Debian wiki][]. Those flags were actually not used:
  • -O normalization=formD: normalize file names on comparisons (not storage), implies utf8only=on, which is a bad idea (and effectively meant my first sync failed to copy some files, including this folder from a supysonic checkout). and this cannot be changed after the filesystem is created. bad, bad, bad.
[the Debian wiki]: https://wiki.debian.org/ZFS#Advanced_Topics

Side note about single-disk pools Also note that we're living dangerously here: single-disk ZFS pools are rumoured to be more dangerous than not running ZFS at all. The choice quote from this article is:
[...] any error can be detected, but cannot be corrected. This sounds like an acceptable compromise, but its actually not. The reason its not is that ZFS' metadata cannot be allowed to be corrupted. If it is it is likely the zpool will be impossible to mount (and will probably crash the system once the corruption is found). So a couple of bad sectors in the right place will mean that all data on the zpool will be lost. Not some, all. Also there's no ZFS recovery tools, so you cannot recover any data on the drives.
Compared with (say) ext4, where a single disk error can recovered, this is pretty bad. But we are ready to live with this with the idea that we'll have hourly offline snapshots that we can easily recover from. It's trade-off. Also, we're running this on a NVMe/M.2 drive which typically just blinks out of existence completely, and doesn't "bit rot" the way a HDD would. Also, the FreeBSD handbook quick start doesn't have any warnings about their first example, which is with a single disk. So I am reassured at least.

Creating mount points Next we create the actual filesystems, known as "datasets" which are the things that get mounted on mountpoint and hold the actual files.
  • this creates two containers, for ROOT and BOOT
     zfs create -o canmount=off -o mountpoint=none rpool/ROOT &&
     zfs create -o canmount=off -o mountpoint=none bpool/BOOT
    
    Note that it's unclear to me why those datasets are necessary, but they seem common practice, also used in this FreeBSD example. The OpenZFS guide mentions the Solaris upgrades and Ubuntu's zsys that use that container for upgrades and rollbacks. This blog post seems to explain a bit the layout behind the installer.
  • this creates the actual boot and root filesystems:
     zfs create -o canmount=noauto -o mountpoint=/ rpool/ROOT/debian &&
     zfs mount rpool/ROOT/debian &&
     zfs create -o mountpoint=/boot bpool/BOOT/debian
    
    I guess the debian name here is because we could technically have multiple operating systems with the same underlying datasets.
  • then the main datasets:
     zfs create                                 rpool/home &&
     zfs create -o mountpoint=/root             rpool/home/root &&
     chmod 700 /mnt/root &&
     zfs create                                 rpool/var
    
  • exclude temporary files from snapshots:
     zfs create -o com.sun:auto-snapshot=false  rpool/var/cache &&
     zfs create -o com.sun:auto-snapshot=false  rpool/var/tmp &&
     chmod 1777 /mnt/var/tmp
    
  • and skip automatic snapshots in Docker:
     zfs create -o canmount=off                 rpool/var/lib &&
     zfs create -o com.sun:auto-snapshot=false  rpool/var/lib/docker
    
    Notice here a peculiarity: we must create rpool/var/lib to create rpool/var/lib/docker otherwise we get this error:
     cannot create 'rpool/var/lib/docker': parent does not exist
    
    ... and no, just creating /mnt/var/lib doesn't fix that problem. In fact, it makes things even more confusing because an existing directory shadows a mountpoint, which is the opposite of how things normally work. Also note that you will probably need to change storage driver in Docker, see the zfs-driver documentation for details but, basically, I did:
    echo '  "storage-driver": "zfs"  ' > /etc/docker/daemon.json
    
    Note that podman has the same problem (and similar solution):
    printf '[storage]\ndriver = "zfs"\n' > /etc/containers/storage.conf
    
  • make a tmpfs for /run:
     mkdir /mnt/run &&
     mount -t tmpfs tmpfs /mnt/run &&
     mkdir /mnt/run/lock
    
We don't create a /srv, as that's the HDD stuff. Also mount the EFI partition:
mkfs.fat -F 32 /dev/sdc2 &&
mount /dev/sdc2 /mnt/boot/efi/
At this point, everything should be mounted in /mnt. It should look like this:
root@curie:~# LANG=C df -h -t zfs -t vfat
Filesystem            Size  Used Avail Use% Mounted on
rpool/ROOT/debian     899G  384K  899G   1% /mnt
bpool/BOOT/debian     832M  123M  709M  15% /mnt/boot
rpool/home            899G  256K  899G   1% /mnt/home
rpool/home/root       899G  256K  899G   1% /mnt/root
rpool/var             899G  384K  899G   1% /mnt/var
rpool/var/cache       899G  256K  899G   1% /mnt/var/cache
rpool/var/tmp         899G  256K  899G   1% /mnt/var/tmp
rpool/var/lib/docker  899G  256K  899G   1% /mnt/var/lib/docker
/dev/sdc2             511M  4.0K  511M   1% /mnt/boot/efi
Now that we have everything setup and mounted, let's copy all files over.

Copying files This is a list of all the mounted filesystems
for fs in /boot/ /boot/efi/ / /home/; do
    echo "syncing $fs to /mnt$fs..." && 
    rsync -aSHAXx --info=progress2 --delete $fs /mnt$fs
done
You can check that the list is correct with:
mount -l -t ext4,btrfs,vfat   awk ' print $3 '
Note that we skip /srv as it's on a different disk. On the first run, we had:
root@curie:~# for fs in /boot/ /boot/efi/ / /home/; do
        echo "syncing $fs to /mnt$fs..." && 
        rsync -aSHAXx --info=progress2 $fs /mnt$fs
    done
syncing /boot/ to /mnt/boot/...
              0   0%    0.00kB/s    0:00:00 (xfr#0, to-chk=0/299)  
syncing /boot/efi/ to /mnt/boot/efi/...
     16,831,437 100%  184.14MB/s    0:00:00 (xfr#101, to-chk=0/110)
syncing / to /mnt/...
 28,019,293,280  94%   47.63MB/s    0:09:21 (xfr#703710, ir-chk=6748/839220)rsync: [generator] delete_file: rmdir(var/lib/docker) failed: Device or resource busy (16)
could not make way for new symlink: var/lib/docker
 34,081,267,990  98%   50.71MB/s    0:10:40 (xfr#736577, to-chk=0/867732)    
rsync error: some files/attrs were not transferred (see previous errors) (code 23) at main.c(1333) [sender=3.2.3]
syncing /home/ to /mnt/home/...
rsync: [sender] readlink_stat("/home/anarcat/.fuse") failed: Permission denied (13)
 24,456,268,098  98%   68.03MB/s    0:05:42 (xfr#159867, ir-chk=6875/172377) 
file has vanished: "/home/anarcat/.cache/mozilla/firefox/s2hwvqbu.quantum/cache2/entries/B3AB0CDA9C4454B3C1197E5A22669DF8EE849D90"
199,762,528,125  93%   74.82MB/s    0:42:26 (xfr#1437846, ir-chk=1018/1983979)rsync: [generator] recv_generator: mkdir "/mnt/home/anarcat/dist/supysonic/tests/assets/\#346" failed: Invalid or incomplete multibyte or wide character (84)
*** Skipping any contents from this failed directory ***
315,384,723,978  96%   76.82MB/s    1:05:15 (xfr#2256473, to-chk=0/2993950)    
rsync error: some files/attrs were not transferred (see previous errors) (code 23) at main.c(1333) [sender=3.2.3]
Note the failure to transfer that supysonic file? It turns out they had a weird filename in their source tree, since then removed, but still it showed how the utf8only feature might not be such a bad idea. At this point, the procedure was restarted all the way back to "Creating pools", after unmounting all ZFS filesystems (umount /mnt/run /mnt/boot/efi && umount -t zfs -a) and destroying the pool, which, surprisingly, doesn't require any confirmation (zpool destroy rpool). The second run was cleaner:
root@curie:~# for fs in /boot/ /boot/efi/ / /home/; do
        echo "syncing $fs to /mnt$fs..." && 
        rsync -aSHAXx --info=progress2 --delete $fs /mnt$fs
    done
syncing /boot/ to /mnt/boot/...
              0   0%    0.00kB/s    0:00:00 (xfr#0, to-chk=0/299)  
syncing /boot/efi/ to /mnt/boot/efi/...
              0   0%    0.00kB/s    0:00:00 (xfr#0, to-chk=0/110)  
syncing / to /mnt/...
 28,019,033,070  97%   42.03MB/s    0:10:35 (xfr#703671, ir-chk=1093/833515)rsync: [generator] delete_file: rmdir(var/lib/docker) failed: Device or resource busy (16)
could not make way for new symlink: var/lib/docker
 34,081,807,102  98%   44.84MB/s    0:12:04 (xfr#736580, to-chk=0/867723)    
rsync error: some files/attrs were not transferred (see previous errors) (code 23) at main.c(1333) [sender=3.2.3]
syncing /home/ to /mnt/home/...
rsync: [sender] readlink_stat("/home/anarcat/.fuse") failed: Permission denied (13)
IO error encountered -- skipping file deletion
 24,043,086,450  96%   62.03MB/s    0:06:09 (xfr#151819, ir-chk=15117/172571)
file has vanished: "/home/anarcat/.cache/mozilla/firefox/s2hwvqbu.quantum/cache2/entries/4C1FDBFEA976FF924D062FB990B24B897A77B84B"
315,423,626,507  96%   67.09MB/s    1:14:43 (xfr#2256845, to-chk=0/2994364)    
rsync error: some files/attrs were not transferred (see previous errors) (code 23) at main.c(1333) [sender=3.2.3]
Also note the transfer speed: we seem capped at 76MB/s, or 608Mbit/s. This is not as fast as I was expecting: the USB connection seems to be at around 5Gbps:
anarcat@curie:~$ lsusb -tv   head -4
/:  Bus 02.Port 1: Dev 1, Class=root_hub, Driver=xhci_hcd/6p, 5000M
    ID 1d6b:0003 Linux Foundation 3.0 root hub
     __ Port 1: Dev 4, If 0, Class=Mass Storage, Driver=uas, 5000M
        ID 0b05:1932 ASUSTek Computer, Inc.
So it shouldn't cap at that speed. It's possible the USB adapter is failing to give me the full speed though. It's not the M.2 SSD drive either, as that has a ~500MB/s bandwidth, acccording to its spec. At this point, we're about ready to do the final configuration. We drop to single user mode and do the rest of the procedure. That used to be shutdown now, but it seems like the systemd switch broke that, so now you can reboot into grub and pick the "recovery" option. Alternatively, you might try systemctl rescue, as I found out. I also wanted to copy the drive over to another new NVMe drive, but that failed: it looks like the USB controller I have doesn't work with older, non-NVME drives.

Boot configuration Now we need to enter the new system to rebuild the boot loader and initrd and so on. First, we bind mounts and chroot into the ZFS disk:
mount --rbind /dev  /mnt/dev &&
mount --rbind /proc /mnt/proc &&
mount --rbind /sys  /mnt/sys &&
chroot /mnt /bin/bash
Next we add an extra service that imports the bpool on boot, to make sure it survives a zpool.cache destruction:
cat > /etc/systemd/system/zfs-import-bpool.service <<EOF
[Unit]
DefaultDependencies=no
Before=zfs-import-scan.service
Before=zfs-import-cache.service
[Service]
Type=oneshot
RemainAfterExit=yes
ExecStart=/sbin/zpool import -N -o cachefile=none bpool
# Work-around to preserve zpool cache:
ExecStartPre=-/bin/mv /etc/zfs/zpool.cache /etc/zfs/preboot_zpool.cache
ExecStartPost=-/bin/mv /etc/zfs/preboot_zpool.cache /etc/zfs/zpool.cache
[Install]
WantedBy=zfs-import.target
EOF
Enable the service:
systemctl enable zfs-import-bpool.service
I had to trim down /etc/fstab and /etc/crypttab to only contain references to the legacy filesystems (/srv is still BTRFS!). If we don't already have a tmpfs defined in /etc/fstab:
ln -s /usr/share/systemd/tmp.mount /etc/systemd/system/ &&
systemctl enable tmp.mount
Rebuild boot loader with support for ZFS, but also to workaround GRUB's missing zpool-features support:
grub-probe /boot   grep -q zfs &&
update-initramfs -c -k all &&
sed -i 's,GRUB_CMDLINE_LINUX.*,GRUB_CMDLINE_LINUX="root=ZFS=rpool/ROOT/debian",' /etc/default/grub &&
update-grub
For good measure, make sure the right disk is configured here, for example you might want to tag both drives in a RAID array:
dpkg-reconfigure grub-pc
Install grub to EFI while you're there:
grub-install --target=x86_64-efi --efi-directory=/boot/efi --bootloader-id=debian --recheck --no-floppy
Filesystem mount ordering. The rationale here in the OpenZFS guide is a little strange, but I don't dare ignore that.
mkdir /etc/zfs/zfs-list.cache
touch /etc/zfs/zfs-list.cache/bpool
touch /etc/zfs/zfs-list.cache/rpool
zed -F &
Verify that zed updated the cache by making sure these are not empty:
cat /etc/zfs/zfs-list.cache/bpool
cat /etc/zfs/zfs-list.cache/rpool
Once the files have data, stop zed:
fg
Press Ctrl-C.
Fix the paths to eliminate /mnt:
sed -Ei "s /mnt/? / " /etc/zfs/zfs-list.cache/*
Snapshot initial install:
zfs snapshot bpool/BOOT/debian@install
zfs snapshot rpool/ROOT/debian@install
Exit chroot:
exit

Finalizing One last sync was done in rescue mode:
for fs in /boot/ /boot/efi/ / /home/; do
    echo "syncing $fs to /mnt$fs..." && 
    rsync -aSHAXx --info=progress2 --delete $fs /mnt$fs
done
Then we unmount all filesystems:
mount   grep -v zfs   tac   awk '/\/mnt/  print $3 '   xargs -i  umount -lf  
zpool export -a
Reboot, swap the drives, and boot in ZFS. Hurray!

Benchmarks This is a test that was ran in single-user mode using fio and the Ars Technica recommended tests, which are:
  • Single 4KiB random write process:
     fio --name=randwrite4k1x --ioengine=posixaio --rw=randwrite --bs=4k --size=4g --numjobs=1 --iodepth=1 --runtime=60 --time_based --end_fsync=1
    
  • 16 parallel 64KiB random write processes:
     fio --name=randwrite64k16x --ioengine=posixaio --rw=randwrite --bs=64k --size=256m --numjobs=16 --iodepth=16 --runtime=60 --time_based --end_fsync=1
    
  • Single 1MiB random write process:
     fio --name=randwrite1m1x --ioengine=posixaio --rw=randwrite --bs=1m --size=16g --numjobs=1 --iodepth=1 --runtime=60 --time_based --end_fsync=1
    
Strangely, that's not exactly what the author, Jim Salter, did in his actual test bench used in the ZFS benchmarking article. The first thing is there's no read test at all, which is already pretty strange. But also it doesn't include stuff like dropping caches or repeating results. So here's my variation, which i called fio-ars-bench.sh for now. It just batches a bunch of fio tests, one by one, 60 seconds each. It should take about 12 minutes to run, as there are 3 pair of tests, read/write, with and without async. My bias, before building, running and analysing those results is that ZFS should outperform the traditional stack on writes, but possibly not on reads. It's also possible it outperforms it on both, because it's a newer drive. A new test might be possible with a new external USB drive as well, although I doubt I will find the time to do this.

Results All tests were done on WD blue SN550 drives, which claims to be able to push 2400MB/s read and 1750MB/s write. An extra drive was bought to move the LVM setup from a WDC WDS500G1B0B-00AS40 SSD, a WD blue M.2 2280 SSD that was at least 5 years old, spec'd at 560MB/s read, 530MB/s write. Benchmarks were done on the M.2 SSD drive but discarded so that the drive difference is not a factor in the test. In practice, I'm going to assume we'll never reach those numbers because we're not actually NVMe (this is an old workstation!) so the bottleneck isn't the disk itself. For our purposes, it might still give us useful results.

Rescue test, LUKS/LVM/ext4 Those tests were performed with everything shutdown, after either entering the system in rescue mode, or by reaching that target with:
systemctl rescue
The network might have been started before or after the test as well:
systemctl start systemd-networkd
So it should be fairly reliable as basically nothing else is running. Raw numbers, from the ?job-curie-lvm.log, converted to MiB/s and manually merged:
test read I/O read IOPS write I/O write IOPS
rand4k4g1x 39.27 10052 212.15 54310
rand4k4g1x--fsync=1 39.29 10057 2.73 699
rand64k256m16x 1297.00 20751 1068.57 17097
rand64k256m16x--fsync=1 1290.90 20654 353.82 5661
rand1m16g1x 315.15 315 563.77 563
rand1m16g1x--fsync=1 345.88 345 157.01 157
Peaks are at about 20k IOPS and ~1.3GiB/s read, 1GiB/s write in the 64KB blocks with 16 jobs. Slowest is the random 4k block sync write at an abysmal 3MB/s and 700 IOPS The 1MB read/write tests have lower IOPS, but that is expected.

Rescue test, ZFS This test was also performed in rescue mode. Raw numbers, from the ?job-curie-zfs.log, converted to MiB/s and manually merged:
test read I/O read IOPS write I/O write IOPS
rand4k4g1x 77.20 19763 27.13 6944
rand4k4g1x--fsync=1 76.16 19495 6.53 1673
rand64k256m16x 1882.40 30118 70.58 1129
rand64k256m16x--fsync=1 1865.13 29842 71.98 1151
rand1m16g1x 921.62 921 102.21 102
rand1m16g1x--fsync=1 908.37 908 64.30 64
Peaks are at 1.8GiB/s read, also in the 64k job like above, but much faster. The write is, as expected, much slower at 70MiB/s (compared to 1GiB/s!), but it should be noted the sync write doesn't degrade performance compared to async writes (although it's still below the LVM 300MB/s).

Conclusions Really, ZFS has trouble performing in all write conditions. The random 4k sync write test is the only place where ZFS outperforms LVM in writes, and barely (7MiB/s vs 3MiB/s). Everywhere else, writes are much slower, sometimes by an order of magnitude. And before some ZFS zealot jumps in talking about the SLOG or some other cache that could be added to improved performance, I'll remind you that those numbers are on a bare bones NVMe drive, pretty much as fast storage as you can find on this machine. Adding another NVMe drive as a cache probably will not improve write performance here. Still, those are very different results than the tests performed by Salter which shows ZFS beating traditional configurations in all categories but uncached 4k reads (not writes!). That said, those tests are very different from the tests I performed here, where I test writes on a single disk, not a RAID array, which might explain the discrepancy. Also, note that neither LVM or ZFS manage to reach the 2400MB/s read and 1750MB/s write performance specification. ZFS does manage to reach 82% of the read performance (1973MB/s) and LVM 64% of the write performance (1120MB/s). LVM hits 57% of the read performance and ZFS hits barely 6% of the write performance. Overall, I'm a bit disappointed in the ZFS write performance here, I must say. Maybe I need to tweak the record size or some other ZFS voodoo, but I'll note that I didn't have to do any such configuration on the other side to kick ZFS in the pants...

Real world experience This section document not synthetic backups, but actual real world workloads, comparing before and after I switched my workstation to ZFS.

Docker performance I had the feeling that running some git hook (which was firing a Docker container) was "slower" somehow. It seems that, at runtime, ZFS backends are significant slower than their overlayfs/ext4 equivalent:
May 16 14:42:52 curie systemd[1]: home-docker-overlay2-17e4d24228decc2d2d493efc401dbfb7ac29739da0e46775e122078d9daf3e87\x2dinit-merged.mount: Succeeded.
May 16 14:42:52 curie systemd[5161]: home-docker-overlay2-17e4d24228decc2d2d493efc401dbfb7ac29739da0e46775e122078d9daf3e87\x2dinit-merged.mount: Succeeded.
May 16 14:42:52 curie systemd[1]: home-docker-overlay2-17e4d24228decc2d2d493efc401dbfb7ac29739da0e46775e122078d9daf3e87-merged.mount: Succeeded.
May 16 14:42:53 curie dockerd[1723]: time="2022-05-16T14:42:53.087219426-04:00" level=info msg="starting signal loop" namespace=moby path=/run/docker/containerd/daemon/io.containerd.runtime.v2.task/moby/af22586fba07014a4d10ab19da10cf280db7a43cad804d6c1e9f2682f12b5f10 pid=151170
May 16 14:42:53 curie systemd[1]: Started libcontainer container af22586fba07014a4d10ab19da10cf280db7a43cad804d6c1e9f2682f12b5f10.
May 16 14:42:54 curie systemd[1]: docker-af22586fba07014a4d10ab19da10cf280db7a43cad804d6c1e9f2682f12b5f10.scope: Succeeded.
May 16 14:42:54 curie dockerd[1723]: time="2022-05-16T14:42:54.047297800-04:00" level=info msg="shim disconnected" id=af22586fba07014a4d10ab19da10cf280db7a43cad804d6c1e9f2682f12b5f10
May 16 14:42:54 curie dockerd[998]: time="2022-05-16T14:42:54.051365015-04:00" level=info msg="ignoring event" container=af22586fba07014a4d10ab19da10cf280db7a43cad804d6c1e9f2682f12b5f10 module=libcontainerd namespace=moby topic=/tasks/delete type="*events.TaskDelete"
May 16 14:42:54 curie systemd[2444]: run-docker-netns-f5453c87c879.mount: Succeeded.
May 16 14:42:54 curie systemd[5161]: run-docker-netns-f5453c87c879.mount: Succeeded.
May 16 14:42:54 curie systemd[2444]: home-docker-overlay2-17e4d24228decc2d2d493efc401dbfb7ac29739da0e46775e122078d9daf3e87-merged.mount: Succeeded.
May 16 14:42:54 curie systemd[5161]: home-docker-overlay2-17e4d24228decc2d2d493efc401dbfb7ac29739da0e46775e122078d9daf3e87-merged.mount: Succeeded.
May 16 14:42:54 curie systemd[1]: run-docker-netns-f5453c87c879.mount: Succeeded.
May 16 14:42:54 curie systemd[1]: home-docker-overlay2-17e4d24228decc2d2d493efc401dbfb7ac29739da0e46775e122078d9daf3e87-merged.mount: Succeeded.
Translating this:
  • container setup: ~1 second
  • container runtime: ~1 second
  • container teardown: ~1 second
  • total runtime: 2-3 seconds
Obviously, those timestamps are not quite accurate enough to make precise measurements... After I switched to ZFS:
mai 30 15:31:39 curie systemd[1]: var-lib-docker-zfs-graph-41ce08fb7a1d3a9c101694b82722f5621c0b4819bd1d9f070933fd1e00543cdf\x2dinit.mount: Succeeded. 
mai 30 15:31:39 curie systemd[5287]: var-lib-docker-zfs-graph-41ce08fb7a1d3a9c101694b82722f5621c0b4819bd1d9f070933fd1e00543cdf\x2dinit.mount: Succeeded. 
mai 30 15:31:40 curie systemd[1]: var-lib-docker-zfs-graph-41ce08fb7a1d3a9c101694b82722f5621c0b4819bd1d9f070933fd1e00543cdf.mount: Succeeded. 
mai 30 15:31:40 curie systemd[5287]: var-lib-docker-zfs-graph-41ce08fb7a1d3a9c101694b82722f5621c0b4819bd1d9f070933fd1e00543cdf.mount: Succeeded. 
mai 30 15:31:41 curie dockerd[3199]: time="2022-05-30T15:31:41.551403693-04:00" level=info msg="starting signal loop" namespace=moby path=/run/docker/containerd/daemon/io.containerd.runtime.v2.task/moby/42a1a1ed5912a7227148e997f442e7ab2e5cc3558aa3471548223c5888c9b142 pid=141080 
mai 30 15:31:41 curie systemd[1]: run-docker-runtime\x2drunc-moby-42a1a1ed5912a7227148e997f442e7ab2e5cc3558aa3471548223c5888c9b142-runc.ZVcjvl.mount: Succeeded. 
mai 30 15:31:41 curie systemd[5287]: run-docker-runtime\x2drunc-moby-42a1a1ed5912a7227148e997f442e7ab2e5cc3558aa3471548223c5888c9b142-runc.ZVcjvl.mount: Succeeded. 
mai 30 15:31:41 curie systemd[1]: Started libcontainer container 42a1a1ed5912a7227148e997f442e7ab2e5cc3558aa3471548223c5888c9b142. 
mai 30 15:31:45 curie systemd[1]: docker-42a1a1ed5912a7227148e997f442e7ab2e5cc3558aa3471548223c5888c9b142.scope: Succeeded. 
mai 30 15:31:45 curie dockerd[3199]: time="2022-05-30T15:31:45.883019128-04:00" level=info msg="shim disconnected" id=42a1a1ed5912a7227148e997f442e7ab2e5cc3558aa3471548223c5888c9b142 
mai 30 15:31:45 curie dockerd[1726]: time="2022-05-30T15:31:45.883064491-04:00" level=info msg="ignoring event" container=42a1a1ed5912a7227148e997f442e7ab2e5cc3558aa3471548223c5888c9b142 module=libcontainerd namespace=moby topic=/tasks/delete type="*events.TaskDelete" 
mai 30 15:31:45 curie systemd[1]: run-docker-netns-e45f5cf5f465.mount: Succeeded. 
mai 30 15:31:45 curie systemd[5287]: run-docker-netns-e45f5cf5f465.mount: Succeeded. 
mai 30 15:31:45 curie systemd[1]: var-lib-docker-zfs-graph-41ce08fb7a1d3a9c101694b82722f5621c0b4819bd1d9f070933fd1e00543cdf.mount: Succeeded. 
mai 30 15:31:45 curie systemd[5287]: var-lib-docker-zfs-graph-41ce08fb7a1d3a9c101694b82722f5621c0b4819bd1d9f070933fd1e00543cdf.mount: Succeeded.
That's double or triple the run time, from 2 seconds to 6 seconds. Most of the time is spent in run time, inside the container. Here's the breakdown:
  • container setup: ~2 seconds
  • container run: ~4 seconds
  • container teardown: ~1 second
  • total run time: about ~6-7 seconds
That's a two- to three-fold increase! Clearly something is going on here that I should tweak. It's possible that code path is less optimized in Docker. I also worry about podman, but apparently it also supports ZFS backends. Possibly it would perform better, but at this stage I wouldn't have a good comparison: maybe it would have performed better on non-ZFS as well...

Interactivity While doing the offsite backups (below), the system became somewhat "sluggish". I felt everything was slow, and I estimate it introduced ~50ms latency in any input device. Arguably, those are all USB and the external drive was connected through USB, but I suspect the ZFS drivers are not as well tuned with the scheduler as the regular filesystem drivers...

Recovery procedures For test purposes, I unmounted all systems during the procedure:
umount /mnt/boot/efi /mnt/boot/run
umount -a -t zfs
zpool export -a
And disconnected the drive, to see how I would recover this system from another Linux system in case of a total motherboard failure. To import an existing pool, plug the device, then import the pool with an alternate root, so it doesn't mount over your existing filesystems, then you mount the root filesystem and all the others:
zpool import -l -a -R /mnt &&
zfs mount rpool/ROOT/debian &&
zfs mount -a &&
mount /dev/sdc2 /mnt/boot/efi &&
mount -t tmpfs tmpfs /mnt/run &&
mkdir /mnt/run/lock

Offsite backup Part of the goal of using ZFS is to simplify and harden backups. I wanted to experiment with shorter recovery times specifically both point in time recovery objective and recovery time objective and faster incremental backups. This is, therefore, part of my backup services. This section documents how an external NVMe enclosure was setup in a pool to mirror the datasets from my workstation. The final setup should include syncoid copying datasets to the backup server regularly, but I haven't finished that configuration yet.

Partitioning The above partitioning procedure used sgdisk, but I couldn't figure out how to do this with sgdisk, so this uses sfdisk to dump the partition from the first disk to an external, identical drive:
sfdisk -d /dev/nvme0n1   sfdisk --no-reread /dev/sda --force

Pool creation This is similar to the main pool creation, except we tweaked a few bits after changing the upstream procedure:
zpool create \
        -o cachefile=/etc/zfs/zpool.cache \
        -o ashift=12 -d \
        -o feature@async_destroy=enabled \
        -o feature@bookmarks=enabled \
        -o feature@embedded_data=enabled \
        -o feature@empty_bpobj=enabled \
        -o feature@enabled_txg=enabled \
        -o feature@extensible_dataset=enabled \
        -o feature@filesystem_limits=enabled \
        -o feature@hole_birth=enabled \
        -o feature@large_blocks=enabled \
        -o feature@lz4_compress=enabled \
        -o feature@spacemap_histogram=enabled \
        -o feature@zpool_checkpoint=enabled \
        -O acltype=posixacl -O xattr=sa \
        -O compression=lz4 \
        -O devices=off \
        -O relatime=on \
        -O canmount=off \
        -O mountpoint=/boot -R /mnt \
        bpool-tubman /dev/sdb3
The change from the main boot pool are: Main pool creation is:
zpool create \
        -o ashift=12 \
        -O encryption=on -O keylocation=prompt -O keyformat=passphrase \
        -O acltype=posixacl -O xattr=sa -O dnodesize=auto \
        -O compression=zstd \
        -O relatime=on \
        -O canmount=off \
        -O mountpoint=/ -R /mnt \
        rpool-tubman /dev/sdb4

First sync I used syncoid to copy all pools over to the external device. syncoid is a thing that's part of the sanoid project which is specifically designed to sync snapshots between pool, typically over SSH links but it can also operate locally. The sanoid command had a --readonly argument to simulate changes, but syncoid didn't so I tried to fix that with an upstream PR. It seems it would be better to do this by hand, but this was much easier. The full first sync was:
root@curie:/home/anarcat# ./bin/syncoid -r  bpool bpool-tubman
CRITICAL ERROR: Target bpool-tubman exists but has no snapshots matching with bpool!
                Replication to target would require destroying existing
                target. Cowardly refusing to destroy your existing target.
          NOTE: Target bpool-tubman dataset is < 64MB used - did you mistakenly run
                 zfs create bpool-tubman  on the target? ZFS initial
                replication must be to a NON EXISTENT DATASET, which will
                then be CREATED BY the initial replication process.
INFO: Sending oldest full snapshot bpool/BOOT@test (~ 42 KB) to new target filesystem:
44.2KiB 0:00:00 [4.19MiB/s] [========================================================================================================================] 103%            
INFO: Updating new target filesystem with incremental bpool/BOOT@test ... syncoid_curie_2022-05-30:12:50:39 (~ 4 KB):
2.13KiB 0:00:00 [ 114KiB/s] [===============================================================>                                                         ] 53%            
INFO: Sending oldest full snapshot bpool/BOOT/debian@install (~ 126.0 MB) to new target filesystem:
 126MiB 0:00:00 [ 308MiB/s] [=======================================================================================================================>] 100%            
INFO: Updating new target filesystem with incremental bpool/BOOT/debian@install ... syncoid_curie_2022-05-30:12:50:39 (~ 113.4 MB):
 113MiB 0:00:00 [ 315MiB/s] [=======================================================================================================================>] 100%
root@curie:/home/anarcat# ./bin/syncoid -r  rpool rpool-tubman
CRITICAL ERROR: Target rpool-tubman exists but has no snapshots matching with rpool!
                Replication to target would require destroying existing
                target. Cowardly refusing to destroy your existing target.
          NOTE: Target rpool-tubman dataset is < 64MB used - did you mistakenly run
                 zfs create rpool-tubman  on the target? ZFS initial
                replication must be to a NON EXISTENT DATASET, which will
                then be CREATED BY the initial replication process.
INFO: Sending oldest full snapshot rpool/ROOT@syncoid_curie_2022-05-30:12:50:51 (~ 69 KB) to new target filesystem:
44.2KiB 0:00:00 [2.44MiB/s] [===========================================================================>                                             ] 63%            
INFO: Sending oldest full snapshot rpool/ROOT/debian@install (~ 25.9 GB) to new target filesystem:
25.9GiB 0:03:33 [ 124MiB/s] [=======================================================================================================================>] 100%            
INFO: Updating new target filesystem with incremental rpool/ROOT/debian@install ... syncoid_curie_2022-05-30:12:50:52 (~ 3.9 GB):
3.92GiB 0:00:33 [ 119MiB/s] [======================================================================================================================>  ] 99%            
INFO: Sending oldest full snapshot rpool/home@syncoid_curie_2022-05-30:12:55:04 (~ 276.8 GB) to new target filesystem:
 277GiB 0:27:13 [ 174MiB/s] [=======================================================================================================================>] 100%            
INFO: Sending oldest full snapshot rpool/home/root@syncoid_curie_2022-05-30:13:22:19 (~ 2.2 GB) to new target filesystem:
2.22GiB 0:00:25 [90.2MiB/s] [=======================================================================================================================>] 100%            
INFO: Sending oldest full snapshot rpool/var@syncoid_curie_2022-05-30:13:22:47 (~ 5.6 GB) to new target filesystem:
5.56GiB 0:00:32 [ 176MiB/s] [=======================================================================================================================>] 100%            
INFO: Sending oldest full snapshot rpool/var/cache@syncoid_curie_2022-05-30:13:23:22 (~ 627.3 MB) to new target filesystem:
 627MiB 0:00:03 [ 169MiB/s] [=======================================================================================================================>] 100%            
INFO: Sending oldest full snapshot rpool/var/lib@syncoid_curie_2022-05-30:13:23:28 (~ 69 KB) to new target filesystem:
44.2KiB 0:00:00 [1.40MiB/s] [===========================================================================>                                             ] 63%            
INFO: Sending oldest full snapshot rpool/var/lib/docker@syncoid_curie_2022-05-30:13:23:28 (~ 442.6 MB) to new target filesystem:
 443MiB 0:00:04 [ 103MiB/s] [=======================================================================================================================>] 100%            
INFO: Sending oldest full snapshot rpool/var/lib/docker/05c0de7fabbea60500eaa495d0d82038249f6faa63b12914737c4d71520e62c5@266253254 (~ 6.3 MB) to new target filesystem:
6.49MiB 0:00:00 [12.9MiB/s] [========================================================================================================================] 102%            
INFO: Updating new target filesystem with incremental rpool/var/lib/docker/05c0de7fabbea60500eaa495d0d82038249f6faa63b12914737c4d71520e62c5@266253254 ... syncoid_curie_2022-05-30:13:23:34 (~ 4 KB):
1.52KiB 0:00:00 [27.6KiB/s] [============================================>                                                                            ] 38%            
INFO: Sending oldest full snapshot rpool/var/lib/flatpak@syncoid_curie_2022-05-30:13:23:36 (~ 2.0 GB) to new target filesystem:
2.00GiB 0:00:17 [ 115MiB/s] [=======================================================================================================================>] 100%            
INFO: Sending oldest full snapshot rpool/var/tmp@syncoid_curie_2022-05-30:13:23:55 (~ 57.0 MB) to new target filesystem:
61.8MiB 0:00:01 [45.0MiB/s] [========================================================================================================================] 108%            
INFO: Clone is recreated on target rpool-tubman/var/lib/docker/ed71ddd563a779ba6fb37b3b1d0cc2c11eca9b594e77b4b234867ebcb162b205 based on rpool/var/lib/docker/05c0de7fabbea60500eaa495d0d82038249f6faa63b12914737c4d71520e62c5@266253254
INFO: Sending oldest full snapshot rpool/var/lib/docker/ed71ddd563a779ba6fb37b3b1d0cc2c11eca9b594e77b4b234867ebcb162b205@syncoid_curie_2022-05-30:13:23:58 (~ 218.6 MB) to new target filesystem:
 219MiB 0:00:01 [ 151MiB/s] [=======================================================================================================================>] 100%
Funny how the CRITICAL ERROR doesn't actually stop syncoid and it just carries on merrily doing when it's telling you it's "cowardly refusing to destroy your existing target"... Maybe that's because my pull request broke something though... During the transfer, the computer was very sluggish: everything feels like it has ~30-50ms latency extra:
anarcat@curie:sanoid$ LANG=C top -b  -n 1   head -20
top - 13:07:05 up 6 days,  4:01,  1 user,  load average: 16.13, 16.55, 11.83
Tasks: 606 total,   6 running, 598 sleeping,   0 stopped,   2 zombie
%Cpu(s): 18.8 us, 72.5 sy,  1.2 ni,  5.0 id,  1.2 wa,  0.0 hi,  1.2 si,  0.0 st
MiB Mem :  15898.4 total,   1387.6 free,  13170.0 used,   1340.8 buff/cache
MiB Swap:      0.0 total,      0.0 free,      0.0 used.   1319.8 avail Mem 
    PID USER      PR  NI    VIRT    RES    SHR S  %CPU  %MEM     TIME+ COMMAND
     70 root      20   0       0      0      0 S  83.3   0.0   6:12.67 kswapd0
4024878 root      20   0  282644  96432  10288 S  44.4   0.6   0:11.43 puppet
3896136 root      20   0   35328  16528     48 S  22.2   0.1   2:08.04 mbuffer
3896135 root      20   0   10328    776    168 R  16.7   0.0   1:22.93 zfs
3896138 root      20   0   10588    788    156 R  16.7   0.0   1:49.30 zfs
    350 root       0 -20       0      0      0 R  11.1   0.0   1:03.53 z_rd_int
    351 root       0 -20       0      0      0 S  11.1   0.0   1:04.15 z_rd_int
3896137 root      20   0    4384    352    244 R  11.1   0.0   0:44.73 pv
4034094 anarcat   30  10   20028  13960   2428 S  11.1   0.1   0:00.70 mbsync
4036539 anarcat   20   0    9604   3464   2408 R  11.1   0.0   0:00.04 top
    352 root       0 -20       0      0      0 S   5.6   0.0   1:03.64 z_rd_int
    353 root       0 -20       0      0      0 S   5.6   0.0   1:03.64 z_rd_int
    354 root       0 -20       0      0      0 S   5.6   0.0   1:04.01 z_rd_int
I wonder how much of that is due to syncoid, particularly because I often saw mbuffer and pv in there which are not strictly necessary to do those kind of operations, as far as I understand. Once that's done, export the pools to disconnect the drive:
zpool export bpool-tubman
zpool export rpool-tubman

Raw disk benchmark Copied the 512GB SSD/M.2 device to another 1024GB NVMe/M.2 device:
anarcat@curie:~$ sudo dd if=/dev/sdb of=/dev/sdc bs=4M status=progress conv=fdatasync
499944259584 octets (500 GB, 466 GiB) copi s, 1713 s, 292 MB/s
119235+1 enregistrements lus
119235+1 enregistrements  crits
500107862016 octets (500 GB, 466 GiB) copi s, 1719,93 s, 291 MB/s
... while both over USB, whoohoo 300MB/s!

Monitoring ZFS should be monitoring your pools regularly. Normally, the [[!debman zed]] daemon monitors all ZFS events. It is the thing that will report when a scrub failed, for example. See this configuration guide. Scrubs should be regularly scheduled to ensure consistency of the pool. This can be done in newer zfsutils-linux versions (bullseye-backports or bookworm) with one of those, depending on the desired frequency:
systemctl enable zfs-scrub-weekly@rpool.timer --now
systemctl enable zfs-scrub-monthly@rpool.timer --now
When the scrub runs, if it finds anything it will send an event which will get picked up by the zed daemon which will then send a notification, see below for an example. TODO: deploy on curie, if possible (probably not because no RAID) TODO: this should be in Puppet

Scrub warning example So what happens when problems are found? Here's an example of how I dealt with an error I received. After setting up another server (tubman) with ZFS, I eventually ended up getting a warning from the ZFS toolchain.
Date: Sun, 09 Oct 2022 00:58:08 -0400
From: root <root@anarc.at>
To: root@anarc.at
Subject: ZFS scrub_finish event for rpool on tubman
ZFS has finished a scrub:
   eid: 39536
 class: scrub_finish
  host: tubman
  time: 2022-10-09 00:58:07-0400
  pool: rpool
 state: ONLINE
status: One or more devices has experienced an unrecoverable error.  An
        attempt was made to correct the error.  Applications are unaffected.
action: Determine if the device needs to be replaced, and clear the errors
        using 'zpool clear' or replace the device with 'zpool replace'.
   see: https://openzfs.github.io/openzfs-docs/msg/ZFS-8000-9P
  scan: scrub repaired 0B in 00:33:57 with 0 errors on Sun Oct  9 00:58:07 2022
config:
        NAME        STATE     READ WRITE CKSUM
        rpool       ONLINE       0     0     0
          mirror-0  ONLINE       0     0     0
            sdb4    ONLINE       0     1     0
            sdc4    ONLINE       0     0     0
        cache
          sda3      ONLINE       0     0     0
errors: No known data errors
This, in itself, is a little worrisome. But it helpfully links to this more detailed documentation (and props up there: the link still works) which explains this is a "minor" problem (something that could be included in the report). In this case, this happened on a server setup on 2021-04-28, but the disks and server hardware are much older. The server itself (marcos v1) was built around 2011, over 10 years ago now. The hard drive in question is:
root@tubman:~# smartctl -i -qnoserial /dev/sdb
smartctl 7.2 2020-12-30 r5155 [x86_64-linux-5.10.0-15-amd64] (local build)
Copyright (C) 2002-20, Bruce Allen, Christian Franke, www.smartmontools.org
=== START OF INFORMATION SECTION ===
Model Family:     Seagate BarraCuda 3.5
Device Model:     ST4000DM004-2CV104
Firmware Version: 0001
User Capacity:    4,000,787,030,016 bytes [4.00 TB]
Sector Sizes:     512 bytes logical, 4096 bytes physical
Rotation Rate:    5425 rpm
Form Factor:      3.5 inches
Device is:        In smartctl database [for details use: -P show]
ATA Version is:   ACS-3 T13/2161-D revision 5
SATA Version is:  SATA 3.1, 6.0 Gb/s (current: 3.0 Gb/s)
Local Time is:    Tue Oct 11 11:02:32 2022 EDT
SMART support is: Available - device has SMART capability.
SMART support is: Enabled
Some more SMART stats:
root@tubman:~# smartctl -a -qnoserial /dev/sdb   grep -e  Head_Flying_Hours -e Power_On_Hours -e Total_LBA -e 'Sector Sizes'
Sector Sizes:     512 bytes logical, 4096 bytes physical
  9 Power_On_Hours          0x0032   086   086   000    Old_age   Always       -       12464 (206 202 0)
240 Head_Flying_Hours       0x0000   100   253   000    Old_age   Offline      -       10966h+55m+23.757s
241 Total_LBAs_Written      0x0000   100   253   000    Old_age   Offline      -       21107792664
242 Total_LBAs_Read         0x0000   100   253   000    Old_age   Offline      -       3201579750
That's over a year of power on, which shouldn't be so bad. It has written about 10TB of data (21107792664 LBAs * 512 byte/LBA), which is about two full writes. According to its specification, this device is supposed to support 55 TB/year of writes, so we're far below spec. Note that are still far from the "non-recoverable read error per bits" spec (1 per 10E15), as we've basically read 13E12 bits (3201579750 LBAs * 512 byte/LBA = 13E12 bits). It's likely this disk was made in 2018, so it is in its fourth year. Interestingly, /dev/sdc is also a Seagate drive, but of a different series:
root@tubman:~# smartctl -qnoserial  -i /dev/sdb
smartctl 7.2 2020-12-30 r5155 [x86_64-linux-5.10.0-15-amd64] (local build)
Copyright (C) 2002-20, Bruce Allen, Christian Franke, www.smartmontools.org
=== START OF INFORMATION SECTION ===
Model Family:     Seagate BarraCuda 3.5
Device Model:     ST4000DM004-2CV104
Firmware Version: 0001
User Capacity:    4,000,787,030,016 bytes [4.00 TB]
Sector Sizes:     512 bytes logical, 4096 bytes physical
Rotation Rate:    5425 rpm
Form Factor:      3.5 inches
Device is:        In smartctl database [for details use: -P show]
ATA Version is:   ACS-3 T13/2161-D revision 5
SATA Version is:  SATA 3.1, 6.0 Gb/s (current: 3.0 Gb/s)
Local Time is:    Tue Oct 11 11:21:35 2022 EDT
SMART support is: Available - device has SMART capability.
SMART support is: Enabled
It has seen much more reads than the other disk which is also interesting:
root@tubman:~# smartctl -a -qnoserial /dev/sdc   grep -e  Head_Flying_Hours -e Power_On_Hours -e Total_LBA -e 'Sector Sizes'
Sector Sizes:     512 bytes logical, 4096 bytes physical
  9 Power_On_Hours          0x0032   059   059   000    Old_age   Always       -       36240
240 Head_Flying_Hours       0x0000   100   253   000    Old_age   Offline      -       33994h+10m+52.118s
241 Total_LBAs_Written      0x0000   100   253   000    Old_age   Offline      -       30730174438
242 Total_LBAs_Read         0x0000   100   253   000    Old_age   Offline      -       51894566538
That's 4 years of Head_Flying_Hours, and over 4 years (4 years and 48 days) of Power_On_Hours. The copyright date on that drive's specs goes back to 2016, so it's a much older drive. SMART self-test succeeded.

Remaining issues
  • TODO: move send/receive backups to offsite host, see also zfs for alternatives to syncoid/sanoid there
  • TODO: setup backup cron job (or timer?)
  • TODO: swap still not setup on curie, see zfs
  • TODO: document this somewhere: bpool and rpool are both pools and datasets. that's pretty confusing, but also very useful because it allows for pool-wide recursive snapshots, which are used for the backup system

fio improvements I really want to improve my experience with fio. Right now, I'm just cargo-culting stuff from other folks and I don't really like it. stressant is a good example of my struggles, in the sense that it doesn't really work that well for disk tests. I would love to have just a single .fio job file that lists multiple jobs to run serially. For example, this file describes the above workload pretty well:
[global]
# cargo-culting Salter
fallocate=none
ioengine=posixaio
runtime=60
time_based=1
end_fsync=1
stonewall=1
group_reporting=1
# no need to drop caches, done by default
# invalidate=1
# Single 4KiB random read/write process
[randread-4k-4g-1x]
rw=randread
bs=4k
size=4g
numjobs=1
iodepth=1
[randwrite-4k-4g-1x]
rw=randwrite
bs=4k
size=4g
numjobs=1
iodepth=1
# 16 parallel 64KiB random read/write processes:
[randread-64k-256m-16x]
rw=randread
bs=64k
size=256m
numjobs=16
iodepth=16
[randwrite-64k-256m-16x]
rw=randwrite
bs=64k
size=256m
numjobs=16
iodepth=16
# Single 1MiB random read/write process
[randread-1m-16g-1x]
rw=randread
bs=1m
size=16g
numjobs=1
iodepth=1
[randwrite-1m-16g-1x]
rw=randwrite
bs=1m
size=16g
numjobs=1
iodepth=1
... except the jobs are actually started in parallel, even though they are stonewall'd, as far as I can tell by the reports. I sent a mail to the fio mailing list for clarification. It looks like the jobs are started in parallel, but actual (correctly) run serially. It seems like this might just be a matter of reporting the right timestamps in the end, although it does feel like starting all the processes (even if not doing any work yet) could skew the results.

Hangs during procedure During the procedure, it happened a few times where any ZFS command would completely hang. It seems that using an external USB drive to sync stuff didn't work so well: sometimes it would reconnect under a different device (from sdc to sdd, for example), and this would greatly confuse ZFS. Here, for example, is sdd reappearing out of the blue:
May 19 11:22:53 curie kernel: [  699.820301] scsi host4: uas
May 19 11:22:53 curie kernel: [  699.820544] usb 2-1: authorized to connect
May 19 11:22:53 curie kernel: [  699.922433] scsi 4:0:0:0: Direct-Access     ROG      ESD-S1C          0    PQ: 0 ANSI: 6
May 19 11:22:53 curie kernel: [  699.923235] sd 4:0:0:0: Attached scsi generic sg2 type 0
May 19 11:22:53 curie kernel: [  699.923676] sd 4:0:0:0: [sdd] 1953525168 512-byte logical blocks: (1.00 TB/932 GiB)
May 19 11:22:53 curie kernel: [  699.923788] sd 4:0:0:0: [sdd] Write Protect is off
May 19 11:22:53 curie kernel: [  699.923949] sd 4:0:0:0: [sdd] Write cache: enabled, read cache: enabled, doesn't support DPO or FUA
May 19 11:22:53 curie kernel: [  699.924149] sd 4:0:0:0: [sdd] Optimal transfer size 33553920 bytes
May 19 11:22:53 curie kernel: [  699.961602]  sdd: sdd1 sdd2 sdd3 sdd4
May 19 11:22:53 curie kernel: [  699.996083] sd 4:0:0:0: [sdd] Attached SCSI disk
Next time I run a ZFS command (say zpool list), the command completely hangs (D state) and this comes up in the logs:
May 19 11:34:21 curie kernel: [ 1387.914843] zio pool=bpool vdev=/dev/sdc3 error=5 type=2 offset=71344128 size=4096 flags=184880
May 19 11:34:21 curie kernel: [ 1387.914859] zio pool=bpool vdev=/dev/sdc3 error=5 type=2 offset=205565952 size=4096 flags=184880
May 19 11:34:21 curie kernel: [ 1387.914874] zio pool=bpool vdev=/dev/sdc3 error=5 type=2 offset=272789504 size=4096 flags=184880
May 19 11:34:21 curie kernel: [ 1387.914906] zio pool=bpool vdev=/dev/sdc3 error=5 type=1 offset=270336 size=8192 flags=b08c1
May 19 11:34:21 curie kernel: [ 1387.914932] zio pool=bpool vdev=/dev/sdc3 error=5 type=1 offset=1073225728 size=8192 flags=b08c1
May 19 11:34:21 curie kernel: [ 1387.914948] zio pool=bpool vdev=/dev/sdc3 error=5 type=1 offset=1073487872 size=8192 flags=b08c1
May 19 11:34:21 curie kernel: [ 1387.915165] zio pool=bpool vdev=/dev/sdc3 error=5 type=2 offset=272793600 size=4096 flags=184880
May 19 11:34:21 curie kernel: [ 1387.915183] zio pool=bpool vdev=/dev/sdc3 error=5 type=2 offset=339853312 size=4096 flags=184880
May 19 11:34:21 curie kernel: [ 1387.915648] WARNING: Pool 'bpool' has encountered an uncorrectable I/O failure and has been suspended.
May 19 11:34:21 curie kernel: [ 1387.915648] 
May 19 11:37:25 curie kernel: [ 1571.558614] task:txg_sync        state:D stack:    0 pid:  997 ppid:     2 flags:0x00004000
May 19 11:37:25 curie kernel: [ 1571.558623] Call Trace:
May 19 11:37:25 curie kernel: [ 1571.558640]  __schedule+0x282/0x870
May 19 11:37:25 curie kernel: [ 1571.558650]  schedule+0x46/0xb0
May 19 11:37:25 curie kernel: [ 1571.558670]  schedule_timeout+0x8b/0x140
May 19 11:37:25 curie kernel: [ 1571.558675]  ? __next_timer_interrupt+0x110/0x110
May 19 11:37:25 curie kernel: [ 1571.558678]  io_schedule_timeout+0x4c/0x80
May 19 11:37:25 curie kernel: [ 1571.558689]  __cv_timedwait_common+0x12b/0x160 [spl]
May 19 11:37:25 curie kernel: [ 1571.558694]  ? add_wait_queue_exclusive+0x70/0x70
May 19 11:37:25 curie kernel: [ 1571.558702]  __cv_timedwait_io+0x15/0x20 [spl]
May 19 11:37:25 curie kernel: [ 1571.558816]  zio_wait+0x129/0x2b0 [zfs]
May 19 11:37:25 curie kernel: [ 1571.558929]  dsl_pool_sync+0x461/0x4f0 [zfs]
May 19 11:37:25 curie kernel: [ 1571.559032]  spa_sync+0x575/0xfa0 [zfs]
May 19 11:37:25 curie kernel: [ 1571.559138]  ? spa_txg_history_init_io+0x101/0x110 [zfs]
May 19 11:37:25 curie kernel: [ 1571.559245]  txg_sync_thread+0x2e0/0x4a0 [zfs]
May 19 11:37:25 curie kernel: [ 1571.559354]  ? txg_fini+0x240/0x240 [zfs]
May 19 11:37:25 curie kernel: [ 1571.559366]  thread_generic_wrapper+0x6f/0x80 [spl]
May 19 11:37:25 curie kernel: [ 1571.559376]  ? __thread_exit+0x20/0x20 [spl]
May 19 11:37:25 curie kernel: [ 1571.559379]  kthread+0x11b/0x140
May 19 11:37:25 curie kernel: [ 1571.559382]  ? __kthread_bind_mask+0x60/0x60
May 19 11:37:25 curie kernel: [ 1571.559386]  ret_from_fork+0x22/0x30
May 19 11:37:25 curie kernel: [ 1571.559401] task:zed             state:D stack:    0 pid: 1564 ppid:     1 flags:0x00000000
May 19 11:37:25 curie kernel: [ 1571.559404] Call Trace:
May 19 11:37:25 curie kernel: [ 1571.559409]  __schedule+0x282/0x870
May 19 11:37:25 curie kernel: [ 1571.559412]  ? __kmalloc_node+0x141/0x2b0
May 19 11:37:25 curie kernel: [ 1571.559417]  schedule+0x46/0xb0
May 19 11:37:25 curie kernel: [ 1571.559420]  schedule_preempt_disabled+0xa/0x10
May 19 11:37:25 curie kernel: [ 1571.559424]  __mutex_lock.constprop.0+0x133/0x460
May 19 11:37:25 curie kernel: [ 1571.559435]  ? nvlist_xalloc.part.0+0x68/0xc0 [znvpair]
May 19 11:37:25 curie kernel: [ 1571.559537]  spa_all_configs+0x41/0x120 [zfs]
May 19 11:37:25 curie kernel: [ 1571.559644]  zfs_ioc_pool_configs+0x17/0x70 [zfs]
May 19 11:37:25 curie kernel: [ 1571.559752]  zfsdev_ioctl_common+0x697/0x870 [zfs]
May 19 11:37:25 curie kernel: [ 1571.559758]  ? _copy_from_user+0x28/0x60
May 19 11:37:25 curie kernel: [ 1571.559860]  zfsdev_ioctl+0x53/0xe0 [zfs]
May 19 11:37:25 curie kernel: [ 1571.559866]  __x64_sys_ioctl+0x83/0xb0
May 19 11:37:25 curie kernel: [ 1571.559869]  do_syscall_64+0x33/0x80
May 19 11:37:25 curie kernel: [ 1571.559873]  entry_SYSCALL_64_after_hwframe+0x44/0xa9
May 19 11:37:25 curie kernel: [ 1571.559876] RIP: 0033:0x7fcf0ef32cc7
May 19 11:37:25 curie kernel: [ 1571.559878] RSP: 002b:00007fcf0e181618 EFLAGS: 00000246 ORIG_RAX: 0000000000000010
May 19 11:37:25 curie kernel: [ 1571.559881] RAX: ffffffffffffffda RBX: 000055b212f972a0 RCX: 00007fcf0ef32cc7
May 19 11:37:25 curie kernel: [ 1571.559883] RDX: 00007fcf0e181640 RSI: 0000000000005a04 RDI: 000000000000000b
May 19 11:37:25 curie kernel: [ 1571.559885] RBP: 00007fcf0e184c30 R08: 00007fcf08016810 R09: 00007fcf08000080
May 19 11:37:25 curie kernel: [ 1571.559886] R10: 0000000000080000 R11: 0000000000000246 R12: 000055b212f972a0
May 19 11:37:25 curie kernel: [ 1571.559888] R13: 0000000000000000 R14: 00007fcf0e181640 R15: 0000000000000000
May 19 11:37:25 curie kernel: [ 1571.559980] task:zpool           state:D stack:    0 pid:11815 ppid:  3816 flags:0x00004000
May 19 11:37:25 curie kernel: [ 1571.559983] Call Trace:
May 19 11:37:25 curie kernel: [ 1571.559988]  __schedule+0x282/0x870
May 19 11:37:25 curie kernel: [ 1571.559992]  schedule+0x46/0xb0
May 19 11:37:25 curie kernel: [ 1571.559995]  io_schedule+0x42/0x70
May 19 11:37:25 curie kernel: [ 1571.560004]  cv_wait_common+0xac/0x130 [spl]
May 19 11:37:25 curie kernel: [ 1571.560008]  ? add_wait_queue_exclusive+0x70/0x70
May 19 11:37:25 curie kernel: [ 1571.560118]  txg_wait_synced_impl+0xc9/0x110 [zfs]
May 19 11:37:25 curie kernel: [ 1571.560223]  txg_wait_synced+0xc/0x40 [zfs]
May 19 11:37:25 curie kernel: [ 1571.560325]  spa_export_common+0x4cd/0x590 [zfs]
May 19 11:37:25 curie kernel: [ 1571.560430]  ? zfs_log_history+0x9c/0xf0 [zfs]
May 19 11:37:25 curie kernel: [ 1571.560537]  zfsdev_ioctl_common+0x697/0x870 [zfs]
May 19 11:37:25 curie kernel: [ 1571.560543]  ? _copy_from_user+0x28/0x60
May 19 11:37:25 curie kernel: [ 1571.560644]  zfsdev_ioctl+0x53/0xe0 [zfs]
May 19 11:37:25 curie kernel: [ 1571.560649]  __x64_sys_ioctl+0x83/0xb0
May 19 11:37:25 curie kernel: [ 1571.560653]  do_syscall_64+0x33/0x80
May 19 11:37:25 curie kernel: [ 1571.560656]  entry_SYSCALL_64_after_hwframe+0x44/0xa9
May 19 11:37:25 curie kernel: [ 1571.560659] RIP: 0033:0x7fdc23be2cc7
May 19 11:37:25 curie kernel: [ 1571.560661] RSP: 002b:00007ffc8c792478 EFLAGS: 00000246 ORIG_RAX: 0000000000000010
May 19 11:37:25 curie kernel: [ 1571.560664] RAX: ffffffffffffffda RBX: 000055942ca49e20 RCX: 00007fdc23be2cc7
May 19 11:37:25 curie kernel: [ 1571.560666] RDX: 00007ffc8c792490 RSI: 0000000000005a03 RDI: 0000000000000003
May 19 11:37:25 curie kernel: [ 1571.560667] RBP: 00007ffc8c795e80 R08: 00000000ffffffff R09: 00007ffc8c792310
May 19 11:37:25 curie kernel: [ 1571.560669] R10: 000055942ca49e30 R11: 0000000000000246 R12: 00007ffc8c792490
May 19 11:37:25 curie kernel: [ 1571.560671] R13: 000055942ca49e30 R14: 000055942aed2c20 R15: 00007ffc8c795a40
Here's another example, where you see the USB controller bleeping out and back into existence:
mai 19 11:38:39 curie kernel: usb 2-1: USB disconnect, device number 2
mai 19 11:38:39 curie kernel: sd 4:0:0:0: [sdd] Synchronizing SCSI cache
mai 19 11:38:39 curie kernel: sd 4:0:0:0: [sdd] Synchronize Cache(10) failed: Result: hostbyte=DID_ERROR driverbyte=DRIVER_OK
mai 19 11:39:25 curie kernel: INFO: task zed:1564 blocked for more than 241 seconds.
mai 19 11:39:25 curie kernel:       Tainted: P          IOE     5.10.0-14-amd64 #1 Debian 5.10.113-1
mai 19 11:39:25 curie kernel: "echo 0 > /proc/sys/kernel/hung_task_timeout_secs" disables this message.
mai 19 11:39:25 curie kernel: task:zed             state:D stack:    0 pid: 1564 ppid:     1 flags:0x00000000
mai 19 11:39:25 curie kernel: Call Trace:
mai 19 11:39:25 curie kernel:  __schedule+0x282/0x870
mai 19 11:39:25 curie kernel:  ? __kmalloc_node+0x141/0x2b0
mai 19 11:39:25 curie kernel:  schedule+0x46/0xb0
mai 19 11:39:25 curie kernel:  schedule_preempt_disabled+0xa/0x10
mai 19 11:39:25 curie kernel:  __mutex_lock.constprop.0+0x133/0x460
mai 19 11:39:25 curie kernel:  ? nvlist_xalloc.part.0+0x68/0xc0 [znvpair]
mai 19 11:39:25 curie kernel:  spa_all_configs+0x41/0x120 [zfs]
mai 19 11:39:25 curie kernel:  zfs_ioc_pool_configs+0x17/0x70 [zfs]
mai 19 11:39:25 curie kernel:  zfsdev_ioctl_common+0x697/0x870 [zfs]
mai 19 11:39:25 curie kernel:  ? _copy_from_user+0x28/0x60
mai 19 11:39:25 curie kernel:  zfsdev_ioctl+0x53/0xe0 [zfs]
mai 19 11:39:25 curie kernel:  __x64_sys_ioctl+0x83/0xb0
mai 19 11:39:25 curie kernel:  do_syscall_64+0x33/0x80
mai 19 11:39:25 curie kernel:  entry_SYSCALL_64_after_hwframe+0x44/0xa9
mai 19 11:39:25 curie kernel: RIP: 0033:0x7fcf0ef32cc7
mai 19 11:39:25 curie kernel: RSP: 002b:00007fcf0e181618 EFLAGS: 00000246 ORIG_RAX: 0000000000000010
mai 19 11:39:25 curie kernel: RAX: ffffffffffffffda RBX: 000055b212f972a0 RCX: 00007fcf0ef32cc7
mai 19 11:39:25 curie kernel: RDX: 00007fcf0e181640 RSI: 0000000000005a04 RDI: 000000000000000b
mai 19 11:39:25 curie kernel: RBP: 00007fcf0e184c30 R08: 00007fcf08016810 R09: 00007fcf08000080
mai 19 11:39:25 curie kernel: R10: 0000000000080000 R11: 0000000000000246 R12: 000055b212f972a0
mai 19 11:39:25 curie kernel: R13: 0000000000000000 R14: 00007fcf0e181640 R15: 0000000000000000
mai 19 11:39:25 curie kernel: INFO: task zpool:11815 blocked for more than 241 seconds.
mai 19 11:39:25 curie kernel:       Tainted: P          IOE     5.10.0-14-amd64 #1 Debian 5.10.113-1
mai 19 11:39:25 curie kernel: "echo 0 > /proc/sys/kernel/hung_task_timeout_secs" disables this message.
mai 19 11:39:25 curie kernel: task:zpool           state:D stack:    0 pid:11815 ppid:  2621 flags:0x00004004
mai 19 11:39:25 curie kernel: Call Trace:
mai 19 11:39:25 curie kernel:  __schedule+0x282/0x870
mai 19 11:39:25 curie kernel:  schedule+0x46/0xb0
mai 19 11:39:25 curie kernel:  io_schedule+0x42/0x70
mai 19 11:39:25 curie kernel:  cv_wait_common+0xac/0x130 [spl]
mai 19 11:39:25 curie kernel:  ? add_wait_queue_exclusive+0x70/0x70
mai 19 11:39:25 curie kernel:  txg_wait_synced_impl+0xc9/0x110 [zfs]
mai 19 11:39:25 curie kernel:  txg_wait_synced+0xc/0x40 [zfs]
mai 19 11:39:25 curie kernel:  spa_export_common+0x4cd/0x590 [zfs]
mai 19 11:39:25 curie kernel:  ? zfs_log_history+0x9c/0xf0 [zfs]
mai 19 11:39:25 curie kernel:  zfsdev_ioctl_common+0x697/0x870 [zfs]
mai 19 11:39:25 curie kernel:  ? _copy_from_user+0x28/0x60
mai 19 11:39:25 curie kernel:  zfsdev_ioctl+0x53/0xe0 [zfs]
mai 19 11:39:25 curie kernel:  __x64_sys_ioctl+0x83/0xb0
mai 19 11:39:25 curie kernel:  do_syscall_64+0x33/0x80
mai 19 11:39:25 curie kernel:  entry_SYSCALL_64_after_hwframe+0x44/0xa9
mai 19 11:39:25 curie kernel: RIP: 0033:0x7fdc23be2cc7
mai 19 11:39:25 curie kernel: RSP: 002b:00007ffc8c792478 EFLAGS: 00000246 ORIG_RAX: 0000000000000010
mai 19 11:39:25 curie kernel: RAX: ffffffffffffffda RBX: 000055942ca49e20 RCX: 00007fdc23be2cc7
mai 19 11:39:25 curie kernel: RDX: 00007ffc8c792490 RSI: 0000000000005a03 RDI: 0000000000000003
mai 19 11:39:25 curie kernel: RBP: 00007ffc8c795e80 R08: 00000000ffffffff R09: 00007ffc8c792310
mai 19 11:39:25 curie kernel: R10: 000055942ca49e30 R11: 0000000000000246 R12: 00007ffc8c792490
mai 19 11:39:25 curie kernel: R13: 000055942ca49e30 R14: 000055942aed2c20 R15: 00007ffc8c795a40
I understand those are rather extreme conditions: I would fully expect the pool to stop working if the underlying drives disappear. What doesn't seem acceptable is that a command would completely hang like this.

References See the zfs documentation for more information about ZFS, and tubman for another installation and migration procedure.

5 November 2022

Anuradha Weeraman: Getting started with Linkerd

If you ve done anything in the Kubernetes space in recent years, you ve most likely come across the words Service Mesh . It s backed by a set of mature technologies that provides cross-cutting networking, security, infrastructure capabilities to be used by workloads running in Kubernetes in a manner that is transparent to the actual workload. This abstraction enables application developers to not worry about building in otherwise sophisticated capabilities for networking, routing, circuit-breaking and security, and simply rely on the services offered by the service mesh.In this post, I ll be covering Linkerd, which is an alternative to Istio. It has gone through a significant re-write when it transitioned from the JVM to a Go-based Control Plane and a Rust-based Data Plane a few years back and is now a part of the CNCF and is backed by Buoyant. It has proven itself widely for use in production workloads and has a healthy community and release cadence.It achieves this with a side-car container that communicates with a Linkerd control plane that allows central management of policy, telemetry, mutual TLS, traffic routing, shaping, retries, load balancing, circuit-breaking and other cross-cutting concerns before the traffic hits the container. This has made the task of implementing the application services much simpler as it is managed by container orchestrator and service mesh. I covered Istio in a prior post a few years back, and much of the content is still applicable for this post, if you d like to have a look.Here are the broad architectural components of Linkerd:
The components are separated into the control plane and the data plane.The control plane components live in its own namespace and consists of a controller that the Linkerd CLI interacts with via the Kubernetes API. The destination service is used for service discovery, TLS identity, policy on access control for inter-service communication and service profile information on routing, retries, timeouts. The identity service acts as the Certificate Authority which responds to Certificate Signing Requests (CSRs) from proxies for initialization and for service-to-service encrypted traffic. The proxy injector is an admission webhook that injects the Linkerd proxy side car and the init container automatically into a pod when the linkerd.io/inject: enabled is available on the namespace or workload.On the data plane side are two components. First, the init container, which is responsible for automatically forwarding incoming and outgoing traffic through the Linkerd proxy via iptables rules. Second, the Linkerd proxy, which is a lightweight micro-proxy written in Rust, is the data plane itself.I will be walking you through the setup of Linkerd (2.12.2 at the time of writing) on a Kubernetes cluster.Let s see what s running on the cluster currently. This assumes you have a cluster running and kubectl is installed and available on the PATH.
$ kubectl get pods -A
NAMESPACE NAME READY STATUS RESTARTS AGE
kube-system calico-kube-controllers-59697b644f-7fsln 1/1 Running 2 (119m ago) 7d
kube-system calico-node-6ptsh 1/1 Running 2 (119m ago) 7d
kube-system calico-node-7x5j8 1/1 Running 2 (119m ago) 7d
kube-system calico-node-qlnf6 1/1 Running 2 (119m ago) 7d
kube-system coredns-565d847f94-79jlw 1/1 Running 2 (119m ago) 7d
kube-system coredns-565d847f94-fqwn4 1/1 Running 2 (119m ago) 7d
kube-system etcd-k8s-master 1/1 Running 2 (119m ago) 7d
kube-system kube-apiserver-k8s-master 1/1 Running 2 (119m ago) 7d
kube-system kube-controller-manager-k8s-master 1/1 Running 2 (119m ago) 7d
kube-system kube-proxy-4n9b7 1/1 Running 2 (119m ago) 7d
kube-system kube-proxy-k4rzv 1/1 Running 2 (119m ago) 7d
kube-system kube-proxy-lz2dd 1/1 Running 2 (119m ago) 7d
kube-system kube-scheduler-k8s-master 1/1 Running 2 (119m ago) 7d
The first step would be to setup the Linkerd CLI:
$ curl --proto '=https' --tlsv1.2 -sSfL https://run.linkerd.io/install   sh
On most systems, this should be sufficient to setup the CLI. You may need to restart your terminal to load the updated paths. If you have a non-standard configuration and linkerd is not found after the installation, add the following to your PATH to be able to find the cli:
export PATH=$PATH:~/.linkerd2/bin/
At this point, checking the version would give you the following:
$ linkerd version
Client version: stable-2.12.2
Server version: unavailable
Setting up Linkerd Control PlaneBefore installing Linkerd on the cluster, run the following step to check the cluster for pre-requisites:
$ linkerd check --pre
Linkerd core checks
===================
kubernetes-api
--------------
can initialize the client
can query the Kubernetes API
kubernetes-version
------------------
is running the minimum Kubernetes API version
is running the minimum kubectl version
pre-kubernetes-setup
--------------------
control plane namespace does not already exist
can create non-namespaced resources
can create ServiceAccounts
can create Services
can create Deployments
can create CronJobs
can create ConfigMaps
can create Secrets
can read Secrets
can read extension-apiserver-authentication configmap
no clock skew detected
linkerd-version
---------------
can determine the latest version
cli is up-to-date
Status check results are  
All the pre-requisites appear to be good right now, and so installation can proceed.The first step of the installation is to setup the Custom Resource Definitions (CRDs) that Linkerd requires. The linkerd cli only prints the resource YAMLs to standard output and does not create them directly in Kubernetes, so you would need to pipe the output to kubectl apply to create the resources in the cluster that you re working with.
$ linkerd install --crds   kubectl apply -f -
Rendering Linkerd CRDs...
Next, run linkerd install kubectl apply -f - to install the control plane.
customresourcedefinition.apiextensions.k8s.io/authorizationpolicies.policy.linkerd.io created
customresourcedefinition.apiextensions.k8s.io/httproutes.policy.linkerd.io created
customresourcedefinition.apiextensions.k8s.io/meshtlsauthentications.policy.linkerd.io created
customresourcedefinition.apiextensions.k8s.io/networkauthentications.policy.linkerd.io created
customresourcedefinition.apiextensions.k8s.io/serverauthorizations.policy.linkerd.io created
customresourcedefinition.apiextensions.k8s.io/servers.policy.linkerd.io created
customresourcedefinition.apiextensions.k8s.io/serviceprofiles.linkerd.io created
Next, install the Linkerd control plane components in the same manner, this time without the crds switch:
$ linkerd install   kubectl apply -f -       
namespace/linkerd created
clusterrole.rbac.authorization.k8s.io/linkerd-linkerd-identity created
clusterrolebinding.rbac.authorization.k8s.io/linkerd-linkerd-identity created
serviceaccount/linkerd-identity created
clusterrole.rbac.authorization.k8s.io/linkerd-linkerd-destination created
clusterrolebinding.rbac.authorization.k8s.io/linkerd-linkerd-destination created
serviceaccount/linkerd-destination created
secret/linkerd-sp-validator-k8s-tls created
validatingwebhookconfiguration.admissionregistration.k8s.io/linkerd-sp-validator-webhook-config created
secret/linkerd-policy-validator-k8s-tls created
validatingwebhookconfiguration.admissionregistration.k8s.io/linkerd-policy-validator-webhook-config created
clusterrole.rbac.authorization.k8s.io/linkerd-policy created
clusterrolebinding.rbac.authorization.k8s.io/linkerd-destination-policy created
role.rbac.authorization.k8s.io/linkerd-heartbeat created
rolebinding.rbac.authorization.k8s.io/linkerd-heartbeat created
clusterrole.rbac.authorization.k8s.io/linkerd-heartbeat created
clusterrolebinding.rbac.authorization.k8s.io/linkerd-heartbeat created
serviceaccount/linkerd-heartbeat created
clusterrole.rbac.authorization.k8s.io/linkerd-linkerd-proxy-injector created
clusterrolebinding.rbac.authorization.k8s.io/linkerd-linkerd-proxy-injector created
serviceaccount/linkerd-proxy-injector created
secret/linkerd-proxy-injector-k8s-tls created
mutatingwebhookconfiguration.admissionregistration.k8s.io/linkerd-proxy-injector-webhook-config created
configmap/linkerd-config created
secret/linkerd-identity-issuer created
configmap/linkerd-identity-trust-roots created
service/linkerd-identity created
service/linkerd-identity-headless created
deployment.apps/linkerd-identity created
service/linkerd-dst created
service/linkerd-dst-headless created
service/linkerd-sp-validator created
service/linkerd-policy created
service/linkerd-policy-validator created
deployment.apps/linkerd-destination created
cronjob.batch/linkerd-heartbeat created
deployment.apps/linkerd-proxy-injector created
service/linkerd-proxy-injector created
secret/linkerd-config-overrides created
Kubernetes will start spinning up the data plane components and you should see the following when you list the pods:
$ kubectl get pods -A
...
linkerd linkerd-destination-67b9cc8749-xqcbx 4/4 Running 0 69s
linkerd linkerd-identity-59b46789cc-ntfcx 2/2 Running 0 69s
linkerd linkerd-proxy-injector-7fc85556bf-vnvw6 1/2 Running 0 69s
The components are running in the new linkerd namespace.To verify the setup, run a check:
$ linkerd check
Linkerd core checks
===================
kubernetes-api
--------------
can initialize the client
can query the Kubernetes API
kubernetes-version
------------------
is running the minimum Kubernetes API version
is running the minimum kubectl version
linkerd-existence
-----------------
'linkerd-config' config map exists
heartbeat ServiceAccount exist
control plane replica sets are ready
no unschedulable pods
control plane pods are ready
cluster networks contains all pods
cluster networks contains all services
linkerd-config
--------------
control plane Namespace exists
control plane ClusterRoles exist
control plane ClusterRoleBindings exist
control plane ServiceAccounts exist
control plane CustomResourceDefinitions exist
control plane MutatingWebhookConfigurations exist
control plane ValidatingWebhookConfigurations exist
proxy-init container runs as root user if docker container runtime is used
linkerd-identity
----------------
certificate config is valid
trust anchors are using supported crypto algorithm
trust anchors are within their validity period
trust anchors are valid for at least 60 days
issuer cert is using supported crypto algorithm
issuer cert is within its validity period
issuer cert is valid for at least 60 days
issuer cert is issued by the trust anchor
linkerd-webhooks-and-apisvc-tls
-------------------------------
proxy-injector webhook has valid cert
proxy-injector cert is valid for at least 60 days
sp-validator webhook has valid cert
sp-validator cert is valid for at least 60 days
policy-validator webhook has valid cert
policy-validator cert is valid for at least 60 days
linkerd-version
---------------
can determine the latest version
cli is up-to-date
control-plane-version
---------------------
can retrieve the control plane version
control plane is up-to-date
control plane and cli versions match
linkerd-control-plane-proxy
---------------------------
control plane proxies are healthy
control plane proxies are up-to-date
control plane proxies and cli versions match
Status check results are  
Everything looks good.Setting up the Viz ExtensionAt this point, the required components for the service mesh are setup, but let s also install the viz extension, which provides a good visualization capabilities that will come in handy subsequently. Once again, linkerd uses the same pattern for installing the extension.
$ linkerd viz install   kubectl apply -f -
namespace/linkerd-viz created
clusterrole.rbac.authorization.k8s.io/linkerd-linkerd-viz-metrics-api created
clusterrolebinding.rbac.authorization.k8s.io/linkerd-linkerd-viz-metrics-api created
serviceaccount/metrics-api created
clusterrole.rbac.authorization.k8s.io/linkerd-linkerd-viz-prometheus created
clusterrolebinding.rbac.authorization.k8s.io/linkerd-linkerd-viz-prometheus created
serviceaccount/prometheus created
clusterrole.rbac.authorization.k8s.io/linkerd-linkerd-viz-tap created
clusterrole.rbac.authorization.k8s.io/linkerd-linkerd-viz-tap-admin created
clusterrolebinding.rbac.authorization.k8s.io/linkerd-linkerd-viz-tap created
clusterrolebinding.rbac.authorization.k8s.io/linkerd-linkerd-viz-tap-auth-delegator created
serviceaccount/tap created
rolebinding.rbac.authorization.k8s.io/linkerd-linkerd-viz-tap-auth-reader created
secret/tap-k8s-tls created
apiservice.apiregistration.k8s.io/v1alpha1.tap.linkerd.io created
role.rbac.authorization.k8s.io/web created
rolebinding.rbac.authorization.k8s.io/web created
clusterrole.rbac.authorization.k8s.io/linkerd-linkerd-viz-web-check created
clusterrolebinding.rbac.authorization.k8s.io/linkerd-linkerd-viz-web-check created
clusterrolebinding.rbac.authorization.k8s.io/linkerd-linkerd-viz-web-admin created
clusterrole.rbac.authorization.k8s.io/linkerd-linkerd-viz-web-api created
clusterrolebinding.rbac.authorization.k8s.io/linkerd-linkerd-viz-web-api created
serviceaccount/web created
server.policy.linkerd.io/admin created
authorizationpolicy.policy.linkerd.io/admin created
networkauthentication.policy.linkerd.io/kubelet created
server.policy.linkerd.io/proxy-admin created
authorizationpolicy.policy.linkerd.io/proxy-admin created
service/metrics-api created
deployment.apps/metrics-api created
server.policy.linkerd.io/metrics-api created
authorizationpolicy.policy.linkerd.io/metrics-api created
meshtlsauthentication.policy.linkerd.io/metrics-api-web created
configmap/prometheus-config created
service/prometheus created
deployment.apps/prometheus created
service/tap created
deployment.apps/tap created
server.policy.linkerd.io/tap-api created
authorizationpolicy.policy.linkerd.io/tap created
clusterrole.rbac.authorization.k8s.io/linkerd-tap-injector created
clusterrolebinding.rbac.authorization.k8s.io/linkerd-tap-injector created
serviceaccount/tap-injector created
secret/tap-injector-k8s-tls created
mutatingwebhookconfiguration.admissionregistration.k8s.io/linkerd-tap-injector-webhook-config created
service/tap-injector created
deployment.apps/tap-injector created
server.policy.linkerd.io/tap-injector-webhook created
authorizationpolicy.policy.linkerd.io/tap-injector created
networkauthentication.policy.linkerd.io/kube-api-server created
service/web created
deployment.apps/web created
serviceprofile.linkerd.io/metrics-api.linkerd-viz.svc.cluster.local created
serviceprofile.linkerd.io/prometheus.linkerd-viz.svc.cluster.local created
A few seconds later, you should see the following in your pod list:
$ kubectl get pods -A
...
linkerd-viz prometheus-b5865f776-w5ssf 1/2 Running 0 35s
linkerd-viz tap-64f5c8597b-rqgbk 2/2 Running 0 35s
linkerd-viz tap-injector-7c75cfff4c-wl9mx 2/2 Running 0 34s
linkerd-viz web-8c444745-jhzr5 2/2 Running 0 34s
The viz components live in the linkerd-viz namespace.You can now checkout the viz dashboard:
$ linkerd viz dashboard
Linkerd dashboard available at:
http://localhost:50750
Grafana dashboard available at:
http://localhost:50750/grafana
Opening Linkerd dashboard in the default browser
Opening in existing browser session.
The Meshed column indicates the workload that is currently integrated with the Linkerd control plane. As you can see, there are no application deployments right now that are running.Injecting the Linkerd Data Plane componentsThere are two ways to integrate Linkerd to the application containers:1 by manually injecting the Linkerd data plane components
2 by instructing Kubernetes to automatically inject the data plane componentsInject Linkerd data plane manuallyLet s try the first option. Below is a simple nginx-app that I will deploy into the cluster:
$ cat deploy.yaml 
apiVersion: apps/v1
kind: Deployment
metadata:
name: nginx-deployment
spec:
selector:
matchLabels:
app: nginx
replicas: 2
template:
metadata:
labels:
app: nginx
spec:
containers:
- name: nginx
image: nginx:latest
ports:
- containerPort: 80
$ kubectl apply -f deploy.yaml
Back in the viz dashboard, I do see the workload deployed, but it isn t currently communicating with the Linkerd control plane, and so doesn t show any metrics, and the Meshed count is 0:
Looking at the Pod s deployment YAML, I can see that it only includes the nginx container:
$ kubectl get pod nginx-deployment-cd55c47f5-cgxw2 -o yaml
apiVersion: v1
kind: Pod
metadata:
annotations:
cni.projectcalico.org/containerID: aee0295dda906f7935ce5c150ae30360005f5330e98c75a550b7cc0d1532f529
cni.projectcalico.org/podIP: 172.16.36.89/32
cni.projectcalico.org/podIPs: 172.16.36.89/32
creationTimestamp: "2022-11-05T19:35:12Z"
generateName: nginx-deployment-cd55c47f5-
labels:
app: nginx
pod-template-hash: cd55c47f5
name: nginx-deployment-cd55c47f5-cgxw2
namespace: default
ownerReferences:
- apiVersion: apps/v1
blockOwnerDeletion: true
controller: true
kind: ReplicaSet
name: nginx-deployment-cd55c47f5
uid: b604f5c4-f662-4333-aaa0-bd1a2b8b08c6
resourceVersion: "22979"
uid: 8fe30214-491b-4753-9fb2-485b6341376c
spec:
containers:
- image: nginx:latest
imagePullPolicy: Always
name: nginx
ports:
- containerPort: 80
protocol: TCP
resources:
terminationMessagePath: /dev/termination-log
terminationMessagePolicy: File
volumeMounts:
- mountPath: /var/run/secrets/kubernetes.io/serviceaccount
name: kube-api-access-2bt6z
readOnly: true
dnsPolicy: ClusterFirst
enableServiceLinks: true
nodeName: k8s-node1
preemptionPolicy: PreemptLowerPriority
priority: 0
restartPolicy: Always
schedulerName: default-scheduler
securityContext:
serviceAccount: default
serviceAccountName: default
terminationGracePeriodSeconds: 30
tolerations:
- effect: NoExecute
key: node.kubernetes.io/not-ready
operator: Exists
tolerationSeconds: 300
- effect: NoExecute
key: node.kubernetes.io/unreachable
operator: Exists
tolerationSeconds: 300
volumes:
- name: kube-api-access-2bt6z
projected:
defaultMode: 420
sources:
- serviceAccountToken:
expirationSeconds: 3607
path: token
- configMap:
items:
- key: ca.crt
path: ca.crt
name: kube-root-ca.crt
- downwardAPI:
items:
- fieldRef:
apiVersion: v1
fieldPath: metadata.namespace
path: namespace
status:
conditions:
- lastProbeTime: null
lastTransitionTime: "2022-11-05T19:35:12Z"
status: "True"
type: Initialized
- lastProbeTime: null
lastTransitionTime: "2022-11-05T19:35:16Z"
status: "True"
type: Ready
- lastProbeTime: null
lastTransitionTime: "2022-11-05T19:35:16Z"
status: "True"
type: ContainersReady
- lastProbeTime: null
lastTransitionTime: "2022-11-05T19:35:13Z"
status: "True"
type: PodScheduled
containerStatuses:
- containerID: containerd://f088f200315b44cbeed16499aba9b2d1396f9f81645e53b032d4bfa44166128a
image: docker.io/library/nginx:latest
imageID: docker.io/library/nginx@sha256:943c25b4b66b332184d5ba6bb18234273551593016c0e0ae906bab111548239f
lastState:
name: nginx
ready: true
restartCount: 0
started: true
state:
running:
startedAt: "2022-11-05T19:35:15Z"
hostIP: 192.168.2.216
phase: Running
podIP: 172.16.36.89
podIPs:
- ip: 172.16.36.89
qosClass: BestEffort
startTime: "2022-11-05T19:35:12Z"
Let s directly inject the linkerd data plane into this running container. We do this by retrieving the YAML of the deployment, piping it to linkerd cli to inject the necessary components and then piping to kubectl apply the changed resources.
$ kubectl get deploy nginx-deployment -o yaml   linkerd inject -   kubectl apply -f -
deployment "nginx-deployment" injected
deployment.apps/nginx-deployment configured
Back in the viz dashboard, the workload now is integrated into Linkerd control plane.
Looking at the updated Pod definition, we see a number of changes that the linkerd has injected that allows it to integrate with the control plane. Let s have a look:
$ kubectl get pod nginx-deployment-858bdd545b-55jpf -o yaml
apiVersion: v1
kind: Pod
metadata:
annotations:
cni.projectcalico.org/containerID: 1ec3d345f859be8ead0374a7e880bcfdb9ba74a121b220a6fccbd342ac4b7ea8
cni.projectcalico.org/podIP: 172.16.36.90/32
cni.projectcalico.org/podIPs: 172.16.36.90/32
linkerd.io/created-by: linkerd/proxy-injector stable-2.12.2
linkerd.io/inject: enabled
linkerd.io/proxy-version: stable-2.12.2
linkerd.io/trust-root-sha256: 354fe6f49331e8e03d8fb07808e00a3e145d2661181cbfec7777b41051dc8e22
viz.linkerd.io/tap-enabled: "true"
creationTimestamp: "2022-11-05T19:44:15Z"
generateName: nginx-deployment-858bdd545b-
labels:
app: nginx
linkerd.io/control-plane-ns: linkerd
linkerd.io/proxy-deployment: nginx-deployment
linkerd.io/workload-ns: default
pod-template-hash: 858bdd545b
name: nginx-deployment-858bdd545b-55jpf
namespace: default
ownerReferences:
- apiVersion: apps/v1
blockOwnerDeletion: true
controller: true
kind: ReplicaSet
name: nginx-deployment-858bdd545b
uid: 2e618972-aa10-4e35-a7dd-084853673a80
resourceVersion: "23820"
uid: 62f1857a-b701-4a19-8996-b5b605ff8488
spec:
containers:
- env:
- name: _pod_name
valueFrom:
fieldRef:
apiVersion: v1
fieldPath: metadata.name
- name: _pod_ns
valueFrom:
fieldRef:
apiVersion: v1
fieldPath: metadata.namespace
- name: _pod_nodeName
valueFrom:
fieldRef:
apiVersion: v1
fieldPath: spec.nodeName
- name: LINKERD2_PROXY_LOG
value: warn,linkerd=info
- name: LINKERD2_PROXY_LOG_FORMAT
value: plain
- name: LINKERD2_PROXY_DESTINATION_SVC_ADDR
value: linkerd-dst-headless.linkerd.svc.cluster.local.:8086
- name: LINKERD2_PROXY_DESTINATION_PROFILE_NETWORKS
value: 10.0.0.0/8,100.64.0.0/10,172.16.0.0/12,192.168.0.0/16
- name: LINKERD2_PROXY_POLICY_SVC_ADDR
value: linkerd-policy.linkerd.svc.cluster.local.:8090
- name: LINKERD2_PROXY_POLICY_WORKLOAD
value: $(_pod_ns):$(_pod_name)
- name: LINKERD2_PROXY_INBOUND_DEFAULT_POLICY
value: all-unauthenticated
- name: LINKERD2_PROXY_POLICY_CLUSTER_NETWORKS
value: 10.0.0.0/8,100.64.0.0/10,172.16.0.0/12,192.168.0.0/16
- name: LINKERD2_PROXY_INBOUND_CONNECT_TIMEOUT
value: 100ms
- name: LINKERD2_PROXY_OUTBOUND_CONNECT_TIMEOUT
value: 1000ms
- name: LINKERD2_PROXY_CONTROL_LISTEN_ADDR
value: 0.0.0.0:4190
- name: LINKERD2_PROXY_ADMIN_LISTEN_ADDR
value: 0.0.0.0:4191
- name: LINKERD2_PROXY_OUTBOUND_LISTEN_ADDR
value: 127.0.0.1:4140
- name: LINKERD2_PROXY_INBOUND_LISTEN_ADDR
value: 0.0.0.0:4143
- name: LINKERD2_PROXY_INBOUND_IPS
valueFrom:
fieldRef:
apiVersion: v1
fieldPath: status.podIPs
- name: LINKERD2_PROXY_INBOUND_PORTS
value: "80"
- name: LINKERD2_PROXY_DESTINATION_PROFILE_SUFFIXES
value: svc.cluster.local.
- name: LINKERD2_PROXY_INBOUND_ACCEPT_KEEPALIVE
value: 10000ms
- name: LINKERD2_PROXY_OUTBOUND_CONNECT_KEEPALIVE
value: 10000ms
- name: LINKERD2_PROXY_INBOUND_PORTS_DISABLE_PROTOCOL_DETECTION
value: 25,587,3306,4444,5432,6379,9300,11211
- name: LINKERD2_PROXY_DESTINATION_CONTEXT
value:
"ns":"$(_pod_ns)", "nodeName":"$(_pod_nodeName)"
- name: _pod_sa
valueFrom:
fieldRef:
apiVersion: v1
fieldPath: spec.serviceAccountName
- name: _l5d_ns
value: linkerd
- name: _l5d_trustdomain
value: cluster.local
- name: LINKERD2_PROXY_IDENTITY_DIR
value: /var/run/linkerd/identity/end-entity
- name: LINKERD2_PROXY_IDENTITY_TRUST_ANCHORS
value:
-----BEGIN CERTIFICATE-----
MIIBiDCCAS6gAwIBAgIBATAKBggqhkjOPQQDAjAcMRowGAYDVQQDExFpZGVudGl0
eS5saW5rZXJkLjAeFw0yMjExMDUxOTIxMDlaFw0yMzExMDUxOTIxMjlaMBwxGjAY
BgNVBAMTEWlkZW50aXR5LmxpbmtlcmQuMFkwEwYHKoZIzj0CAQYIKoZIzj0DAQcD
QgAE8AgxbWWa1qgEgN3ykFAOJ3sw9nSugUk1N5Qfvo6jXX/8/TZUW0ddko/N71+H
EcKc72kK0tlclj8jDi3pzJ4C0KNhMF8wDgYDVR0PAQH/BAQDAgEGMB0GA1UdJQQW
MBQGCCsGAQUFBwMBBggrBgEFBQcDAjAPBgNVHRMBAf8EBTADAQH/MB0GA1UdDgQW
BBThSr0yAj5joW7pj/NZPYcfIIepbzAKBggqhkjOPQQDAgNIADBFAiAomg0TVn6N
UxhOyzZdg848lAvH0Io9Ra/Ef2hxZGN0LgIhAIKjrsgDUqZA8XHiiciYYicxFnKr
Tw5yj9gBhVAgYCaB
-----END CERTIFICATE-----
- name: LINKERD2_PROXY_IDENTITY_TOKEN_FILE
value: /var/run/secrets/tokens/linkerd-identity-token
- name: LINKERD2_PROXY_IDENTITY_SVC_ADDR
value: linkerd-identity-headless.linkerd.svc.cluster.local.:8080
- name: LINKERD2_PROXY_IDENTITY_LOCAL_NAME
value: $(_pod_sa).$(_pod_ns).serviceaccount.identity.linkerd.cluster.local
- name: LINKERD2_PROXY_IDENTITY_SVC_NAME
value: linkerd-identity.linkerd.serviceaccount.identity.linkerd.cluster.local
- name: LINKERD2_PROXY_DESTINATION_SVC_NAME
value: linkerd-destination.linkerd.serviceaccount.identity.linkerd.cluster.local
- name: LINKERD2_PROXY_POLICY_SVC_NAME
value: linkerd-destination.linkerd.serviceaccount.identity.linkerd.cluster.local
- name: LINKERD2_PROXY_TAP_SVC_NAME
value: tap.linkerd-viz.serviceaccount.identity.linkerd.cluster.local
image: cr.l5d.io/linkerd/proxy:stable-2.12.2
imagePullPolicy: IfNotPresent
lifecycle:
postStart:
exec:
command:
- /usr/lib/linkerd/linkerd-await
- --timeout=2m
livenessProbe:
failureThreshold: 3
httpGet:
path: /live
port: 4191
scheme: HTTP
initialDelaySeconds: 10
periodSeconds: 10
successThreshold: 1
timeoutSeconds: 1
name: linkerd-proxy
ports:
- containerPort: 4143
name: linkerd-proxy
protocol: TCP
- containerPort: 4191
name: linkerd-admin
protocol: TCP
readinessProbe:
failureThreshold: 3
httpGet:
path: /ready
port: 4191
scheme: HTTP
initialDelaySeconds: 2
periodSeconds: 10
successThreshold: 1
timeoutSeconds: 1
resources:
securityContext:
allowPrivilegeEscalation: false
readOnlyRootFilesystem: true
runAsUser: 2102
terminationMessagePath: /dev/termination-log
terminationMessagePolicy: FallbackToLogsOnError
volumeMounts:
- mountPath: /var/run/linkerd/identity/end-entity
name: linkerd-identity-end-entity
- mountPath: /var/run/secrets/tokens
name: linkerd-identity-token
- mountPath: /var/run/secrets/kubernetes.io/serviceaccount
name: kube-api-access-9zpnn
readOnly: true
- image: nginx:latest
imagePullPolicy: Always
name: nginx
ports:
- containerPort: 80
protocol: TCP
resources:
terminationMessagePath: /dev/termination-log
terminationMessagePolicy: File
volumeMounts:
- mountPath: /var/run/secrets/kubernetes.io/serviceaccount
name: kube-api-access-9zpnn
readOnly: true
dnsPolicy: ClusterFirst
enableServiceLinks: true
initContainers:
- args:
- --incoming-proxy-port
- "4143"
- --outgoing-proxy-port
- "4140"
- --proxy-uid
- "2102"
- --inbound-ports-to-ignore
- 4190,4191,4567,4568
- --outbound-ports-to-ignore
- 4567,4568
image: cr.l5d.io/linkerd/proxy-init:v2.0.0
imagePullPolicy: IfNotPresent
name: linkerd-init
resources:
limits:
cpu: 100m
memory: 20Mi
requests:
cpu: 100m
memory: 20Mi
securityContext:
allowPrivilegeEscalation: false
capabilities:
add:
- NET_ADMIN
- NET_RAW
privileged: false
readOnlyRootFilesystem: true
runAsNonRoot: true
runAsUser: 65534
terminationMessagePath: /dev/termination-log
terminationMessagePolicy: FallbackToLogsOnError
volumeMounts:
- mountPath: /run
name: linkerd-proxy-init-xtables-lock
- mountPath: /var/run/secrets/kubernetes.io/serviceaccount
name: kube-api-access-9zpnn
readOnly: true
nodeName: k8s-node1
preemptionPolicy: PreemptLowerPriority
priority: 0
restartPolicy: Always
schedulerName: default-scheduler
securityContext:
serviceAccount: default
serviceAccountName: default
terminationGracePeriodSeconds: 30
tolerations:
- effect: NoExecute
key: node.kubernetes.io/not-ready
operator: Exists
tolerationSeconds: 300
- effect: NoExecute
key: node.kubernetes.io/unreachable
operator: Exists
tolerationSeconds: 300
volumes:
- name: kube-api-access-9zpnn
projected:
defaultMode: 420
sources:
- serviceAccountToken:
expirationSeconds: 3607
path: token
- configMap:
items:
- key: ca.crt
path: ca.crt
name: kube-root-ca.crt
- downwardAPI:
items:
- fieldRef:
apiVersion: v1
fieldPath: metadata.namespace
path: namespace
- emptyDir:
name: linkerd-proxy-init-xtables-lock
- emptyDir:
medium: Memory
name: linkerd-identity-end-entity
- name: linkerd-identity-token
projected:
defaultMode: 420
sources:
- serviceAccountToken:
audience: identity.l5d.io
expirationSeconds: 86400
path: linkerd-identity-token
status:
conditions:
- lastProbeTime: null
lastTransitionTime: "2022-11-05T19:44:16Z"
status: "True"
type: Initialized
- lastProbeTime: null
lastTransitionTime: "2022-11-05T19:44:19Z"
status: "True"
type: Ready
- lastProbeTime: null
lastTransitionTime: "2022-11-05T19:44:19Z"
status: "True"
type: ContainersReady
- lastProbeTime: null
lastTransitionTime: "2022-11-05T19:44:15Z"
status: "True"
type: PodScheduled
containerStatuses:
- containerID: containerd://62028867c48aaa726df48249a27c52cd8820cd33e8e5695ad0d322540924754e
image: cr.l5d.io/linkerd/proxy:stable-2.12.2
imageID: cr.l5d.io/linkerd/proxy@sha256:787db5055b2a46a3c4318ef3b632461261f81254c8e47bf4b9b8dab2c42575e4
lastState:
name: linkerd-proxy
ready: true
restartCount: 0
started: true
state:
running:
startedAt: "2022-11-05T19:44:16Z"
- containerID: containerd://8f8ce663c19360a7b6868ace68a4a5119f0b18cd57ffebcc2d19331274038381
image: docker.io/library/nginx:latest
imageID: docker.io/library/nginx@sha256:943c25b4b66b332184d5ba6bb18234273551593016c0e0ae906bab111548239f
lastState:
name: nginx
ready: true
restartCount: 0
started: true
state:
running:
startedAt: "2022-11-05T19:44:19Z"
hostIP: 192.168.2.216
initContainerStatuses:
- containerID: containerd://c0417ea9c8418ab296bf86077e81c5d8be06fe9b87390c138d1c5d7b73cc577c
image: cr.l5d.io/linkerd/proxy-init:v2.0.0
imageID: cr.l5d.io/linkerd/proxy-init@sha256:7d5e66b9e176b1ebbdd7f40b6385d1885e82c80a06f4c6af868247bb1dffe262
lastState:
name: linkerd-init
ready: true
restartCount: 0
state:
terminated:
containerID: containerd://c0417ea9c8418ab296bf86077e81c5d8be06fe9b87390c138d1c5d7b73cc577c
exitCode: 0
finishedAt: "2022-11-05T19:44:16Z"
reason: Completed
startedAt: "2022-11-05T19:44:15Z"
phase: Running
podIP: 172.16.36.90
podIPs:
- ip: 172.16.36.90
qosClass: Burstable
startTime: "2022-11-05T19:44:15Z"
At this point, the necessary components are setup for you to explore Linkerd further. You can also try out the jaeger and multicluster extensions, similar to the process of installing and using the viz extension and try out their capabilities.Inject Linkerd data plane automaticallyIn this approach, we shall we how to instruct Kubernetes to automatically inject the Linkerd data plane to workloads at deployment time.We can achieve this by adding the linkerd.io/inject annotation to the deployment descriptor which causes the proxy injector admission hook to execute and inject linkerd data plane components automatically at the time of deployment.
$ cat deploy.yaml 
apiVersion: apps/v1
kind: Deployment
metadata:
name: nginx-deployment
spec:
selector:
matchLabels:
app: nginx
replicas: 2
template:
metadata:
labels:
app: nginx
annotations:
linkerd.io/inject: enabled
spec:
containers:
- name: nginx
image: nginx:latest
ports:
- containerPort: 80
This annotation can also be specified at the namespace level to affect all the workloads within the namespace. Note that any resources created before the annotation was added to the namespace will require a rollout restart to trigger the injection of the Linkerd components.Uninstalling LinkerdNow that we have walked through the installation and setup process of Linkerd, let s also cover how to remove it from the infrastructure and go back to the state prior to its installation.The first step would be to remove extensions, such as viz.
$ linkerd viz uninstall   kubectl delete -f -
clusterrole.rbac.authorization.k8s.io "linkerd-linkerd-viz-metrics-api" deleted
clusterrole.rbac.authorization.k8s.io "linkerd-linkerd-viz-prometheus" deleted
clusterrole.rbac.authorization.k8s.io "linkerd-linkerd-viz-tap" deleted
clusterrole.rbac.authorization.k8s.io "linkerd-linkerd-viz-tap-admin" deleted
clusterrole.rbac.authorization.k8s.io "linkerd-linkerd-viz-web-api" deleted
clusterrole.rbac.authorization.k8s.io "linkerd-linkerd-viz-web-check" deleted
clusterrole.rbac.authorization.k8s.io "linkerd-tap-injector" deleted
clusterrolebinding.rbac.authorization.k8s.io "linkerd-linkerd-viz-metrics-api" deleted
clusterrolebinding.rbac.authorization.k8s.io "linkerd-linkerd-viz-prometheus" deleted
clusterrolebinding.rbac.authorization.k8s.io "linkerd-linkerd-viz-tap" deleted
clusterrolebinding.rbac.authorization.k8s.io "linkerd-linkerd-viz-tap-auth-delegator" deleted
clusterrolebinding.rbac.authorization.k8s.io "linkerd-linkerd-viz-web-admin" deleted
clusterrolebinding.rbac.authorization.k8s.io "linkerd-linkerd-viz-web-api" deleted
clusterrolebinding.rbac.authorization.k8s.io "linkerd-linkerd-viz-web-check" deleted
clusterrolebinding.rbac.authorization.k8s.io "linkerd-tap-injector" deleted
role.rbac.authorization.k8s.io "web" deleted
rolebinding.rbac.authorization.k8s.io "linkerd-linkerd-viz-tap-auth-reader" deleted
rolebinding.rbac.authorization.k8s.io "web" deleted
apiservice.apiregistration.k8s.io "v1alpha1.tap.linkerd.io" deleted
mutatingwebhookconfiguration.admissionregistration.k8s.io "linkerd-tap-injector-webhook-config" deleted
namespace "linkerd-viz" deleted
authorizationpolicy.policy.linkerd.io "admin" deleted
authorizationpolicy.policy.linkerd.io "metrics-api" deleted
authorizationpolicy.policy.linkerd.io "proxy-admin" deleted
authorizationpolicy.policy.linkerd.io "tap" deleted
authorizationpolicy.policy.linkerd.io "tap-injector" deleted
server.policy.linkerd.io "admin" deleted
server.policy.linkerd.io "metrics-api" deleted
server.policy.linkerd.io "proxy-admin" deleted
server.policy.linkerd.io "tap-api" deleted
server.policy.linkerd.io "tap-injector-webhook" deleted
In order to uninstall the control plane, you would need to first uninject the Linkerd control plane components from any existing running pods by:
$ kubectl get deployments
NAME READY UP-TO-DATE AVAILABLE AGE
nginx-deployment 2/2 2 2 10m
$ kubectl get deployment nginx-deployment -o yaml   linkerd uninject -   kubectl apply -f -
deployment "nginx-deployment" uninjected
deployment.apps/nginx-deployment configured
Now you can delete the control plane.
$ linkerd uninstall   kubectl delete -f -
clusterrole.rbac.authorization.k8s.io "linkerd-heartbeat" deleted
clusterrole.rbac.authorization.k8s.io "linkerd-linkerd-destination" deleted
clusterrole.rbac.authorization.k8s.io "linkerd-linkerd-identity" deleted
clusterrole.rbac.authorization.k8s.io "linkerd-linkerd-proxy-injector" deleted
clusterrole.rbac.authorization.k8s.io "linkerd-policy" deleted
clusterrolebinding.rbac.authorization.k8s.io "linkerd-destination-policy" deleted
clusterrolebinding.rbac.authorization.k8s.io "linkerd-heartbeat" deleted
clusterrolebinding.rbac.authorization.k8s.io "linkerd-linkerd-destination" deleted
clusterrolebinding.rbac.authorization.k8s.io "linkerd-linkerd-identity" deleted
clusterrolebinding.rbac.authorization.k8s.io "linkerd-linkerd-proxy-injector" deleted
role.rbac.authorization.k8s.io "linkerd-heartbeat" deleted
rolebinding.rbac.authorization.k8s.io "linkerd-heartbeat" deleted
customresourcedefinition.apiextensions.k8s.io "authorizationpolicies.policy.linkerd.io" deleted
customresourcedefinition.apiextensions.k8s.io "httproutes.policy.linkerd.io" deleted
customresourcedefinition.apiextensions.k8s.io "meshtlsauthentications.policy.linkerd.io" deleted
customresourcedefinition.apiextensions.k8s.io "networkauthentications.policy.linkerd.io" deleted
customresourcedefinition.apiextensions.k8s.io "serverauthorizations.policy.linkerd.io" deleted
customresourcedefinition.apiextensions.k8s.io "servers.policy.linkerd.io" deleted
customresourcedefinition.apiextensions.k8s.io "serviceprofiles.linkerd.io" deleted
mutatingwebhookconfiguration.admissionregistration.k8s.io "linkerd-proxy-injector-webhook-config" deleted
validatingwebhookconfiguration.admissionregistration.k8s.io "linkerd-policy-validator-webhook-config" deleted
validatingwebhookconfiguration.admissionregistration.k8s.io "linkerd-sp-validator-webhook-config" deleted
namespace "linkerd" deleted
At this point we re back to the original state:
$ kubectl get pods -A
NAMESPACE NAME READY STATUS RESTARTS AGE
default nginx-deployment-cd55c47f5-99xf2 1/1 Running 0 82s
default nginx-deployment-cd55c47f5-tt58t 1/1 Running 0 86s
kube-system calico-kube-controllers-59697b644f-7fsln 1/1 Running 2 (3h39m ago) 7d1h
kube-system calico-node-6ptsh 1/1 Running 2 (3h39m ago) 7d1h
kube-system calico-node-7x5j8 1/1 Running 2 (3h39m ago) 7d1h
kube-system calico-node-qlnf6 1/1 Running 2 (3h39m ago) 7d1h
kube-system coredns-565d847f94-79jlw 1/1 Running 2 (3h39m ago) 7d2h
kube-system coredns-565d847f94-fqwn4 1/1 Running 2 (3h39m ago) 7d2h
kube-system etcd-k8s-master 1/1 Running 2 (3h39m ago) 7d2h
kube-system kube-apiserver-k8s-master 1/1 Running 2 (3h39m ago) 7d2h
kube-system kube-controller-manager-k8s-master 1/1 Running 2 (3h39m ago) 7d2h
kube-system kube-proxy-4n9b7 1/1 Running 2 (3h39m ago) 7d2h
kube-system kube-proxy-k4rzv 1/1 Running 2 (3h39m ago) 7d2h
kube-system kube-proxy-lz2dd 1/1 Running 2 (3h39m ago) 7d2h
kube-system kube-scheduler-k8s-master 1/1 Running 2 (3h39m ago) 7d2h
I hope you find this useful to get you started on your journey with Linkerd. Head on over to the docs for more information, guides and best practices.

2 November 2022

Antoine Beaupr : A typical yak shaving session

Someone recently asked what yak shaving means and, because I am a professional at this pastime, I figured I would share my most recent excursion in the field. As a reminder, "yak shaving" describes a (anti?) pattern by which you engage in more and more (possibly useless) tasks that lead you further and further away from your original objective. The path I took through the yak heard is this:
  1. i wondered if i can use my home network to experiment with another VPN software (e.g. Wireguard instead of IPsec)
  2. then i tried Tailscale because I heard good things about it, and they have an interesting approach to opensource
  3. I wasn't happy with that, so i tried an IPv6 tunnel
  4. that broke after a few minutes, so i went on to try deploying Wireguard with Puppet), which involved reviewing about 4 different Puppet modules
  5. while I was there, I might as well share those findings with the community, so I publish that as a blog post
  6. someone else mentions that Nebula (from Slack) is a thing, but after investigation, it's not well packaged in Debian, so didn't test it, but add it to the blog post
  7. now that I found the right Puppet module, I tried to deploy it with Puppet's g10k, which requires me to input a checksum
  8. I got lazy and figured if i would put the checksum wrong, it would tell me what the right checksum was, but it didn't: instead it silently succeeded instead of failing, which seemed really bad
  9. then I looked upstream for such a bug report and saw that the Debian package was many versions behind and, because I'm on the Golang packaging team, I figured I would just do the upgrade myself
  10. then there were problems with the Debian-specific patch trying to disable network tests, so i rewrote the patch
  11. ... but ended up realizing basically all tests require the network, so I just disabled the build-time tests
  12. ... but then tried to readd it to Debian CI instead, which didn't work
At that point, I had given up, after shaving a 12th yak. Thankfully, a kind soul provided a working test suite and I was able to roll back all those parenthesis and:
  1. test the g10k package and confirm it works (and checks the checksums)
  2. upload the package to the Debian archive
  3. deploy the package in my Puppet manifests
  4. deploy a first tunnel
You'll also notice the work is not complete at all. I still need to: Also notice the 8th yak, above, which might be a security issue. I wasn't able to confirm it, because g10k does some pretty aggressive caching, and I could "reproduce" it in the sense that the checksum wasn't checked if it exists in the cache. So it might have just been that I had actually already deployed the module before adding the checksum... but I still had that distressing sentiment:
<anarcat> there's a huge yak breathing down my neck with "CVE" written in large red letters on the side
<anarcat> i'm trying to ignore it, it stinks like hell
Hopefully it's nothing to worry about. Right? Riiight. Oh. And obviously, writing this blog post is the sugar on top, the one last yak that is self-documented here.

31 October 2022

Dirk Eddelbuettel: RApiDatetime 0.0.7 on CRAN: Maintenance

A new release of our RApiDatetime package is now on CRAN. RApiDatetime provides a number of entry points for C-level functions of the R API for Date and Datetime calculations. The functions asPOSIXlt and asPOSIXct convert between long and compact datetime representation, formatPOSIXlt and Rstrptime convert to and from character strings, and POSIXlt2D and D2POSIXlt convert between Date and POSIXlt datetime. Lastly, asDatePOSIXct converts to a date type. All these functions are rather useful, but were not previously exported by R for C-level use by other packages. Which this package aims to change. This release accomodates, just like so many other releases this week, the more stringent views of clang-15 about what a correct function prototype is. While we were at, updates to GitHub Actions and https URL were made as well.

Changes in RApiDatetime version 0.0.7 (2022-10-30)
  • A function prototype was updated for clang-15.
  • GitHub Actions were updated to checkout version 3.
  • Several remaining http:// URLs were converted to https://.

Courtesy of my CRANberries, there is are comparisons to the previous release. More information is on the rapidatetime page. For questions or comments please use the issue tracker off the GitHub repo.

This post by Dirk Eddelbuettel originated on his Thinking inside the box blog. Please report excessive re-aggregation in third-party for-profit settings.

28 October 2022

Antoine Beaupr : Debating VPN options

In my home lab(s), I have a handful of machines spread around a few points of presence, with mostly residential/commercial cable/DSL uplinks, which means, generally, NAT. This makes monitoring those devices kind of impossible. While I do punch holes for SSH, using jump hosts gets old quick, so I'm considering adding a virtual private network (a "VPN", not a VPN service) so that all machines can be reachable from everywhere. I see three ways this can work:
  1. a home-made Wireguard VPN, deployed with Puppet
  2. a Wireguard VPN overlay, with Tailscale or equivalent
  3. IPv6, native or with tunnels
So which one will it be?

Wireguard Puppet modules As is (unfortunately) typical with Puppet, I found multiple different modules to talk with Wireguard.
module score downloads release stars watch forks license docs contrib issue PR notes
halyard 3.1 1,807 2022-10-14 0 0 0 MIT no requires firewall and Configvault_Write modules?
voxpupuli 5.0 4,201 2022-10-01 2 23 7 AGPLv3 good 1/9 1/4 1/61 optionnally configures ferm, uses systemd-networkd, recommends systemd module with manage_systemd to true, purges unknown keys
abaranov 4.7 17,017 2021-08-20 9 3 38 MIT okay 1/17 4/7 4/28 requires pre-generated private keys
arrnorets 3.1 16,646 2020-12-28 1 2 1 Apache-2 okay 1 0 0 requires pre-generated private keys?
The voxpupuli module seems to be the most promising. The abaranov module is more popular and has more contributors, but it has more open issues and PRs. More critically, the voxpupuli module was written after the abaranov author didn't respond to a PR from the voxpupuli author trying to add more automation (namely private key management). It looks like setting up a wireguard network would be as simple as this on node A:
wireguard::interface   'wg0':
  source_addresses => ['2003:4f8:c17:4cf::1', '149.9.255.4'],
  public_key       => $facts['wireguard_pubkeys']['nodeB'],
  endpoint         => 'nodeB.example.com:53668',
  addresses        => [ 'Address' => '192.168.123.6/30', , 'Address' => 'fe80::beef:1/64' ,],
 
This configuration come from this pull request I sent to the module to document how to use that fact. Note that the addresses used here are examples that shouldn't be reused and do not confirm to RFC5737 ("IPv4 Address Blocks Reserved for Documentation", 192.0.2.0/24 (TEST-NET-1), 198.51.100.0/24 (TEST-NET-2), and 203.0.113.0/24 (TEST-NET-3)) or RFC3849 ("IPv6 Address Prefix Reserved for Documentation", 2001:DB8::/32), but that's another story. (To avoid boostrapping problems, the resubmit-facts configuration could be used so that other nodes facts are more immediately available.) One problem with the above approach is that you explicitly need to take care of routing, network topology, and addressing. This can get complicated quickly, especially if you have lots of devices, behind NAT, in multiple locations (which is basically my life at home, unfortunately). Concretely, basic Wireguard only support one peer behind NAT. There are some workarounds for this, but they generally imply a relay server of some sort, or some custom registry, it's kind of a mess. And this is where overlay networks like Tailscale come in.

Tailscale Tailscale is basically designed to deal with this problem. It's not fully opensource, but pretty close, and they have an interesting philosophy behind that. The client is opensource, and there is an opensource version of the server side, called headscale. They have recently (late 2022) hired the main headscale developer while promising to keep supporting it, which is pretty amazing. Tailscale provides an overlay network based on Wireguard, where each peer basically has a peer-to-peer encrypted connexion, with automatic key rotation. They also ship a multitude of applications and features on top of that like file sharing, keyless SSH access, and so on. The authentication layer is based on an existing SSO provider, you don't just register with Tailscale with new account, you login with Google, Microsoft, or GitHub (which, really, is still Microsoft). The Headscale server ships with many features out of that:
  • Full "base" support of Tailscale's features
  • Configurable DNS
    • Split DNS
    • MagicDNS (each user gets a name)
  • Node registration
    • Single-Sign-On (via Open ID Connect)
    • Pre authenticated key
  • Taildrop (File Sharing)
  • Access control lists
  • Support for multiple IP ranges in the tailnet
  • Dual stack (IPv4 and IPv6)
  • Routing advertising (including exit nodes)
  • Ephemeral nodes
  • Embedded DERP server (AKA NAT-to-NAT traversal)
Neither project (client or server) is in Debian (RFP 972439 for the client, none filed yet for the server), which makes deploying this for my use case rather problematic. Their install instructions are basically a curl bash but they also provide packages for various platforms. Their Debian install instructions are surprisingly good, and check most of the third party checklist we're trying to establish. (It's missing a pin.) There's also a Puppet module for tailscale, naturally. What I find a little disturbing with Tailscale is that you not only need to trust Tailscale with authorizing your devices, you also basically delegate that trust also to the SSO provider. So, in my case, GitHub (or anyone who compromises my account there) can penetrate the VPN. A little scary. Tailscale is also kind of an "all or nothing" thing. They have MagicDNS, file transfers, all sorts of things, but those things require you to hook up your resolver with Tailscale. In fact, Tailscale kind of assumes you will use their nameservers, and have suffered great lengths to figure out how to do that. And naturally, here, it doesn't seem to work reliably; my resolv.conf somehow gets replaced and the magic resolution of the ts.net domain fails. (I wonder why we can't opt in to just publicly resolve the ts.net domain. I don't care if someone can enumerate the private IP addreses or machines in use in my VPN, at least I don't care as much as fighting with resolv.conf everywhere.) Because I mostly have access to the routers on the networks I'm on, I don't think I'll be using tailscale in the long term. But it's pretty impressive stuff: in the time it took me to even review the Puppet modules to configure Wireguard (which is what I'll probably end up doing), I was up and running with Tailscale (but with a broken DNS, naturally). (And yes, basic Wireguard won't bring me DNS either, but at least I won't have to trust Tailscale's Debian packages, and Tailscale, and Microsoft, and GitHub with this thing.)

IPv6 IPv6 is actually what is supposed to solve this. Not NAT port forwarding crap, just real IPs everywhere. The problem is: even though IPv6 adoption is still growing, it's kind of reaching a plateau at around 40% world-wide, with Canada lagging behind at 34%. It doesn't help that major ISPs in Canada (e.g. Bell Canada, Videotron) don't care at all about IPv6 (e.g. Videotron in beta since 2011). So we can't rely on those companies to do the right thing here. The typical solution here is often to use a tunnel like HE's tunnelbroker.net. It's kind of tricky to configure, but once it's done, it works. You get end-to-end connectivity as long as everyone on the network is on IPv6. And that's really where the problem lies here; the second one of your nodes can't setup such a tunnel, you're kind of stuck and that tool completely breaks down. IPv6 tunnels also don't give you the kind of security a VPN provides as well, naturally. The other downside of a tunnel is you don't really get peer-to-peer connectivity: you go through the tunnel. So you can expect higher latencies and possibly lower bandwidth as well. Also, HE.net doesn't currently charge for this service (and they've been doing this for a long time), but this could change in the future (just like Tailscale, that said). Concretely, the latency difference is rather minimal, Google:
--- ipv6.l.google.com ping statistics ---
10 packets transmitted, 10 received, 0,00% packet loss, time 136,8ms
RTT[ms]: min = 13, median = 14, p(90) = 14, max = 15
--- google.com ping statistics ---
10 packets transmitted, 10 received, 0,00% packet loss, time 136,0ms
RTT[ms]: min = 13, median = 13, p(90) = 14, max = 14
In the case of GitHub, latency is actually lower, interestingly:
--- ipv6.github.com ping statistics ---
10 packets transmitted, 10 received, 0,00% packet loss, time 134,6ms
RTT[ms]: min = 13, median = 13, p(90) = 14, max = 14
--- github.com ping statistics ---
10 packets transmitted, 10 received, 0,00% packet loss, time 293,1ms
RTT[ms]: min = 29, median = 29, p(90) = 29, max = 30
That is because HE.net peers directly with my ISP and Fastly (which is behind GitHub.com's IPv6, apparently?), so it's only 6 hops away. While over IPv4, the ping goes over New York, before landing AWS's Ashburn, Virginia datacenters, for a whopping 13 hops... I managed setup a HE.net tunnel at home, because I also need IPv6 for other reasons (namely debugging at work). My first attempt at setting this up in the office failed, but now that I found the openwrt.org guide, it worked... for a while, and I was able to produce the above, encouraging, mini benchmarks. Unfortunately, a few minutes later, IPv6 just went down again. And the problem with that is that many programs (and especially OpenSSH) do not respect the Happy Eyeballs protocol (RFC 8305), which means various mysterious "hangs" at random times on random applications. It's kind of a terrible user experience, on top of breaking the one thing it's supposed to do, of course, which is to give me transparent access to all the nodes I maintain. Even worse, it would still be a problem for other remote nodes I might setup where I might not have acess to the router to setup the tunnel. It's also not absolutely clear what happens if you setup the same tunnel in two places... Presumably, something is smart enough to distribute only a part of the /48 block selectively, but I don't really feel like going that far, considering how flaky the setup is already.

Other options If this post sounds a little biased towards IPv6 and Wireguard, it's because it is. I would like everyone to migrate to IPv6 already, and Wireguard seems like a simple and sound system. I'm aware of many other options to make VPNs. So before anyone jumps in and says "but what about...", do know that I have personnally experimented with:
  • tinc: nice, automatic meshing, used for the Montreal mesh, serious design flaws in the crypto that make it generally unsafe to use; supposedly, v1.1 (or 2.0?) will fix this, but that's been promised for over a decade by now
  • ipsec, specifically strongswan: hard to configure (especially configure correctly!), harder even to debug, otherwise really nice because transparent (e.g. no need for special subnets), used at work, but also considering a replacement there because it's a major barrier to entry to train new staff
  • OpenVPN: mostly used as a client for [VPN service][]s like Riseup VPN or Mullvad, mostly relevant for client-server configurations, not really peer-to-peer, shared secrets or TLS, kind of an hassle to maintain, see also SoftEther for an alternative implementation
All of those solutions have significant problems and I do not wish to use any of those for this project. Also note that Tailscale is only one of many projects laid over Wireguard to do that kind of thing, see this LWN review for others (basically NetbBird, Firezone, and Netmaker).

Future work Those are options that came up after writing this post, and might warrant further examination in the future.
  • Meshbird, a "distributed private networking" with little information about how it actually works other than "encrypted with strong AES-256"
  • Nebula, "A scalable overlay networking tool with a focus on performance, simplicity and security", written by Slack people to replace IPsec, docs, runs as an overlay for Slack's 50k node network, only packaged in Debian experimental, lagging behind upstream (1.4.0, from May 2021 vs upstream's 1.6.1 from September 2022), requires a central CA, Golang, I'm in "wait and see" mode for now
  • n2n: "layer two VPN", seems packaged in Debian but inactive
  • ouroboros: "peer-to-peer packet network prototype", sounds and seems complicated
  • QuickTUN is interesting because it's just a small wrapper around NaCL, and it's in Debian... but maybe too obscure for my own good
  • unetd: Wireguard-based full mesh networking from OpenWRT, not in Debian
  • vpncloud: "high performance peer-to-peer mesh VPN over UDP supporting strong encryption, NAT traversal and a simple configuration", sounds interesting, not in Debian
  • Yggdrasil: actually a pretty good match for my use case, but I didn't think of it when starting the experiments here; packaged in Debian, with the Golang version planned, Puppet module; major caveat: nodes exposed publicly inside the global mesh unless configured otherwise (firewall suggested), requires port forwards, alpha status

Conclusion Right now, I'm going to deploy Wireguard tunnels with Puppet. It seems like kind of a pain in the back, but it's something I will be able to reuse for work, possibly completely replacing strongswan. I have another Puppet module for IPsec which I was planning to publish, but now I'm thinking I should just abort that and replace everything with Wireguard, assuming we still need VPNs at work in the future. (I have a number of reasons to believe we might not need any in the near future anyways...)

25 October 2022

Arturo Borrero Gonz lez: Netfilter Workshop 2022 summary

Netfilter logo This is my report from the Netfilter Workshop 2022. The event was held on 2022-10-20/2022-10-21 in Seville, and the venue was the offices of Zevenet. We started on Thursday with Pablo Neira (head of the project) giving a short welcome / opening speech. The previous iteration of this event was in virtual fashion in 2020, two years ago. In the year 2021 we were unable to meet either in person or online. This year, the number of participants was just eight people, and this allowed the setup to be a bit more informal. We had kind of an un-conference style meeting, in which whoever had something prepared just went ahead and opened a topic for debate. In the opening speech, Pablo did a quick recap on the legal problems the Netfilter project had a few years ago, a topic that was settled for good some months ago, in January 2022. There were no news in this front, which was definitely a good thing. Moving into the technical topics, the workshop proper, Pablo started to comment on the recent developments to instrument a way to perform inner matching for tunnel protocols. The current implementation supports VXLAN, IPIP, GRE and GENEVE. Using nftables you can match packet headers that are encapsulated inside these protocols. He mentioned the design and the goals, that was to have a kernel space setup that allows adding more protocols by just patching userspace. In that sense, more tunnel protocols will be supported soon, such as IP6IP, UDP, and ESP. Pablo requested our opinion on whether if nftables should generate the matching dependencies. For example, if a given tunnel is UDP-based, a dependency match should be there otherwise the rule won t work as expected. The agreement was to assist the user in the setup when possible and if not, print clear error messages. By the way, this inner thing is pure stateless packet filtering. Doing inner-conntracking is an open topic that will be worked on in the future. Pablo continued with the next topic: nftables automatic ruleset optimizations. The times of linear ruleset evaluation are over, but some people have a hard time understanding / creating rulesets that leverage maps, sets, and concatenations. This is where the ruleset optimizations kick in: it can transform a given ruleset to be more optimal by using such advanced data structures. This is purely about optimizing the ruleset, not about validating the usefulness of it, which could be another interesting project. There were a couple of problems mentioned, however. The ruleset optimizer can be slow, O(n!) in worst case. And the user needs to use nested syntax. More improvements to come in the future. Next was Stefano Brivio s turn (Red Hat engineer). He had been involved lately in a couple of migrations to nftables, in particular libvirt and KubeVirt. We were pointed to https://libvirt.org/firewall.html, and Stefano walked us through the 3 or 4 different virtual networks that libvirt can create. He evaluated some options to generate efficient rulesets in nftables to instrument such networks, and commented on a couple of ideas: having a null matcher in nftables set expression. Or perhaps having kind of subsets, something similar to a view in a SQL database. The room spent quite a bit of time debating how the nft_lookup API could be extended to support such new search operations. We also discussed if having intermediate facilities such as firewalld could provide the abstraction levels that could make developers more comfortable. Using firewalld also may have the advantage that coordination between different system components writing ruleset to nftables is handled by firewalld itself and developers are freed of the responsibility of doing it right. Next was Fernando F. Mancera (Red Hat engineer). He wanted to improve error reporting when deleting table/chain/rules with nftables. In general, there are some inconsistencies on how tables can be deleted (or flushed). And there seems to be no correct way to make a single table go away with all its content in a single command. The room agreed in that the commands destroy table and delete table should be defined consistently, with the following meanings: This topic diverted into another: how to reload/replace a ruleset but keep stateful information (such as counters). Next was Phil Sutter (Netfilter coreteam member and Red Hat engineer). He was interested in discussing options to make iptables-nft backward compatible. The use case he brought was simple: What happens if a container running iptables 1.8.7 creates a ruleset with features not supported by 1.8.6. A later container running 1.8.6 may fail to operate. Phil s first approach was to attach additional metadata into rules to assist older iptables-nft in decoding and printing the ruleset. But in general, there are no obvious or easy solutions to this problem. Some people are mixing different tooling version, and there is no way all cases can be predicted/covered. iptables-nft already refuses to work in some of the most basic failure scenarios. An other way to approach the issue could be to introduce some kind of support to print raw expressions in iptables-nft, like -m nft xyz. Which feels ugly, but may work. We also explored playing with the semantics of release version numbers. And another idea: store strings in the nft rule userdata area with the equivalent matching information for older iptables-nft. In fact, what Phil may have been looking for is not backwards but forward compatibility. Phil was undecided which path to follow, but perhaps the most common-sense approach is to fall back to a major release version bump (2.x.y) and declaring compatibility breakage with older iptables 1.x.y. That was pretty much it for the first day. We had dinner together and went to sleep for the next day. The room The second day was opened by Florian Westphal (Netfilter coreteam member and Red Hat engineer). Florian has been trying to improve nftables performance in kernels with RETPOLINE mitigations enabled. He commented that several workarounds have been collected over the years to avoid the performance penalty of such mitigations. The basic strategy is to avoid function indirect calls in the kernel. Florian also described how BPF programs work around this more effectively. And actually, Florian tried translating nf_hook_slow() to BPF. Some preliminary benchmarks results were showed, with about 2% performance improvement in MB/s and PPS. The flowtable infrastructure is specially benefited from this approach. The software flowtable infrastructure already offers a 5x performance improvement with regards the classic forwarding path, and the change being researched by Florian would be an addition on top of that. We then moved into discussing the meeting Florian had with Alexei in Zurich. My personal opinion was that Netfilter offers interesting user-facing interfaces and semantics that BPF does not. Whereas BPF may be more performant in certain scenarios. The idea of both things going hand in hand may feel natural for some people. Others also shared my view, but no particular agreement was reached in this topic. Florian will probably continue exploring options on that front. The next topic was opened by Fernando. He wanted to discuss Netfilter involvement in Google Summer of Code and Outreachy. Pablo had some personal stuff going on last year that prevented him from engaging in such projects. After all, GSoC is not fundamental or a priority for Netfilter. Also, Pablo mentioned the lack of support from others in the project for mentoring activities. There was no particular decision made here. Netfilter may be present again in such initiatives in the future, perhaps under the umbrella of other organizations. Again, Fernando proposed the next topic: nftables JSON support. Fernando shared his plan of going over all features and introduce programmatic tests from them. He also mentioned that the nftables wiki was incomplete and couldn t be used as a reference for missing tests. Phil suggested running the nftables python test-suite in JSON mode, which should complain about missing features. The py test suite should cover pretty much all statements and variations on how the nftables expression are invoked. Next, Phil commented on nftables xtables support. This is, supporting legacy xtables extensions in nftables. The most prominent problem was that some translations had some corner cases that resulted in a listed ruleset that couldn t be fed back into the kernel. Also, iptables-to-nftables translations can be sloppy, and the resulting rule won t work in some cases. In general, nft list ruleset nft -f may fail in rulesets created by iptables-nft and there is no trivial way to solve it. Phil also commented on potential iptables-tests.py speed-ups. Running the test suite may take very long time depending on the hardware. Phil will try to re-architect it, so it runs faster. Some alternatives had been explored, including collecting all rules into a single iptables-restore run, instead of hundreds of individual iptables calls. Next topic was about documentation on the nftables wiki. Phil is interested in having all nftables code-flows documented, and presented some improvements in that front. We are trying to organize all developer-oriented docs on a mediawiki portal, but the extension was not active yet. Since I worked at the Wikimedia Foundation, all the room stared at me, so at the end I kind of committed to exploring and enabling the mediawiki portal extension. Note to self: is this perhaps https://www.mediawiki.org/wiki/Portals ? Next presentation was by Pablo. He had a list of assorted topics for quick review and comment. Following this, a new topic was introduced by Stefano. He wanted to talk about nft_set_pipapo, documentation, what to do next, etc. He did a nice explanation of how the pipapo algorithm works for element inserts, lookups, and deletion. The source code is pretty well documented, by the way. He showed performance measurements of different data types being stored in the structure. After some lengthly debate on how to introduce changes without breaking usage for users, he declared some action items: writing more docs, addressing problems with non-atomic set reloads and a potential rework of nft_rbtree. After that, the next topic was kubernetes & netfilter , also by Stefano. Actually, this topic was very similar to what we already discussed regarding libvirt. Developers want to reduce packet matching effort, but also often don t leverage nftables most performant features, like sets, maps or concatenations. Some Red Hat developers are already working on replacing everything with native nftables & firewalld integrations. But some rules generators are very bad. Kubernetes (kube-proxy) is a known case. Developers simply won t learn how to code better ruleset generators. There was a good question floating around: What are people missing on first encounter with nftables? The Netfilter project doesn t have a training or marketing department or something like that. We cannot force-educate developers on how to use nftables in the right way. Perhaps we need to create a set of dedicated guidelines, or best practices, in the wiki for app developers that rely on nftables. Jozsef Kadlecsik (Netfilter coreteam) supported this idea, and suggested going beyond: such documents should be written exclusively from the nftables point of view: stop approaching the docs as a comparison to the old iptables semantics. Related to that last topic, next was Laura Garc a (Zevenet engineer, and venue host). She shared the same information as she presented in the Kubernetes network SIG in August 2020. She walked us through nftlb and kube-nftlb, a proof-of-concept replacement for kube-proxy based on nftlb that can outperform it. For whatever reason, kube-nftlb wasn t adopted by the upstream kubernetes community. She also covered latest changes to nftlb and some missing features, such as integration with nftables egress. nftlb is being extended to be a full proxy service and a more robust overall solution for service abstractions. In a nutshell, nftlb uses a templated ruleset and only adds elements to sets, which is exactly the right usage of the nftables framework. Some other projects should follow its example. The performance numbers are impressive, and from the early days it was clear that it was outperforming classical LVS-DSR by 10x. I used this opportunity to bring a topic that I wanted to discuss. I ve seen some SRE coworkers talking about katran as a replacement for traditional LVS setups. This software is a XDP/BPF based solution for load balancing. I was puzzled about what this software had to offer versus, for example, nftlb or any other nftables-based solutions. I commented on the highlighs of katran, and we discussed the nftables equivalents. nftlb is a simple daemon which does everything using a JSON-enabled REST API. It is already packaged into Debian, ready to use, whereas katran feels more like a collection of steps that you need to run in a certain order to get it working. All the hashing, caching, HA without state sharing, and backend weight selection features of katran are already present in nftlb. To work on a pure L3/ToR datacenter network setting, katran uses IPIP encapsulation. They can t just mangle the MAC address as in traditional DSR because the backend server is on a different L3 domain. It turns out nftables has a nft_tunnel expression that can do this encapsulation for complete feature parity. It is only available in the kernel, but it can be made available easily on the userspace utility too. Also, we discussed some limitations of katran, for example, inability to handle IP fragmentation, IP options, and potentially others not documented anywhere. This seems to be common with XDP/BPF programs, because handling all possible network scenarios would over-complicate the BPF programs, and at that point you are probably better off by using the normal Linux network stack and nftables. In summary, we agreed that nftlb can pretty much offer the same as katran, in a more flexible way. Group photo Finally, after many interesting debates over two days, the workshop ended. We all agreed on the need for extending it to 3 days next time, since 2 days feel too intense and too short for all the topics worth discussing. That s all on my side! I really enjoyed this Netfilter workshop round.

24 October 2022

Russ Allbery: Review: Nona the Ninth

Review: Nona the Ninth, by Tamsyn Muir
Series: The Locked Tomb #3
Publisher: Tordotcom
Copyright: 2022
ISBN: 1-250-85412-1
Format: Kindle
Pages: 480
Nona the Ninth is the third book of the Locked Tomb series and entirely pointless to read if you have not read the series to date. It completely spoils the previous books, assuming you would be able to figure out who these people were and why you should care about them. This is only for readers who are already invested. This series was originally supposed to be a trilogy, and this book was supposed to be Alecto the Ninth. Muir says in the acknowledgments, and has said at more length elsewhere, that Nona changed all of her plans and demanded her own book. Hence this book, postponing the end of the series and lengthening it to four books. After reading it, I understand why Muir decided to write a whole book about Nona. She's an interesting character in ways that wouldn't have come out if she was a small part of the concluding book. Unfortunately, it's also obvious that this book wasn't part of the plan. It's not entirely correct to say that Nona the Ninth is devoid of series plot, but the plot advances very little, and mostly at the end. Instead, we get Nona, who is physically a teenager who acts like someone several years younger, most of the time. She lives with her family (who I won't name to avoid spoilers for Harrow the Ninth), helps at a local school (although her level of understanding is about that of the students), and is a member of a kid's gang. She also has dreams every night about a woman with a painted face, dreams her family are very interested in. This sounds weirdly normal for this series, but Nona and her family live in a war-torn city full of fighting, refugees, and Blood of Eden operatives. The previous books of the series took place in the rarefied spaces of the Houses. Here we see a bit of the rest of the universe, although it's not obvious at first what we're looking at and who these people are. Absolutely no concession is made to the reader's fading memory, so expect to need either a re-read, help from friends with better memories, or quality time with a wiki. And, well, good luck with the latter if you've not already read this book, since the Locked Tomb Wiki has now been updated with spoilers for Nona. The other challenge, besides memory for the plot, is that this book is told from a tight third-person focus on Nona, and Nona is not a very reliable narrator. She doesn't lie, exactly, but she mostly doesn't understand what's going on, often doesn't care, and tends not to focus on what the reader is the most interested in. Nona is entirely uninterested in developing the series plot. Her focus is on her child friends (who are moderately interesting but not helpful if you're trying to figure out the rest of the story) and the other rhythms of a strange life that's normal to her. For me at least, that meant the first half of this book involved a lot of "what the heck is going on and why do I care about any of this?" I liked Harrow the Ninth a lot, despite how odd and ambiguous it was, but I was ready for revelations and plot coherence and was not thrilled by additional complexity, odd allusions, and half-revealed details. I didn't mind the layers of complexity added on by Harrow, but for me Nona was a bit too much and I started getting frustrated rather than intrigued. We do, at last, get most of the history of this universe, including the specific details of how John became God Emperor and how the Houses were founded. That happens in odd interludes with a forced and somewhat artificial writing style, but it's more straightforward and comprehensible than I feared at first. The pace of the story picks up considerably towards the end of the book, finally providing the plot momentum that I was hoping for. Unfortunately, it also gets more cryptic at the end of the book in ways that I didn't enjoy. The epilogue, which is vital to understanding the climax of the novel, took me three readings before I think I understood what happened. If you preferred the clarity of Gideon the Ninth, be warned that Nona is more like Harrow and Muir seems to be making the plot more cryptic as she goes. I am hoping this trend reverses in Alecto the Ninth. This book made me grumpy. Nona is okay as a character, but the characters in this series that I really like mostly do not appear or appear in heavily damaged and depressing forms. Muir does bring back a couple of my favorite characters, but then does something to them that's a major spoiler but that I think was intended to be a wonderful moment for them and instead left me completely cold and unhappy. There are still some great moments of humor, but overall it felt more strained. That said, I still had tons of fun discussing this book and its implications with friends who were reading it at the same time. I think that is the best way to read this series. Muir is being intentionally confusing and is inserting a blizzard of references. Some of them are pop culture jokes, but some of them are deep plot clues, and I'm not up to deciphering them all by myself. Working through them with other people is much more fun. (It also gives me an opportunity to feel smug about guessing correctly what was happening at the end of Harrow the Ninth, when I'm almost never the person who makes correct guesses about that sort of thing.) I think your opinion of this one will depend on how much you like Nona as a character, how much patience you have for the postponement of plot resolution, and how much tolerance you have for even more cryptic references. I'm still invested in this series until the end, but this was not my favorite installment. I suspect it (and the rest of the series) would benefit immensely from re-reading, but life is short and my reading backlog is long. What Muir is doing is interesting and has a lot of depth, but she's asking quite a lot of the reader. Content warning: Nona has an eating disorder, which occupied rather more of my mental space while reading this book than I was comfortable with. Followed by Alecto the Ninth, which does not have a publication date scheduled as of this writing. Rating: 7 out of 10

30 September 2022

Jonathan Dowland: vim-css-color

Last year I wrote about a subset of the vim plugins I was using, specifically those created by master craftsman Tim Pope. Off and on since then I've reviewed the other plugins I use and tried a few others, so I thought I'd write about them.
automatic colour name colouring automatic colour name colouring
vim-css-color is a simple plugin that recognised colour names specified in CSS-style: e.g. 'red', '#ff0000', '#rgb(255,0,0)' etc., and colours them accordingly. True to its name, once installed it's active when editing CSS files, but it's also supported for many other file types, and extending it further is not hard.

27 September 2022

Fran ois Marier: Upgrading from chan_sip to res_pjsip in Asterisk 18

After upgrading to Ubuntu Jammy and Asterisk 18.10, I saw the following messages in my logs:
WARNING[360166]: loader.c:2487 in load_modules: Module 'chan_sip' has been loaded but was deprecated in Asterisk version 17 and will be removed in Asterisk version 21.
WARNING[360174]: chan_sip.c:35468 in deprecation_notice: chan_sip has no official maintainer and is deprecated.  Migration to
WARNING[360174]: chan_sip.c:35469 in deprecation_notice: chan_pjsip is recommended.  See guides at the Asterisk Wiki:
WARNING[360174]: chan_sip.c:35470 in deprecation_notice: https://wiki.asterisk.org/wiki/display/AST/Migrating+from+chan_sip+to+res_pjsip
WARNING[360174]: chan_sip.c:35471 in deprecation_notice: https://wiki.asterisk.org/wiki/display/AST/Configuring+res_pjsip
and so I decided it was time to stop postponing the overdue migration of my working setup from chan_sip to res_pjsip. It turns out that it was not as painful as I expected, though the conversion script bundled with Asterisk didn't work for me out of the box.

Debugging Before you start, one very important thing to note is that the SIP debug information you used to see when running this in the asterisk console (asterisk -r):
sip set debug on
now lives behind this command:
pjsip set logger on

SIP phones The first thing I migrated was the config for my two SIP phones (Snom 300 and Snom D715). The original config for them in sip.conf was:
[2000]
; Snom 300
type=friend
qualify=yes
secret=password123
encryption=no
context=full
host=dynamic
nat=no
directmedia=no
mailbox=10@internal
vmexten=707
dtmfmode=rfc2833
call-limit=2
disallow=all
allow=g722
allow=ulaw
[2001]
; Snom D715
type=friend
qualify=yes
secret=password456
encryption=no
context=full
host=dynamic
nat=no
directmedia=yes
mailbox=10@internal
vmexten=707
dtmfmode=rfc2833
call-limit=2
disallow=all
allow=g722
allow=ulaw
and that became the following in pjsip.conf:
[transport-udp]
type = transport
protocol = udp
bind = 0.0.0.0
external_media_address = myasterisk.dyn.example.com
external_signaling_address = myasterisk.dyn.example.com
local_net = 192.168.0.0/255.255.0.0
[2000]
type = aor
max_contacts = 1
[2000]
type = auth
username = 2000
password = password123
[2000]
type = endpoint
context = full
dtmf_mode = rfc4733
disallow = all
allow = g722
allow = ulaw
direct_media = no
mailboxes = 10@internal
auth = 2000
outbound_auth = 2000
aors = 2000
[2001]
type = aor
max_contacts = 1
[2001]
type = auth
username = 2001
password = password456
[2001]
type = endpoint
context = full
dtmf_mode = rfc4733
disallow = all
allow = g722
allow = ulaw
direct_media = yes
mailboxes = 10@internal
auth = 2001
outbound_auth = 2001
aors = 2001
The different direct_media line between the two phones has to do with how they each connect to my Asterisk server and whether or not they have access to the Internet.

Internal calls For some reason, my internal calls (from one SIP phone to the other) didn't work when using "aliases". I fixed it by changing this blurb in extensions.conf from:
[speeddial]
exten => 1000,1,Dial(SIP/2000,20)
exten => 1001,1,Dial(SIP/2001,20)
to:
[speeddial]
exten => 1000,1,Dial($ PJSIP_DIAL_CONTACTS(2000) ,20)
exten => 1001,1,Dial($ PJSIP_DIAL_CONTACTS(2001) ,20)
I have not yet dug into what this changes or why it's necessary and so feel free to leave a comment if you know more here.

PSTN trunk Once I had the internal phones working, I moved to making and receiving phone calls over the PSTN, for which I use VoIP.ms with encryption. I had to change the following in my sip.conf:
[general]
register => tls://555123_myasterisk:password789@vancouver2.voip.ms
externhost=myasterisk.dyn.example.com
localnet=192.168.0.0/255.255.0.0
tcpenable=yes
tlsenable=yes
tlscertfile=/etc/asterisk/asterisk.cert
tlsprivatekey=/etc/asterisk/asterisk.key
tlscapath=/etc/ssl/certs/
[voipms]
type=peer
host=vancouver2.voip.ms
secret=password789
defaultuser=555123_myasterisk
context=from-voipms
disallow=all
allow=ulaw
allow=g729
insecure=port,invite
canreinvite=no
trustrpid=yes
sendrpid=yes
transport=tls
encryption=yes
to the following in pjsip.conf:
[transport-tls]
type = transport
protocol = tls
bind = 0.0.0.0
external_media_address = myasterisk.dyn.example.com
external_signaling_address = myasterisk.dyn.example.com
local_net = 192.168.0.0/255.255.0.0
cert_file = /etc/asterisk/asterisk.cert
priv_key_file = /etc/asterisk/asterisk.key
ca_list_path = /etc/ssl/certs/
method = tlsv1_2
[voipms]
type = registration
transport = transport-tls
outbound_auth = voipms
client_uri = sip:555123_myasterisk@vancouver2.voip.ms
server_uri = sip:vancouver2.voip.ms
[voipms]
type = auth
password = password789
username = 555123_myasterisk
[voipms]
type = aor
contact = sip:555123_myasterisk@vancouver2.voip.ms
[voipms]
type = identify
endpoint = voipms
match = vancouver2.voip.ms
[voipms]
type = endpoint
context = from-voipms
disallow = all
allow = ulaw
allow = g729
from_user = 555123_myasterisk
trust_id_inbound = yes
media_encryption = sdes
auth = voipms
outbound_auth = voipms
aors = voipms
rtp_symmetric = yes
rewrite_contact = yes
send_rpid = yes
timers = no
The TLS method line is needed since the default in Debian OpenSSL is too strict. The timers line is to prevent outbound calls from getting dropped after 15 minutes. Finally, I changed the Dial() lines in these extensions.conf blurbs from:
[from-voipms]
exten => 5551231000,1,Goto(2000,1)
exten => 2000,1,Dial(SIP/2000&SIP/2001,20)
exten => 2000,n,Goto(in2000-$ DIALSTATUS ,1)
exten => 2000,n,Hangup
exten => in2000-BUSY,1,VoiceMail(10@internal,su)
exten => in2000-BUSY,n,Hangup
exten => in2000-CONGESTION,1,VoiceMail(10@internal,su)
exten => in2000-CONGESTION,n,Hangup
exten => in2000-CHANUNAVAIL,1,VoiceMail(10@internal,su)
exten => in2000-CHANUNAVAIL,n,Hangup
exten => in2000-NOANSWER,1,VoiceMail(10@internal,su)
exten => in2000-NOANSWER,n,Hangup
exten => _in2000-.,1,Hangup(16)
[pstn-voipms]
exten => _1NXXNXXXXXX,1,Set(CALLERID(all)=Francois Marier <5551231000>)
exten => _1NXXNXXXXXX,n,Dial(SIP/voipms/$ EXTEN )
exten => _1NXXNXXXXXX,n,Hangup()
exten => _NXXNXXXXXX,1,Set(CALLERID(all)=Francois Marier <5551231000>)
exten => _NXXNXXXXXX,n,Dial(SIP/voipms/1$ EXTEN )
exten => _NXXNXXXXXX,n,Hangup()
exten => _011X.,1,Set(CALLERID(all)=Francois Marier <5551231000>)
exten => _011X.,n,Authenticate(1234)
exten => _011X.,n,Dial(SIP/voipms/$ EXTEN )
exten => _011X.,n,Hangup()
exten => _00X.,1,Set(CALLERID(all)=Francois Marier <5551231000>)
exten => _00X.,n,Authenticate(1234)
exten => _00X.,n,Dial(SIP/voipms/$ EXTEN )
exten => _00X.,n,Hangup()
to:
[from-voipms]
exten => 5551231000,1,Goto(2000,1)
exten => 2000,1,Dial(PJSIP/2000&PJSIP/2001,20)
exten => 2000,n,Goto(in2000-$ DIALSTATUS ,1)
exten => 2000,n,Hangup
exten => in2000-BUSY,1,VoiceMail(10@internal,su)
exten => in2000-BUSY,n,Hangup
exten => in2000-CONGESTION,1,VoiceMail(10@internal,su)
exten => in2000-CONGESTION,n,Hangup
exten => in2000-CHANUNAVAIL,1,VoiceMail(10@internal,su)
exten => in2000-CHANUNAVAIL,n,Hangup
exten => in2000-NOANSWER,1,VoiceMail(10@internal,su)
exten => in2000-NOANSWER,n,Hangup
exten => _in2000-.,1,Hangup(16)
[pstn-voipms]
exten => _1NXXNXXXXXX,1,Set(CALLERID(all)=Francois Marier <5551231000>)
exten => _1NXXNXXXXXX,n,Dial(PJSIP/$ EXTEN @voipms)
exten => _1NXXNXXXXXX,n,Hangup()
exten => _NXXNXXXXXX,1,Set(CALLERID(all)=Francois Marier <5551231000>)
exten => _NXXNXXXXXX,n,Dial(PJSIP/1$ EXTEN @voipms)
exten => _NXXNXXXXXX,n,Hangup()
exten => _011X.,1,Set(CALLERID(all)=Francois Marier <5551231000>)
exten => _011X.,n,Authenticate(1234)
exten => _011X.,n,Dial(PJSIP/$ EXTEN @voipms)
exten => _011X.,n,Hangup()
exten => _00X.,1,Set(CALLERID(all)=Francois Marier <5551231000>)
exten => _00X.,n,Authenticate(1234)
exten => _00X.,n,Dial(PJSIP/$ EXTEN @voipms)
exten => _00X.,n,Hangup()
Note that it's not just replacing SIP/ with PJSIP/, but it was also necessary to use a format supported by pjsip for the channel since SIP/trunkname/extension isn't supported by pjsip.

25 September 2022

Sergio Talens-Oliag: Kubernetes Static Content Server

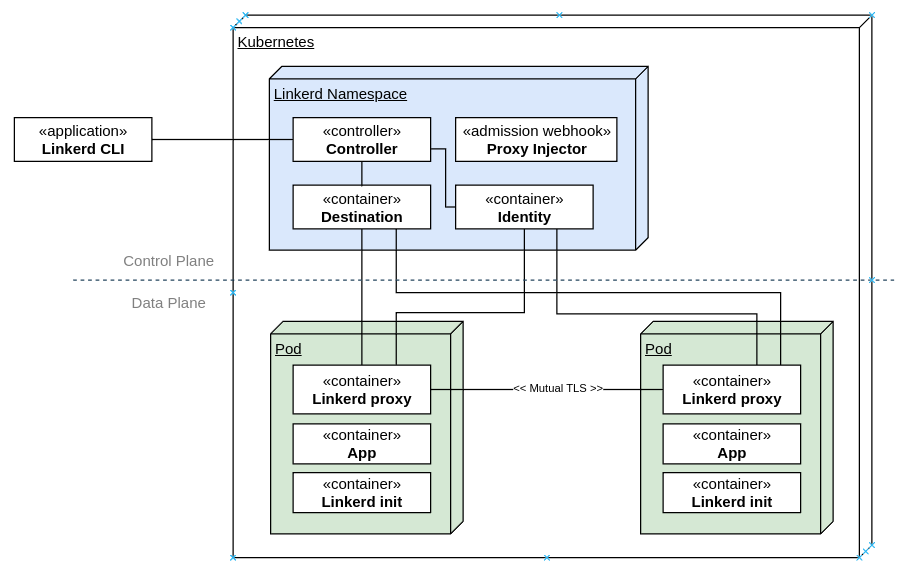
This post describes how I ve put together a simple static content server for kubernetes clusters using a Pod with a persistent volume and multiple containers: an sftp server to manage contents, a web server to publish them with optional access control and another one to run scripts which need access to the volume filesystem. The sftp server runs using MySecureShell, the web server is nginx and the script runner uses the webhook tool to publish endpoints to call them (the calls will come from other Pods that run backend servers or are executed from Jobs or CronJobs).

HistoryThe system was developed because we had a NodeJS API with endpoints to upload files and store them on S3 compatible services that were later accessed via HTTPS, but the requirements changed and we needed to be able to publish folders instead of individual files using their original names and apply access restrictions using our API. Thinking about our requirements the use of a regular filesystem to keep the files and folders was a good option, as uploading and serving files is simple. For the upload I decided to use the sftp protocol, mainly because I already had an sftp container image based on mysecureshell prepared; once we settled on that we added sftp support to the API server and configured it to upload the files to our server instead of using S3 buckets. To publish the files we added a nginx container configured to work as a reverse proxy that uses the ngx_http_auth_request_module to validate access to the files (the sub request is configurable, in our deployment we have configured it to call our API to check if the user can access a given URL). Finally we added a third container when we needed to execute some tasks directly on the filesystem (using kubectl exec with the existing containers did not seem a good idea, as that is not supported by CronJobs objects, for example). The solution we found avoiding the NIH Syndrome (i.e. write our own tool) was to use the webhook tool to provide the endpoints to call the scripts; for now we have three:
  • one to get the disc usage of a PATH,
  • one to hardlink all the files that are identical on the filesystem,
  • one to copy files and folders from S3 buckets to our filesystem.

Container definitions

mysecureshellThe mysecureshell container can be used to provide an sftp service with multiple users (although the files are owned by the same UID and GID) using standalone containers (launched with docker or podman) or in an orchestration system like kubernetes, as we are going to do here. The image is generated using the following Dockerfile:
ARG ALPINE_VERSION=3.16.2
FROM alpine:$ALPINE_VERSION as builder
LABEL maintainer="Sergio Talens-Oliag <sto@mixinet.net>"
RUN apk update &&\
 apk add --no-cache alpine-sdk git musl-dev &&\
 git clone https://github.com/sto/mysecureshell.git &&\
 cd mysecureshell &&\
 ./configure --prefix=/usr --sysconfdir=/etc --mandir=/usr/share/man\
 --localstatedir=/var --with-shutfile=/var/lib/misc/sftp.shut --with-debug=2 &&\
 make all && make install &&\
 rm -rf /var/cache/apk/*
FROM alpine:$ALPINE_VERSION
LABEL maintainer="Sergio Talens-Oliag <sto@mixinet.net>"
COPY --from=builder /usr/bin/mysecureshell /usr/bin/mysecureshell
COPY --from=builder /usr/bin/sftp-* /usr/bin/
RUN apk update &&\
 apk add --no-cache openssh shadow pwgen &&\
 sed -i -e "s ^.*\(AuthorizedKeysFile\).*$ \1 /etc/ssh/auth_keys/%u "\
 /etc/ssh/sshd_config &&\
 mkdir /etc/ssh/auth_keys &&\
 cat /dev/null > /etc/motd &&\
 add-shell '/usr/bin/mysecureshell' &&\
 rm -rf /var/cache/apk/*
COPY bin/* /usr/local/bin/
COPY etc/sftp_config /etc/ssh/
COPY entrypoint.sh /
EXPOSE 22
VOLUME /sftp
ENTRYPOINT ["/entrypoint.sh"]
CMD ["server"]
The /etc/sftp_config file is used to configure the mysecureshell server to have all the user homes under /sftp/data, only allow them to see the files under their home directories as if it were at the root of the server and close idle connections after 5m of inactivity:
etc/sftp_config
# Default mysecureshell configuration
<Default>
   # All users will have access their home directory under /sftp/data
   Home /sftp/data/$USER
   # Log to a file inside /sftp/logs/ (only works when the directory exists)
   LogFile /sftp/logs/mysecureshell.log
   # Force users to stay in their home directory
   StayAtHome true
   # Hide Home PATH, it will be shown as /
   VirtualChroot true
   # Hide real file/directory owner (just change displayed permissions)
   DirFakeUser true
   # Hide real file/directory group (just change displayed permissions)
   DirFakeGroup true
   # We do not want users to keep forever their idle connection
   IdleTimeOut 5m
</Default>
# vim: ts=2:sw=2:et
The entrypoint.sh script is the one responsible to prepare the container for the users included on the /secrets/user_pass.txt file (creates the users with their HOME directories under /sftp/data and a /bin/false shell and creates the key files from /secrets/user_keys.txt if available). The script expects a couple of environment variables:
  • SFTP_UID: UID used to run the daemon and for all the files, it has to be different than 0 (all the files managed by this daemon are going to be owned by the same user and group, even if the remote users are different).
  • SFTP_GID: GID used to run the daemon and for all the files, it has to be different than 0.
And can use the SSH_PORT and SSH_PARAMS values if present. It also requires the following files (they can be mounted as secrets in kubernetes):
  • /secrets/host_keys.txt: Text file containing the ssh server keys in mime format; the file is processed using the reformime utility (the one included on busybox) and can be generated using the gen-host-keys script included on the container (it uses ssh-keygen and makemime).
  • /secrets/user_pass.txt: Text file containing lines of the form username:password_in_clear_text (only the users included on this file are available on the sftp server, in fact in our deployment we use only the scs user for everything).
And optionally can use another one:
  • /secrets/user_keys.txt: Text file that contains lines of the form username:public_ssh_ed25519_or_rsa_key; the public keys are installed on the server and can be used to log into the sftp server if the username exists on the user_pass.txt file.
The contents of the entrypoint.sh script are:
entrypoint.sh
#!/bin/sh
set -e
# ---------
# VARIABLES
# ---------
# Expects SSH_UID & SSH_GID on the environment and uses the value of the
# SSH_PORT & SSH_PARAMS variables if present
# SSH_PARAMS
SSH_PARAMS="-D -e -p $ SSH_PORT:=22  $ SSH_PARAMS "
# Fixed values
# DIRECTORIES
HOME_DIR="/sftp/data"
CONF_FILES_DIR="/secrets"
AUTH_KEYS_PATH="/etc/ssh/auth_keys"
# FILES
HOST_KEYS="$CONF_FILES_DIR/host_keys.txt"
USER_KEYS="$CONF_FILES_DIR/user_keys.txt"
USER_PASS="$CONF_FILES_DIR/user_pass.txt"
USER_SHELL_CMD="/usr/bin/mysecureshell"
# TYPES
HOST_KEY_TYPES="dsa ecdsa ed25519 rsa"
# ---------
# FUNCTIONS
# ---------
# Validate HOST_KEYS, USER_PASS, SFTP_UID and SFTP_GID
_check_environment()  
  # Check the ssh server keys ... we don't boot if we don't have them
  if [ ! -f "$HOST_KEYS" ]; then
    cat <<EOF
We need the host keys on the '$HOST_KEYS' file to proceed.
Call the 'gen-host-keys' script to create and export them on a mime file.
EOF
    exit 1
  fi
  # Check that we have users ... if we don't we can't continue
  if [ ! -f "$USER_PASS" ]; then
    cat <<EOF
We need at least the '$USER_PASS' file to provision users.
Call the 'gen-users-tar' script to create a tar file to create an archive that
contains public and private keys for users, a 'user_keys.txt' with the public
keys of the users and a 'user_pass.txt' file with random passwords for them 
(pass the list of usernames to it).
EOF
    exit 1
  fi
  # Check SFTP_UID
  if [ -z "$SFTP_UID" ]; then
    echo "The 'SFTP_UID' can't be empty, pass a 'GID'."
    exit 1
  fi
  if [ "$SFTP_UID" -eq "0" ]; then
    echo "The 'SFTP_UID' can't be 0, use a different 'UID'"
    exit 1
  fi
  # Check SFTP_GID
  if [ -z "$SFTP_GID" ]; then
    echo "The 'SFTP_GID' can't be empty, pass a 'GID'."
    exit 1
  fi
  if [ "$SFTP_GID" -eq "0" ]; then
    echo "The 'SFTP_GID' can't be 0, use a different 'GID'"
    exit 1
  fi
 
# Adjust ssh host keys
_setup_host_keys()  
  opwd="$(pwd)"
  tmpdir="$(mktemp -d)"
  cd "$tmpdir"
  ret="0"
  reformime <"$HOST_KEYS"   ret="1"
  for kt in $HOST_KEY_TYPES; do
    key="ssh_host_$ kt _key"
    pub="ssh_host_$ kt _key.pub"
    if [ ! -f "$key" ]; then
      echo "Missing '$key' file"
      ret="1"
    fi
    if [ ! -f "$pub" ]; then
      echo "Missing '$pub' file"
      ret="1"
    fi
    if [ "$ret" -ne "0" ]; then
      continue
    fi
    cat "$key" >"/etc/ssh/$key"
    chmod 0600 "/etc/ssh/$key"
    chown root:root "/etc/ssh/$key"
    cat "$pub" >"/etc/ssh/$pub"
    chmod 0600 "/etc/ssh/$pub"
    chown root:root "/etc/ssh/$pub"
  done
  cd "$opwd"
  rm -rf "$tmpdir"
  return "$ret"
 
# Create users
_setup_user_pass()  
  opwd="$(pwd)"
  tmpdir="$(mktemp -d)"
  cd "$tmpdir"
  ret="0"
  [ -d "$HOME_DIR" ]   mkdir "$HOME_DIR"
  # Make sure the data dir can be managed by the sftp user
  chown "$SFTP_UID:$SFTP_GID" "$HOME_DIR"
  # Allow the user (and root) to create directories inside the $HOME_DIR, if
  # we don't allow it the directory creation fails on EFS (AWS)
  chmod 0755 "$HOME_DIR"
  # Create users
  echo "sftp:sftp:$SFTP_UID:$SFTP_GID:::/bin/false" >"newusers.txt"
  sed -n "/^[^#]/   s/:/ /p  " "$USER_PASS"   while read -r _u _p; do
    echo "$_u:$_p:$SFTP_UID:$SFTP_GID::$HOME_DIR/$_u:$USER_SHELL_CMD"
  done >>"newusers.txt"
  newusers --badnames newusers.txt
  # Disable write permission on the directory to forbid remote sftp users to
  # remove their own root dir (they have already done it); we adjust that
  # here to avoid issues with EFS (see before)
  chmod 0555 "$HOME_DIR"
  # Clean up the tmpdir
  cd "$opwd"
  rm -rf "$tmpdir"
  return "$ret"
 
# Adjust user keys
_setup_user_keys()  
  if [ -f "$USER_KEYS" ]; then
    sed -n "/^[^#]/   s/:/ /p  " "$USER_KEYS"   while read -r _u _k; do
      echo "$_k" >>"$AUTH_KEYS_PATH/$_u"
    done
  fi
 
# Main function
exec_sshd()  
  _check_environment
  _setup_host_keys
  _setup_user_pass
  _setup_user_keys
  echo "Running: /usr/sbin/sshd $SSH_PARAMS"
  # shellcheck disable=SC2086
  exec /usr/sbin/sshd -D $SSH_PARAMS
 
# ----
# MAIN
# ----
case "$1" in
"server") exec_sshd ;;
*) exec "$@" ;;
esac
# vim: ts=2:sw=2:et
The container also includes a couple of auxiliary scripts, the first one can be used to generate the host_keys.txt file as follows:
$ docker run --rm stodh/mysecureshell gen-host-keys > host_keys.txt
Where the script is as simple as:
bin/gen-host-keys
#!/bin/sh
set -e
# Generate new host keys
ssh-keygen -A >/dev/null
# Replace hostname
sed -i -e 's/@.*$/@mysecureshell/' /etc/ssh/ssh_host_*_key.pub
# Print in mime format (stdout)
makemime /etc/ssh/ssh_host_*
# vim: ts=2:sw=2:et
And there is another script to generate a .tar file that contains auth data for the list of usernames passed to it (the file contains a user_pass.txt file with random passwords for the users, public and private ssh keys for them and the user_keys.txt file that matches the generated keys). To generate a tar file for the user scs we can execute the following:
$ docker run --rm stodh/mysecureshell gen-users-tar scs > /tmp/scs-users.tar
To see the contents and the text inside the user_pass.txt file we can do:
$ tar tvf /tmp/scs-users.tar
-rw-r--r-- root/root        21 2022-09-11 15:55 user_pass.txt
-rw-r--r-- root/root       822 2022-09-11 15:55 user_keys.txt
-rw------- root/root       387 2022-09-11 15:55 id_ed25519-scs
-rw-r--r-- root/root        85 2022-09-11 15:55 id_ed25519-scs.pub
-rw------- root/root      3357 2022-09-11 15:55 id_rsa-scs
-rw------- root/root      3243 2022-09-11 15:55 id_rsa-scs.pem
-rw-r--r-- root/root       729 2022-09-11 15:55 id_rsa-scs.pub
$ tar xfO /tmp/scs-users.tar user_pass.txt
scs:20JertRSX2Eaar4x
The source of the script is:
bin/gen-users-tar
#!/bin/sh
set -e
# ---------
# VARIABLES
# ---------
USER_KEYS_FILE="user_keys.txt"
USER_PASS_FILE="user_pass.txt"
# ---------
# MAIN CODE
# ---------
# Generate user passwords and keys, return 1 if no username is received
if [ "$#" -eq "0" ]; then
  return 1
fi
opwd="$(pwd)"
tmpdir="$(mktemp -d)"
cd "$tmpdir"
for u in "$@"; do
  ssh-keygen -q -a 100 -t ed25519 -f "id_ed25519-$u" -C "$u" -N ""
  ssh-keygen -q -a 100 -b 4096 -t rsa -f "id_rsa-$u" -C "$u" -N ""
  # Legacy RSA private key format
  cp -a "id_rsa-$u" "id_rsa-$u.pem"
  ssh-keygen -q -p -m pem -f "id_rsa-$u.pem" -N "" -P "" >/dev/null
  chmod 0600 "id_rsa-$u.pem"
  echo "$u:$(pwgen -s 16 1)" >>"$USER_PASS_FILE"
  echo "$u:$(cat "id_ed25519-$u.pub")" >>"$USER_KEYS_FILE"
  echo "$u:$(cat "id_rsa-$u.pub")" >>"$USER_KEYS_FILE"
done
tar cf - "$USER_PASS_FILE" "$USER_KEYS_FILE" id_* 2>/dev/null
cd "$opwd"
rm -rf "$tmpdir"
# vim: ts=2:sw=2:et

nginx-scsThe nginx-scs container is generated using the following Dockerfile:
ARG NGINX_VERSION=1.23.1
FROM nginx:$NGINX_VERSION
LABEL maintainer="Sergio Talens-Oliag <sto@mixinet.net>"
RUN rm -f /docker-entrypoint.d/*
COPY docker-entrypoint.d/* /docker-entrypoint.d/
Basically we are removing the existing docker-entrypoint.d scripts from the standard image and adding a new one that configures the web server as we want using a couple of environment variables:
  • AUTH_REQUEST_URI: URL to use for the auth_request, if the variable is not found on the environment auth_request is not used.
  • HTML_ROOT: Base directory of the web server, if not passed the default /usr/share/nginx/html is used.
Note that if we don t pass the variables everything works as if we were using the original nginx image. The contents of the configuration script are:
docker-entrypoint.d/10-update-default-conf.sh
#!/bin/sh
# Replace the default.conf nginx file by our own version.
set -e
if [ -z "$HTML_ROOT" ]; then
  HTML_ROOT="/usr/share/nginx/html"
fi
if [ "$AUTH_REQUEST_URI" ]; then
  cat >/etc/nginx/conf.d/default.conf <<EOF
server  
  listen       80;
  server_name  localhost;
  location /  
    auth_request /.auth;
    root  $HTML_ROOT;
    index index.html index.htm;
   
  location /.auth  
    internal;
    proxy_pass $AUTH_REQUEST_URI;
    proxy_pass_request_body off;
    proxy_set_header Content-Length "";
    proxy_set_header X-Original-URI \$request_uri;
   
  error_page   500 502 503 504  /50x.html;
  location = /50x.html  
    root /usr/share/nginx/html;
   
 
EOF
else
  cat >/etc/nginx/conf.d/default.conf <<EOF
server  
  listen       80;
  server_name  localhost;
  location /  
    root  $HTML_ROOT;
    index index.html index.htm;
   
  error_page   500 502 503 504  /50x.html;
  location = /50x.html  
    root /usr/share/nginx/html;
   
 
EOF
fi
# vim: ts=2:sw=2:et
As we will see later the idea is to use the /sftp/data or /sftp/data/scs folder as the root of the web published by this container and create an Ingress object to provide access to it outside of our kubernetes cluster.

webhook-scsThe webhook-scs container is generated using the following Dockerfile:
ARG ALPINE_VERSION=3.16.2
ARG GOLANG_VERSION=alpine3.16
FROM golang:$GOLANG_VERSION AS builder
LABEL maintainer="Sergio Talens-Oliag <sto@mixinet.net>"
ENV WEBHOOK_VERSION 2.8.0
ENV WEBHOOK_PR 549
ENV S3FS_VERSION v1.91
WORKDIR /go/src/github.com/adnanh/webhook
RUN apk update &&\
 apk add --no-cache -t build-deps curl libc-dev gcc libgcc patch
RUN curl -L --silent -o webhook.tar.gz\
 https://github.com/adnanh/webhook/archive/$ WEBHOOK_VERSION .tar.gz &&\
 tar xzf webhook.tar.gz --strip 1 &&\
 curl -L --silent -o $ WEBHOOK_PR .patch\
 https://patch-diff.githubusercontent.com/raw/adnanh/webhook/pull/$ WEBHOOK_PR .patch &&\
 patch -p1 < $ WEBHOOK_PR .patch &&\
 go get -d && \
 go build -o /usr/local/bin/webhook
WORKDIR /src/s3fs-fuse
RUN apk update &&\
 apk add ca-certificates build-base alpine-sdk libcurl automake autoconf\
 libxml2-dev libressl-dev mailcap fuse-dev curl-dev
RUN curl -L --silent -o s3fs.tar.gz\
 https://github.com/s3fs-fuse/s3fs-fuse/archive/refs/tags/$S3FS_VERSION.tar.gz &&\
 tar xzf s3fs.tar.gz --strip 1 &&\
 ./autogen.sh &&\
 ./configure --prefix=/usr/local &&\
 make -j && \
 make install
FROM alpine:$ALPINE_VERSION
LABEL maintainer="Sergio Talens-Oliag <sto@mixinet.net>"
WORKDIR /webhook
RUN apk update &&\
 apk add --no-cache ca-certificates mailcap fuse libxml2 libcurl libgcc\
 libstdc++ rsync util-linux-misc &&\
 rm -rf /var/cache/apk/*
COPY --from=builder /usr/local/bin/webhook /usr/local/bin/webhook
COPY --from=builder /usr/local/bin/s3fs /usr/local/bin/s3fs
COPY entrypoint.sh /
COPY hooks/* ./hooks/
EXPOSE 9000
ENTRYPOINT ["/entrypoint.sh"]
CMD ["server"]
Again, we use a multi-stage build because in production we wanted to support a functionality that is not already on the official versions (streaming the command output as a response instead of waiting until the execution ends); this time we build the image applying the PATCH included on this pull request against a released version of the source instead of creating a fork. The entrypoint.sh script is used to generate the webhook configuration file for the existing hooks using environment variables (basically the WEBHOOK_WORKDIR and the *_TOKEN variables) and launch the webhook service:
entrypoint.sh
#!/bin/sh
set -e
# ---------
# VARIABLES
# ---------
WEBHOOK_BIN="$ WEBHOOK_BIN:-/webhook/hooks "
WEBHOOK_YML="$ WEBHOOK_YML:-/webhook/scs.yml "
WEBHOOK_OPTS="$ WEBHOOK_OPTS:--verbose "
# ---------
# FUNCTIONS
# ---------
print_du_yml()  
  cat <<EOF
- id: du
  execute-command: '$WEBHOOK_BIN/du.sh'
  command-working-directory: '$WORKDIR'
  response-headers:
  - name: 'Content-Type'
    value: 'application/json'
  http-methods: ['GET']
  include-command-output-in-response: true
  include-command-output-in-response-on-error: true
  pass-arguments-to-command:
  - source: 'url'
    name: 'path'
  pass-environment-to-command:
  - source: 'string'
    envname: 'OUTPUT_FORMAT'
    name: 'json'
EOF
 
print_hardlink_yml()  
  cat <<EOF
- id: hardlink
  execute-command: '$WEBHOOK_BIN/hardlink.sh'
  command-working-directory: '$WORKDIR'
  http-methods: ['GET']
  include-command-output-in-response: true
  include-command-output-in-response-on-error: true
EOF
 
print_s3sync_yml()  
  cat <<EOF
- id: s3sync
  execute-command: '$WEBHOOK_BIN/s3sync.sh'
  command-working-directory: '$WORKDIR'
  http-methods: ['POST']
  include-command-output-in-response: true
  include-command-output-in-response-on-error: true
  pass-environment-to-command:
  - source: 'payload'
    envname: 'AWS_KEY'
    name: 'aws.key'
  - source: 'payload'
    envname: 'AWS_SECRET_KEY'
    name: 'aws.secret_key'
  - source: 'payload'
    envname: 'S3_BUCKET'
    name: 's3.bucket'
  - source: 'payload'
    envname: 'S3_REGION'
    name: 's3.region'
  - source: 'payload'
    envname: 'S3_PATH'
    name: 's3.path'
  - source: 'payload'
    envname: 'SCS_PATH'
    name: 'scs.path'
  stream-command-output: true
EOF
 
print_token_yml()  
  if [ "$1" ]; then
    cat << EOF
  trigger-rule:
    match:
      type: 'value'
      value: '$1'
      parameter:
        source: 'header'
        name: 'X-Webhook-Token'
EOF
  fi
 
exec_webhook()  
  # Validate WORKDIR
  if [ -z "$WEBHOOK_WORKDIR" ]; then
    echo "Must define the WEBHOOK_WORKDIR variable!" >&2
    exit 1
  fi
  WORKDIR="$(realpath "$WEBHOOK_WORKDIR" 2>/dev/null)"   true
  if [ ! -d "$WORKDIR" ]; then
    echo "The WEBHOOK_WORKDIR '$WEBHOOK_WORKDIR' is not a directory!" >&2
    exit 1
  fi
  # Get TOKENS, if the DU_TOKEN or HARDLINK_TOKEN is defined that is used, if
  # not if the COMMON_TOKEN that is used and in other case no token is checked
  # (that is the default)
  DU_TOKEN="$ DU_TOKEN:-$COMMON_TOKEN "
  HARDLINK_TOKEN="$ HARDLINK_TOKEN:-$COMMON_TOKEN "
  S3_TOKEN="$ S3_TOKEN:-$COMMON_TOKEN "
  # Create webhook configuration
    
    print_du_yml
    print_token_yml "$DU_TOKEN"
    echo ""
    print_hardlink_yml
    print_token_yml "$HARDLINK_TOKEN"
    echo ""
    print_s3sync_yml
    print_token_yml "$S3_TOKEN"
   >"$WEBHOOK_YML"
  # Run the webhook command
  # shellcheck disable=SC2086
  exec webhook -hooks "$WEBHOOK_YML" $WEBHOOK_OPTS
 
# ----
# MAIN
# ----
case "$1" in
"server") exec_webhook ;;
*) exec "$@" ;;
esac
The entrypoint.sh script generates the configuration file for the webhook server calling functions that print a yaml section for each hook and optionally adds rules to validate access to them comparing the value of a X-Webhook-Token header against predefined values. The expected token values are taken from environment variables, we can define a token variable for each hook (DU_TOKEN, HARDLINK_TOKEN or S3_TOKEN) and a fallback value (COMMON_TOKEN); if no token variable is defined for a hook no check is done and everybody can call it. The Hook Definition documentation explains the options you can use for each hook, the ones we have right now do the following:
  • du: runs on the $WORKDIR directory, passes as first argument to the script the value of the path query parameter and sets the variable OUTPUT_FORMAT to the fixed value json (we use that to print the output of the script in JSON format instead of text).
  • hardlink: runs on the $WORKDIR directory and takes no parameters.
  • s3sync: runs on the $WORKDIR directory and sets a lot of environment variables from values read from the JSON encoded payload sent by the caller (all the values must be sent by the caller even if they are assigned an empty value, if they are missing the hook fails without calling the script); we also set the stream-command-output value to true to make the script show its output as it is working (we patched the webhook source to be able to use this option).

The du hook scriptThe du hook script code checks if the argument passed is a directory, computes its size using the du command and prints the results in text format or as a JSON dictionary:
hooks/du.sh
#!/bin/sh
set -e
# Script to print disk usage for a PATH inside the scs folder
# ---------
# FUNCTIONS
# ---------
print_error()  
  if [ "$OUTPUT_FORMAT" = "json" ]; then
    echo " \"error\":\"$*\" "
  else
    echo "$*" >&2
  fi
  exit 1
 
usage()  
  if [ "$OUTPUT_FORMAT" = "json" ]; then
    echo " \"error\":\"Pass arguments as '?path=XXX\" "
  else
    echo "Usage: $(basename "$0") PATH" >&2
  fi
  exit 1
 
# ----
# MAIN
# ----
if [ "$#" -eq "0" ]   [ -z "$1" ]; then
  usage
fi
if [ "$1" = "." ]; then
  DU_PATH="./"
else
  DU_PATH="$(find . -name "$1" -mindepth 1 -maxdepth 1)"   true
fi
if [ -z "$DU_PATH" ]   [ ! -d "$DU_PATH/." ]; then
  print_error "The provided PATH ('$1') is not a directory"
fi
# Print disk usage in bytes for the given PATH
OUTPUT="$(du -b -s "$DU_PATH")"
if [ "$OUTPUT_FORMAT" = "json" ]; then
  # Format output as  "path":"PATH","bytes":"BYTES" 
  echo "$OUTPUT"  
    sed -e "s%^\(.*\)\t.*/\(.*\)$% \"path\":\"\2\",\"bytes\":\"\1\" %"  
    tr -d '\n'
else
  # Print du output as is
  echo "$OUTPUT"
fi
# vim: ts=2:sw=2:et:ai:sts=2

The s3sync hook scriptThe s3sync hook script uses the s3fs tool to mount a bucket and synchronise data between a folder inside the bucket and a directory on the filesystem using rsync; all values needed to execute the task are taken from environment variables:
hooks/s3sync.sh
#!/bin/ash
set -euo pipefail
set -o errexit
set -o errtrace
# Functions
finish()  
  ret="$1"
  echo ""
  echo "Script exit code: $ret"
  exit "$ret"
 
# Check variables
if [ -z "$AWS_KEY" ]   [ -z "$AWS_SECRET_KEY" ]   [ -z "$S3_BUCKET" ]  
  [ -z "$S3_PATH" ]   [ -z "$SCS_PATH" ]; then
  [ "$AWS_KEY" ]   echo "Set the AWS_KEY environment variable"
  [ "$AWS_SECRET_KEY" ]   echo "Set the AWS_SECRET_KEY environment variable"
  [ "$S3_BUCKET" ]   echo "Set the S3_BUCKET environment variable"
  [ "$S3_PATH" ]   echo "Set the S3_PATH environment variable"
  [ "$SCS_PATH" ]   echo "Set the SCS_PATH environment variable"
  finish 1
fi
if [ "$S3_REGION" ] && [ "$S3_REGION" != "us-east-1" ]; then
  EP_URL="endpoint=$S3_REGION,url=https://s3.$S3_REGION.amazonaws.com"
else
  EP_URL="endpoint=us-east-1"
fi
# Prepare working directory
WORK_DIR="$(mktemp -p "$HOME" -d)"
MNT_POINT="$WORK_DIR/s3data"
PASSWD_S3FS="$WORK_DIR/.passwd-s3fs"
# Check the moutpoint
if [ ! -d "$MNT_POINT" ]; then
  mkdir -p "$MNT_POINT"
elif mountpoint "$MNT_POINT"; then
  echo "There is already something mounted on '$MNT_POINT', aborting!"
  finish 1
fi
# Create password file
touch "$PASSWD_S3FS"
chmod 0400 "$PASSWD_S3FS"
echo "$AWS_KEY:$AWS_SECRET_KEY" >"$PASSWD_S3FS"
# Mount s3 bucket as a filesystem
s3fs -o dbglevel=info,retries=5 -o "$EP_URL" -o "passwd_file=$PASSWD_S3FS" \
  "$S3_BUCKET" "$MNT_POINT"
echo "Mounted bucket '$S3_BUCKET' on '$MNT_POINT'"
# Remove the password file, just in case
rm -f "$PASSWD_S3FS"
# Check source PATH
ret="0"
SRC_PATH="$MNT_POINT/$S3_PATH"
if [ ! -d "$SRC_PATH" ]; then
  echo "The S3_PATH '$S3_PATH' can't be found!"
  ret=1
fi
# Compute SCS_UID & SCS_GID (by default based on the working directory owner)
SCS_UID="$ SCS_UID:=$(stat -c "%u" "." 2>/dev/null) "   true
SCS_GID="$ SCS_GID:=$(stat -c "%g" "." 2>/dev/null) "   true
# Check destination PATH
DST_PATH="./$SCS_PATH"
if [ "$ret" -eq "0" ] && [ -d "$DST_PATH" ]; then
  mkdir -p "$DST_PATH"   ret="$?"
fi
# Copy using rsync
if [ "$ret" -eq "0" ]; then
  rsync -rlptv --chown="$SCS_UID:$SCS_GID" --delete --stats \
    "$SRC_PATH/" "$DST_PATH/"   ret="$?"
fi
# Unmount the S3 bucket
umount -f "$MNT_POINT"
echo "Called umount for '$MNT_POINT'"
# Remove mount point dir
rmdir "$MNT_POINT"
# Remove WORK_DIR
rmdir "$WORK_DIR"
# We are done
finish "$ret"
# vim: ts=2:sw=2:et:ai:sts=2

Deployment objectsThe system is deployed as a StatefulSet with one replica. Our production deployment is done on AWS and to be able to scale we use EFS for our PersistenVolume; the idea is that the volume has no size limit, its AccessMode can be set to ReadWriteMany and we can mount it from multiple instances of the Pod without issues, even if they are in different availability zones. For development we use k3d and we are also able to scale the StatefulSet for testing because we use a ReadWriteOnce PVC, but it points to a hostPath that is backed up by a folder that is mounted on all the compute nodes, so in reality Pods in different k3d nodes use the same folder on the host.

secrets.yamlThe secrets file contains the files used by the mysecureshell container that can be generated using kubernetes pods as follows (we are only creating the scs user):
$ kubectl run "mysecureshell" --restart='Never' --quiet --rm --stdin \
  --image "stodh/mysecureshell:latest" -- gen-host-keys >"./host_keys.txt"
$ kubectl run "mysecureshell" --restart='Never' --quiet --rm --stdin \
  --image "stodh/mysecureshell:latest" -- gen-users-tar scs >"./users.tar"
Once we have the files we can generate the secrets.yaml file as follows:
$ tar xf ./users.tar user_keys.txt user_pass.txt
$ kubectl --dry-run=client -o yaml create secret generic "scs-secret" \
  --from-file="host_keys.txt=host_keys.txt" \
  --from-file="user_keys.txt=user_keys.txt" \
  --from-file="user_pass.txt=user_pass.txt" > ./secrets.yaml
The resulting secrets.yaml will look like the following file (the base64 would match the content of the files, of course):
secrets.yaml
apiVersion: v1
data:
  host_keys.txt: TWlt...
  user_keys.txt: c2Nz...
  user_pass.txt: c2Nz...
kind: Secret
metadata:
  creationTimestamp: null
  name: scs-secret

pvc.yamlThe persistent volume claim for a simple deployment (one with only one instance of the statefulSet) can be as simple as this:
pvc.yaml
apiVersion: v1
kind: PersistentVolumeClaim
metadata:
  name: scs-pvc
  labels:
    app.kubernetes.io/name: scs
spec:
  accessModes:
  - ReadWriteOnce
  resources:
    requests:
      storage: 8Gi
On this definition we don t set the storageClassName to use the default one.

Volumes in our development environment (k3d)In our development deployment we create the following PersistentVolume as required by the Local Persistence Volume Static Provisioner (note that the /volumes/scs-pv has to be created by hand, in our k3d system we mount the same host directory on the /volumes path of all the nodes and create the scs-pv directory by hand before deploying the persistent volume):
k3d-pv.yaml
apiVersion: v1
kind: PersistentVolume
metadata:
  name: scs-pv
  labels:
    app.kubernetes.io/name: scs
spec:
  capacity:
    storage: 8Gi
  volumeMode: Filesystem
  accessModes:
  - ReadWriteOnce
  persistentVolumeReclaimPolicy: Delete
  claimRef:
    name: scs-pvc
  storageClassName: local-storage
  local:
    path: /volumes/scs-pv
  nodeAffinity:
    required:
      nodeSelectorTerms:
      - matchExpressions:
        - key: node.kubernetes.io/instance-type
          operator: In
          values:
          - k3s
And to make sure that everything works as expected we update the PVC definition to add the right storageClassName:
k3d-pvc.yaml
apiVersion: v1
kind: PersistentVolumeClaim
metadata:
  name: scs-pvc
  labels:
    app.kubernetes.io/name: scs
spec:
  accessModes:
  - ReadWriteOnce
  resources:
    requests:
      storage: 8Gi
  storageClassName: local-storage

Volumes in our production environment (aws)In the production deployment we don t create the PersistentVolume (we are using the aws-efs-csi-driver which supports Dynamic Provisioning) but we add the storageClassName (we set it to the one mapped to the EFS driver, i.e. efs-sc) and set ReadWriteMany as the accessMode:
efs-pvc.yaml
apiVersion: v1
kind: PersistentVolumeClaim
metadata:
  name: scs-pvc
  labels:
    app.kubernetes.io/name: scs
spec:
  accessModes:
  - ReadWriteMany
  resources:
    requests:
      storage: 8Gi
  storageClassName: efs-sc

statefulset.yamlThe definition of the statefulSet is as follows:
statefulset.yaml
apiVersion: apps/v1
kind: StatefulSet
metadata:
  name: scs
  labels:
    app.kubernetes.io/name: scs
spec:
  serviceName: scs
  replicas: 1
  selector:
    matchLabels:
      app: scs
  template:
    metadata:
      labels:
        app: scs
    spec:
      containers:
      - name: nginx
        image: stodh/nginx-scs:latest
        ports:
        - containerPort: 80
          name: http
        env:
        - name: AUTH_REQUEST_URI
          value: ""
        - name: HTML_ROOT
          value: /sftp/data
        volumeMounts:
        - mountPath: /sftp
          name: scs-datadir
      - name: mysecureshell
        image: stodh/mysecureshell:latest
        ports:
        - containerPort: 22
          name: ssh
        securityContext:
          capabilities:
            add:
            - IPC_OWNER
        env:
        - name: SFTP_UID
          value: '2020'
        - name: SFTP_GID
          value: '2020'
        volumeMounts:
        - mountPath: /secrets
          name: scs-file-secrets
          readOnly: true
        - mountPath: /sftp
          name: scs-datadir
      - name: webhook
        image: stodh/webhook-scs:latest
        securityContext:
          privileged: true
        ports:
        - containerPort: 9000
          name: webhook-http
        env:
        - name: WEBHOOK_WORKDIR
          value: /sftp/data/scs
        volumeMounts:
        - name: devfuse
          mountPath: /dev/fuse
        - mountPath: /sftp
          name: scs-datadir
      volumes:
      - name: devfuse
        hostPath:
          path: /dev/fuse
      - name: scs-file-secrets
        secret:
          secretName: scs-secrets
      - name: scs-datadir
        persistentVolumeClaim:
          claimName: scs-pvc
Notes about the containers:
  • nginx: As this is an example the web server is not using an AUTH_REQUEST_URI and uses the /sftp/data directory as the root of the web (to get to the files uploaded for the scs user we will need to use /scs/ as a prefix on the URLs).
  • mysecureshell: We are adding the IPC_OWNER capability to the container to be able to use some of the sftp-* commands inside it, but they are not really needed, so adding the capability is optional.
  • webhook: We are launching this container in privileged mode to be able to use the s3fs-fuse, as it will not work otherwise for now (see this kubernetes issue); if the functionality is not needed the container can be executed with regular privileges; besides, as we are not enabling public access to this service we don t define *_TOKEN variables (if required the values should be read from a Secret object).
Notes about the volumes:
  • the devfuse volume is only needed if we plan to use the s3fs command on the webhook container, if not we can remove the volume definition and its mounts.

service.yamlTo be able to access the different services on the statefulset we publish the relevant ports using the following Service object:
service.yaml
apiVersion: v1
kind: Service
metadata:
  name: scs-svc
  labels:
    app.kubernetes.io/name: scs
spec:
  ports:
  - name: ssh
    port: 22
    protocol: TCP
    targetPort: 22
  - name: http
    port: 80
    protocol: TCP
    targetPort: 80
  - name: webhook-http
    port: 9000
    protocol: TCP
    targetPort: 9000
  selector:
    app: scs

ingress.yamlTo download the scs files from the outside we can add an ingress object like the following (the definition is for testing using the localhost name):
apiVersion: networking.k8s.io/v1
kind: Ingress
metadata:
  name: scs-ingress
  labels:
    app.kubernetes.io/name: scs
spec:
  ingressClassName: nginx
  rules:
  - host: 'localhost'
    http:
      paths:
      - path: /scs
        pathType: Prefix
        backend:
          service:
            name: scs-svc
            port:
              number: 80

DeploymentTo deploy the statefulSet we create a namespace and apply the object definitions shown before:
$ kubectl create namespace scs-demo
namespace/scs-demo created
$ kubectl -n scs-demo apply -f secrets.yaml
secret/scs-secrets created
$ kubectl -n scs-demo apply -f pvc.yaml
persistentvolumeclaim/scs-pvc created
$ kubectl -n scs-demo apply -f statefulset.yaml
statefulset.apps/scs created
$ kubectl -n scs-demo apply -f service.yaml
service/scs-svc created
$ kubectl -n scs-demo apply -f ingress.yaml
ingress.networking.k8s.io/scs-ingress created
Once the objects are deployed we can check that all is working using kubectl:
$ kubectl  -n scs-demo get all,secrets,ingress
NAME        READY   STATUS    RESTARTS   AGE
pod/scs-0   3/3     Running   0          24s
NAME            TYPE       CLUSTER-IP  EXTERNAL-IP  PORT(S)                  AGE
service/scs-svc ClusterIP  10.43.0.47  <none>       22/TCP,80/TCP,9000/TCP   21s

NAME                   READY   AGE
statefulset.apps/scs   1/1     24s
NAME                         TYPE                                  DATA   AGE
secret/default-token-mwcd7   kubernetes.io/service-account-token   3      53s
secret/scs-secrets           Opaque                                3      39s
NAME                                   CLASS  HOSTS      ADDRESS     PORTS   AGE
ingress.networking.k8s.io/scs-ingress  nginx  localhost  172.21.0.5  80      17s
At this point we are ready to use the system.

Usage examples

File uploadsAs previously mentioned in our system the idea is to use the sftp server from other Pods, but to test the system we are going to do a kubectl port-forward and connect to the server using our host client and the password we have generated (it is on the user_pass.txt file, inside the users.tar archive):
$ kubectl -n scs-demo port-forward service/scs-svc 2020:22 &
Forwarding from 127.0.0.1:2020 -> 22
Forwarding from [::1]:2020 -> 22
$ PF_PID=$!
$ sftp -P 2020 scs@127.0.0.1                                                 1
Handling connection for 2020
The authenticity of host '[127.0.0.1]:2020 ([127.0.0.1]:2020)' can't be \
  established.
ED25519 key fingerprint is SHA256:eHNwCnyLcSSuVXXiLKeGraw0FT/4Bb/yjfqTstt+088.
This key is not known by any other names
Are you sure you want to continue connecting (yes/no/[fingerprint])? yes
Warning: Permanently added '[127.0.0.1]:2020' (ED25519) to the list of known \
  hosts.
scs@127.0.0.1's password: **********
Connected to 127.0.0.1.
sftp> ls -la
drwxr-xr-x    2 sftp     sftp         4096 Sep 25 14:47 .
dr-xr-xr-x    3 sftp     sftp         4096 Sep 25 14:36 ..
sftp> !date -R > /tmp/date.txt                                               2
sftp> put /tmp/date.txt .
Uploading /tmp/date.txt to /date.txt
date.txt                                      100%   32    27.8KB/s   00:00
sftp> ls -l
-rw-r--r--    1 sftp     sftp           32 Sep 25 15:21 date.txt
sftp> ln date.txt date.txt.1                                                 3
sftp> ls -l
-rw-r--r--    2 sftp     sftp           32 Sep 25 15:21 date.txt
-rw-r--r--    2 sftp     sftp           32 Sep 25 15:21 date.txt.1
sftp> put /tmp/date.txt date.txt.2                                           4
Uploading /tmp/date.txt to /date.txt.2
date.txt                                      100%   32    27.8KB/s   00:00
sftp> ls -l                                                                  5
-rw-r--r--    2 sftp     sftp           32 Sep 25 15:21 date.txt
-rw-r--r--    2 sftp     sftp           32 Sep 25 15:21 date.txt.1
-rw-r--r--    1 sftp     sftp           32 Sep 25 15:21 date.txt.2
sftp> exit
$ kill "$PF_PID"
[1]  + terminated  kubectl -n scs-demo port-forward service/scs-svc 2020:22
  1. We connect to the sftp service on the forwarded port with the scs user.
  2. We put a file we have created on the host on the directory.
  3. We do a hard link of the uploaded file.
  4. We put a second copy of the file we created locally.
  5. On the file list we can see that the two first files have two hardlinks

File retrievalsIf our ingress is configured right we can download the date.txt file from the URL http://localhost/scs/date.txt:
$ curl -s http://localhost/scs/date.txt
Sun, 25 Sep 2022 17:21:51 +0200

Use of the webhook containerTo finish this post we are going to show how we can call the hooks directly, from a CronJob and from a Job.

Direct script call (du)In our deployment the direct calls are done from other Pods, to simulate it we are going to do a port-forward and call the script with an existing PATH (the root directory) and a bad one:
$ kubectl -n scs-demo port-forward service/scs-svc 9000:9000 >/dev/null &
$ PF_PID=$!
$ JSON="$(curl -s "http://localhost:9000/hooks/du?path=.")"
$ echo $JSON
 "path":"","bytes":"4160" 
$ JSON="$(curl -s "http://localhost:9000/hooks/du?path=foo")"
$ echo $JSON
 "error":"The provided PATH ('foo') is not a directory" 
$ kill $PF_PID
As we only have files on the base directory we print the disk usage of the . PATH and the output is in json format because we export OUTPUT_FORMAT with the value json on the webhook configuration.

Jobs (s3sync)The following job can be used to synchronise the contents of a directory in a S3 bucket with the SCS Filesystem:
job.yaml
apiVersion: batch/v1
kind: Job
metadata:
  name: s3sync
  labels:
    cronjob: 's3sync'
spec:
  template:
    metadata:
      labels:
        cronjob: 's3sync'
    spec:
      containers:
      - name: s3sync-job
        image: alpine:latest
        command: 
        - "wget"
        - "-q"
        - "--header"
        - "Content-Type: application/json"
        - "--post-file"
        - "/secrets/s3sync.json"
        - "-O-"
        - "http://scs-svc:9000/hooks/s3sync"
        volumeMounts:
        - mountPath: /secrets
          name: job-secrets
          readOnly: true
      restartPolicy: Never
      volumes:
      - name: job-secrets
        secret:
          secretName: webhook-job-secrets
The file with parameters for the script must be something like this:
s3sync.json
 
  "aws":  
    "key": "********************",
    "secret_key": "****************************************"
   ,
  "s3":  
    "region": "eu-north-1",
    "bucket": "blogops-test",
    "path": "test"
   ,
  "scs":  
    "path": "test"
   
 
Once we have both files we can run the Job as follows:
$ kubectl -n scs-demo create secret generic webhook-job-secrets \            1
  --from-file="s3sync.json=s3sync.json"
secret/webhook-job-secrets created
$ kubectl -n scs-demo apply -f webhook-job.yaml                              2
job.batch/s3sync created
$ kubectl -n scs-demo get pods -l "cronjob=s3sync"                           3
NAME           READY   STATUS      RESTARTS   AGE
s3sync-zx2cj   0/1     Completed   0          12s
$ kubectl -n scs-demo logs s3sync-zx2cj                                      4
Mounted bucket 's3fs-test' on '/root/tmp.jiOjaF/s3data'
sending incremental file list
created directory ./test
./
kyso.png
Number of files: 2 (reg: 1, dir: 1)
Number of created files: 2 (reg: 1, dir: 1)
Number of deleted files: 0
Number of regular files transferred: 1
Total file size: 15,075 bytes
Total transferred file size: 15,075 bytes
Literal data: 15,075 bytes
Matched data: 0 bytes
File list size: 0
File list generation time: 0.147 seconds
File list transfer time: 0.000 seconds
Total bytes sent: 15,183
Total bytes received: 74
sent 15,183 bytes  received 74 bytes  30,514.00 bytes/sec
total size is 15,075  speedup is 0.99
Called umount for '/root/tmp.jiOjaF/s3data'
Script exit code: 0
$ kubectl -n scs-demo delete -f webhook-job.yaml                             5
job.batch "s3sync" deleted
$ kubectl -n scs-demo delete secrets webhook-job-secrets                     6
secret "webhook-job-secrets" deleted
  1. Here we create the webhook-job-secrets secret that contains the s3sync.json file.
  2. This command runs the job.
  3. Checking the label cronjob=s3sync we get the Pods executed by the job.
  4. Here we print the logs of the completed job.
  5. Once we are finished we remove the Job.
  6. And also the secret.

Final remarksThis post has been longer than I expected, but I believe it can be useful for someone; in any case, next time I ll try to explain something shorter or will split it into multiple entries.

29 June 2022

Aigars Mahinovs: Long travel in an electric car

Since the first week of April 2022 I have (finally!) changed my company car from a plug-in hybrid to a fully electic car. My new ride, for the next two years, is a BMW i4 M50 in Aventurine Red metallic. An ellegant car with very deep and memorable color, insanely powerful (544 hp/795 Nm), sub-4 second 0-100 km/h, large 84 kWh battery (80 kWh usable), charging up to 210 kW, top speed of 225 km/h and also very efficient (which came out best in this trip) with WLTP range of 510 km and EVDB real range of 435 km. The car also has performance tyres (Hankook Ventus S1 evo3 245/45R18 100Y XL in front and 255/45R18 103Y XL in rear all at recommended 2.5 bar) that have reduced efficiency. So I wanted to document and describe how was it for me to travel ~2000 km (one way) with this, electric, car from south of Germany to north of Latvia. I have done this trip many times before since I live in Germany now and travel back to my relatives in Latvia 1-2 times per year. This was the first time I made this trip in an electric car. And as this trip includes both travelling in Germany (where BEV infrastructure is best in the world) and across Eastern/Northen Europe, I believe that this can be interesting to a few people out there. Normally when I travelled this trip with a gasoline/diesel car I would normally drive for two days with an intermediate stop somewhere around Warsaw with about 12 hours of travel time in each day. This would normally include a couple bathroom stops in each day, at least one longer lunch stop and 3-4 refueling stops on top of that. Normally this would use at least 6 liters of fuel per 100 km on average with total usage of about 270 liters for the whole trip (or about 540 just in fuel costs, nowadays). My (personal) quirk is that both fuel and recharging of my (business) car inside Germany is actually paid by my employer, so it is useful for me to charge up (or fill up) at the last station in Gemany before driving on. The plan for this trip was made in a similar way as when travelling with a gasoline car: travelling as fast as possible on German Autobahn network to last chargin stop on the A4 near G rlitz, there charging up as much as reasonable and then travelling to a hotel in Warsaw, charging there overnight and travelling north towards Ionity chargers in Lithuania from where reaching the final target in north of Latvia should be possible. How did this plan meet the reality? Travelling inside Germany with an electric car was basically perfect. The most efficient way would involve driving fast and hard with top speed of even 180 km/h (where possible due to speed limits and traffic). BMW i4 is very efficient at high speeds with consumption maxing out at 28 kWh/100km when you actually drive at this speed all the time. In real situation in this trip we saw consumption of 20.8-22.2 kWh/100km in the first legs of the trip. The more traffic there is, the more speed limits and roadworks, the lower is the average speed and also the lower the consumption. With this kind of consumption we could comfortably drive 2 hours as fast as we could and then pick any fast charger along the route and in 26 minutes at a charger (50 kWh charged total) we'd be ready to drive for another 2 hours. This lines up very well with recommended rest stops for biological reasons (bathroom, water or coffee, a bit of movement to get blood circulating) and very close to what I had to do anyway with a gasoline car. With a gasoline car I had to refuel first, then park, then go to bathroom and so on. With an electric car I can do all of that while the car is charging and in the end the total time for a stop is very similar. Also not that there was a crazy heat wave going on and temperature outside was at about 34C minimum the whole day and hitting 40C at one point of the trip, so a lot of power was used for cooling. The car has a heat pump standard, but it still was working hard to keep us cool in the sun. The car was able to plan a charging route with all the charging stops required and had all the good options (like multiple intermediate stops) that many other cars (hi Tesla) and mobile apps (hi Google and Apple) do not have yet. There are a couple bugs with charging route and display of current route guidance, those are already fixed and will be delivered with over the air update with July 2022 update. Another good alterantive is the ABRP (A Better Route Planner) that was specifically designed for electric car routing along the best route for charging. Most phone apps (like Google Maps) have no idea about your specific electric car - it has no idea about the battery capacity, charging curve and is missing key live data as well - what is the current consumption and remaining energy in the battery. ABRP is different - it has data and profiles for almost all electric cars and can also be linked to live vehicle data, either via a OBD dongle or via a new Tronity cloud service. Tronity reads data from vehicle-specific cloud service, such as MyBMW service, saves it, tracks history and also re-transmits it to ABRP for live navigation planning. ABRP allows for options and settings that no car or app offers, for example, saying that you want to stop at a particular place for an hour or until battery is charged to 90%, or saying that you have specific charging cards and would only want to stop at chargers that support those. Both the car and the ABRP also support alternate routes even with multiple intermediate stops. In comparison, route planning by Google Maps or Apple Maps or Waze or even Tesla does not really come close. After charging up in the last German fast charger, a more interesting part of the trip started. In Poland the density of high performance chargers (HPC) is much lower than in Germany. There are many chargers (west of Warsaw), but vast majority of them are (relatively) slow 50kW chargers. And that is a difference between putting 50kWh into the car in 23-26 minutes or in 60 minutes. It does not seem too much, but the key bit here is that for 20 minutes there is easy to find stuff that should be done anyway, but after that you are done and you are just waiting for the car and if that takes 4 more minutes or 40 more minutes is a big, perceptual, difference. So using HPC is much, much preferable. So we put in the Ionity charger near Lodz as our intermediate target and the car suggested an intermediate stop at a Greenway charger by Katy Wroclawskie. The location is a bit weird - it has 4 charging stations with 150 kW each. The weird bits are that each station has two CCS connectors, but only one parking place (and the connectors share power, so if two cars were to connect, each would get half power). Also from the front of the location one can only see two stations, the otehr two are semi-hidden around a corner. We actually missed them on the way to Latvia and one person actually waited for the charger behind us for about 10 minutes. We only discovered the other two stations on the way back. With slower speeds in Poland the consumption goes down to 18 kWh/100km which translates to now up to 3 hours driving between stops. At the end of the first day we drove istarting from Ulm from 9:30 in the morning until about 23:00 in the evening with total distance of about 1100 km, 5 charging stops, starting with 92% battery, charging for 26 min (50 kWh), 33 min (57 kWh + lunch), 17 min (23 kWh), 12 min (17 kWh) and 13 min (37 kW). In the last two chargers you can see the difference between a good and fast 150 kW charger at high battery charge level and a really fast Ionity charger at low battery charge level, which makes charging faster still. Arriving to hotel with 23% of battery. Overnight the car charged from a Porsche Destination Charger to 87% (57 kWh). That was a bit less than I would expect from a full power 11kW charger, but good enough. Hotels should really install 11kW Type2 chargers for their guests, it is a really significant bonus that drives more clients to you. The road between Warsaw and Kaunas is the most difficult part of the trip for both driving itself and also for charging. For driving the problem is that there will be a new highway going from Warsaw to Lithuanian border, but it is actually not fully ready yet. So parts of the way one drives on the new, great and wide highway and parts of the way one drives on temporary roads or on old single lane undivided roads. And the most annoying part is navigating between parts as signs are not always clear and the maps are either too old or too new. Some maps do not have the new roads and others have on the roads that have not been actually build or opened to traffic yet. It's really easy to loose ones way and take a significant detour. As far as charging goes, basically there is only the slow 50 kW chargers between Warsaw and Kaunas (for now). We chose to charge on the last charger in Poland, by Suwalki Kaufland. That was not a good idea - there is only one 50 kW CCS and many people decide the same, so there can be a wait. We had to wait 17 minutes before we could charge for 30 more minutes just to get 18 kWh into the battery. Not the best use of time. On the way back we chose a different charger in Lomza where would have a relaxed dinner while the car was charging. That was far more relaxing and a better use of time. We also tried charging at an Orlen charger that was not recommended by our car and we found out why. Unlike all other chargers during our entire trip, this charger did not accept our universal BMW Charging RFID card. Instead it demanded that we download their own Orlen app and register there. The app is only available in some countries (and not in others) and on iPhone it is only available in Polish. That is a bad exception to the rule and a bad example. This is also how most charging works in USA. Here in Europe that is not normal. The normal is to use a charging card - either provided from the car maker or from another supplier (like PlugSufring or Maingau Energy). The providers then make roaming arrangements with all the charging networks, so the cards just work everywhere. In the end the user gets the prices and the bills from their card provider as a single monthly bill. This also saves all any credit card charges for the user. Having a clear, separate RFID card also means that one can easily choose how to pay for each charging session. For example, I have a corporate RFID card that my company pays for (for charging in Germany) and a private BMW Charging card that I am paying myself for (for charging abroad). Having the car itself authenticate direct with the charger (like Tesla does) removes the option to choose how to pay. Having each charge network have to use their own app or token bring too much chaos and takes too much setup. The optimum is having one card that works everywhere and having the option to have additional card or cards for specific purposes. Reaching Ionity chargers in Lithuania is again a breath of fresh air - 20-24 minutes to charge 50 kWh is as expected. One can charge on the first Ionity just enough to reach the next one and then on the second charger one can charge up enough to either reach the Ionity charger in Adazi or the final target in Latvia. There is a huge number of CSDD (Road Traffic and Safety Directorate) managed chargers all over Latvia, but they are 50 kW chargers. Good enough for local travel, but not great for long distance trips. BMW i4 charges at over 50 kW on a HPC even at over 90% battery state of charge (SoC). This means that it is always faster to charge up in a HPC than in a 50 kW charger, if that is at all possible. We also tested the CSDD chargers - they worked without any issues. One could pay with the BMW Charging RFID card, one could use the CSDD e-mobi app or token and one could also use Mobilly - an app that you can use in Latvia for everything from parking to public transport tickets or museums or car washes. We managed to reach our final destination near Aluksne with 17% range remaining after just 3 charging stops: 17+30 min (18 kWh), 24 min (48 kWh), 28 min (36 kWh). Last stop we charged to 90% which took a few extra minutes that would have been optimal. For travel around in Latvia we were charging at our target farmhouse from a normal 3 kW Schuko EU socket. That is very slow. We charged for 33 hours and went from 17% to 94%, so not really full. That was perfectly fine for our purposes. We easily reached Riga, drove to the sea and then back to Aluksne with 8% still in reserve and started charging again for the next trip. If it were required to drive around more and charge faster, we could have used the normal 3-phase 440V connection in the farmhouse to have a red CEE 16A plug installed (same as people use for welders). BMW i4 comes standard with a new BMW Flexible Fast Charger that has changable socket adapters. It comes by default with a Schucko connector in Europe, but for 90 one can buy an adapter for blue CEE plug (3.7 kW) or red CEE 16A or 32A plugs (11 kW). Some public charging stations in France actually use the blue CEE plugs instead of more common Type2 electric car charging stations. The CEE plugs are also common in camping parking places. On the way back the long distance BEV travel was already well understood and did not cause us any problem. From our destination we could easily reach the first Ionity in Lithuania, on the Panevezhis bypass road where in just 8 minutes we got 19 kWh and were ready to drive on to Kaunas, there a longer 32 minute stop before the charging desert of Suwalki Gap that gave us 52 kWh to 90%. That brought us to a shopping mall in Lomzha where we had some food and charged up 39 kWh in lazy 50 minutes. That was enough to bring us to our return hotel for the night - Hotel 500W in Strykow by Lodz that has a 50kW charger on site, while we were having late dinner and preparing for sleep, the car easily recharged to full (71 kWh in 95 minutes), so I just moved it from charger to a parking spot just before going to sleep. Really easy and well flowing day. Second day back went even better as we just needed an 18 minute stop at the same Katy Wroclawskie charger as before to get 22 kWh and that was enough to get back to Germany. After that we were again flying on the Autobahn and charging as needed, 15 min (31 kWh), 23 min (48 kWh) and 31 min (54 kWh + food). We started the day on about 9:40 and were home at 21:40 after driving just over 1000 km on that day. So less than 12 hours for 1000 km travelled, including all charging, bio stops, food and some traffic jams as well. Not bad. Now let's take a look at all the apps and data connections that a technically minded customer can have for their car. Architecturally the car is a network of computers by itself, but it is very secured and normally people do not have any direct access. However, once you log in into the car with your BMW account the car gets your profile info and preferences (seat settings, navigation favorites, ...) and the car then also can start sending information to the BMW backend about its status. This information is then available to the user over multiple different channels. There is no separate channel for each of those data flow. The data only goes once to the backend and then all other communication of apps happens with the backend. First of all the MyBMW app. This is the go-to for everything about the car - seeing its current status and location (when not driving), sending commands to the car (lock, unlock, flash lights, pre-condition, ...) and also monitor and control charging processes. You can also plan a route or destination in the app in advance and then just send it over to the car so it already knows where to drive to when you get to the car. This can also integrate with calendar entries, if you have locations for appointments, for example. This also shows full charging history and allows a very easy export of that data, here I exported all charging sessions from June and then trimmed it back to only sessions relevant to the trip and cut off some design elements to have the data more visible. So one can very easily see when and where we were charging, how much power we got at each spot and (if you set prices for locations) can even show costs. I've already mentioned the Tronity service and its ABRP integration, but it also saves the information that it gets from the car and gathers that data over time. It has nice aspects, like showing the driven routes on a map, having ways to do business trip accounting and having good calendar view. Sadly it does not correctly capture the data for charging sessions (the amounts are incorrect). Update: after talking to Tronity support, it looks like the bug was in the incorrect value for the usable battery capacity for my car. They will look into getting th eright values there by default, but as a workaround one can edit their car in their system (after at least one charging session) and directly set the expected battery capacity (usable) in the car properties on the Tronity web portal settings. One other fun way to see data from your BMW is using the BMW integration in Home Assistant. This brings the car as a device in your own smart home. You can read all the variables from the car current status (and Home Asisstant makes cute historical charts) and you can even see interesting trends, for example for remaining range shows much higher value in Latvia as its prediction is adapted to Latvian road speeds and during the trip it adapts to Polish and then to German road speeds and thus to higher consumption and thus lower maximum predicted remaining range. Having the car attached to the Home Assistant also allows you to attach the car to automations, both as data and event source (like detecting when car enters the "Home" zone) and also as target, so you could flash car lights or even unlock or lock it when certain conditions are met. So, what in the end was the most important thing - cost of the trip? In total we charged up 863 kWh, so that would normally cost one about 290 , which is close to half what this trip would have costed with a gasoline car. Out of that 279 kWh in Germany (paid by my employer) and 154 kWh in the farmhouse (paid by our wonderful relatives :D) so in the end the charging that I actually need to pay adds up to 430 kWh or about 150 . Typically, it took about 400 in fuel that I had to pay to get to Latvia and back. The difference is really nice! In the end I believe that there are three different ways of charging:
  • incidental charging - this is wast majority of charging in the normal day-to-day life. The car gets charged when and where it is convinient to do so along the way. If we go to a movie or a shop and there is a chance to leave the car at a charger, then it can charge up. Works really well, does not take extra time for charging from us.
  • fast charging - charging up at a HPC during optimal charging conditions - from relatively low level to no more than 70-80% while you are still doing all the normal things one would do in a quick stop in a long travel process: bio things, cleaning the windscreen, getting a coffee or a snack.
  • necessary charging - charging from a whatever charger is available just enough to be able to reach the next destination or the next fast charger.
The last category is the only one that is really annoying and should be avoided at all costs. Even by shifting your plans so that you find something else useful to do while necessary charging is happening and thus, at least partially, shifting it over to incidental charging category. Then you are no longer just waiting for the car, you are doing something else and the car magically is charged up again. And when one does that, then travelling with an electric car becomes no more annoying than travelling with a gasoline car. Having more breaks in a trip is a good thing and makes the trips actually easier and less stressfull - I was more relaxed during and after this trip than during previous trips. Having the car air conditioning always be on, even when stopped, was a godsend in the insane heat wave of 30C-38C that we were driving trough. Final stats: 4425 km driven in the trip. Average consumption: 18.7 kWh/100km. Time driving: 2 days and 3 hours. Car regened 152 kWh. Charging stations recharged 863 kWh. Questions? You can use this i4talk forum thread or this Twitter thread to ask them to me.

19 June 2022

Dirk Eddelbuettel: #38: Faster Feedback Systems

Engineers build systems. Good engineers always stress and focus efficiency of these systems. Two recent examples of engineering thinking follow. One was in a video / podcast interview with Martin Thompson (who is a noted high-performance code expert) I came across recently. The overall focus of the hour-long interview is on managing software complexity . Around minute twenty-two, the conversation turns to feedback loops and systems, and a strong preference for simple and fast systems for more immediate feedback. An important topic indeed. The second example connects to this and permeates many tweets and other writings by Erik Bernhardsson. He had an earlier 2017 post on Optimizing for iteration speed , as well as a 17 May 2022 tweet on minimizing feedback loop size, another 28 Mar 2022 tweet reply on shorter feedback loops, then a 14 Feb 2022 post on problems with slow feedback loops, as well as a 13 Jan 2022 post on a priority for tighter feedback loops, and lastly a 23 Jul 2021 post on fast feedback cycles. You get the idea: Erik really digs faster feedback loops. Nobody likes to wait: immediatecy wins each time. A few years ago, I had touched on this topic with two posts on how to make (R) package compilation (and hence installation) faster. One idea (which I still use whenever I must compile) was in post #11 on caching compilation. Another idea was in post #13: make it faster by not doing it, in this case via binary installation which skip the need for compilation (and which is what I aim for with, say, CI dependencies). Several subsequent posts can be found by scrolling down the r^4 blog section: we stressed the use of the amazing Rutter PPA c2d4u for CRAN binaries (often via Rocker containers, the (post #28) promise of RSPM, and the (post #29) awesomeness of bspm. And then in the more recent post #34 from last December we got back to a topic which ties all these things together: Dependencies. We quoted Mies van der Rohe: Less is more. Especially when it comes to dependencies as these elongate the feedback loop and thereby delay feedback. Our most recent post #37 on r2u connects these dots. Access to a complete set of CRAN binaries with full-dependency resolution accelerates use and installation. This of course also covers testing and continuous integration. Why wait minutes to recompile the same packages over and over when you can install the full Tidyverse in 18 seconds or the brms package and all it needs in 13 seconds as shown in the two gifs also on the r2u documentation site. You can even power up the example setup of the second gif via this gitpod link giving you a full Ubuntu 22.04 session in your browser to try this: so go forth and install something from CRAN with ease! The benefit of a system such our r2u CRAN binaries is clear: faster feedback loops. This holds whether you work with few or many dependencies, tiny or tidy. Faster matters, and feedback can be had sooner. And with the title of this post we now get a rallying cry to advocate for faster feedback systems: FFS .

This post by Dirk Eddelbuettel originated on his Thinking inside the box blog. Please report excessive re-aggregation in third-party for-profit settings.

Next.

Previous.